


- Posts: 1011
- Thank you received: 208
3 Post Moderation Rule for New Boarders (25 Jan 2021)
New boarders will have their posts moderated - Don't worry if you cannot see your post immediately.
How to Remove Plosives in FCP X Voiceover?
20 Mar 2015 22:47 #61638
by VidGreg
Replied by VidGreg on topic How to Remove Plosives in FCP X Voiceover?
Hi Alex
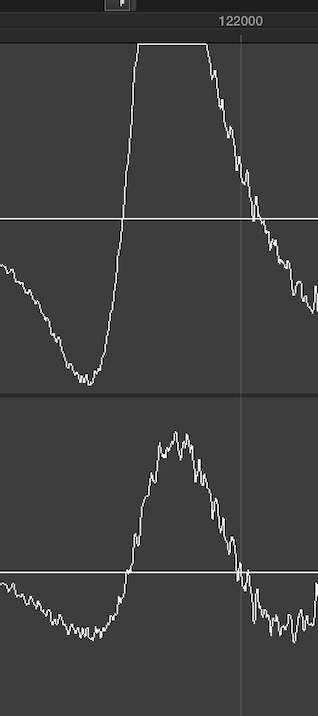
I also took a look at the file and it shows not only plosives but also an actual clipping right @ the "P" on one channel. Clipping is a big no no. One fix is to manually redraw the wave form in a sample editor. A clipped wave form will always pop/click even with aggressive eq-ing.
You can also attenuate the volume at the problem area, but this often removes the "P" altogether. Word will sound clipped.
As mentioned, you can also paste in a good sample as a replacement. Tedious if there are many plosives from "Bs & Ps".
If you are able to re-record the VO, IMHO, that would be the easiest solution if this occurs often in the sound track.
Here are some suggestions for future recording.
Mic selection, placement, use of a pop filter(screen) and vocal talent all should be considered.
Different mics respond differently to plosives. The Zoom mic can be sensitive to plosives.
Typically, the sound pressure waves for plosives are directly in front of the mouth and slightly down, therefore place the mic at or above the talents eyes/forehead, not below the talents mouth.
You can also move the mic off axis to the side of the talent. Plosives are most likely to occur when the mic diaphragms are at 90' to the speaker.
Sound pressure dissipates with distance, place the mic further from the talent.
Use a pop filter/screen/shield between the mic and lips. Separate the mic from the screen 1-3" and have the talent back-off from the screen till the plosives disappear. Monitor the input via headphones and have the talent recite the "Peter piper picked…" as a good test. Also it is important to monitor the VU meters to avoid clipping. Reduce the gain for recording. It is a position switch on the Zooms. Make sure no red peaks.
As to fixing problems in post, I normally would first use equalization (EQ) and apply a high pass filter. Most of the sample is showing problems around 50Hz so rolling off to 80-100 or so helps. Quite often this will take care of the problem.
If you click on the analyzer button in the channel eq it will show you sound patterns (wave forms) so you can eq out the problem frequencies.
I was still getting issues so I added a shelf and then a notch filter and was still getting a problem and then saw the square wave clip on one channel in an audio sample editor.
The problem with using Eq is that it will apply to the entire clip/track unless you automate it. This will color all audio in the clip/track. Not a big problem here as rolling off some bass with a high pass filter is not a bad idea. Another way to do this is to cut up the audio clip for just the problem areas and apply eq to the separated audio. You might add an audio Xfade between repaired sections.
If you use a DAW like LogicPro, then move the problem areas to another track and apply the corrections to the track, not the clips.
As mention earlier, there is some extra noise in the file you posted. You could add a noise gate to remove this if wanted.
Finally add compression. I always add eq first and then compression. Some others do it the opposite way, but I want to be able to fix the issues before squishing the sounds.
Happy editing!
Hope this helps, Greg
I also took a look at the file and it shows not only plosives but also an actual clipping right @ the "P" on one channel. Clipping is a big no no. One fix is to manually redraw the wave form in a sample editor. A clipped wave form will always pop/click even with aggressive eq-ing.
You can also attenuate the volume at the problem area, but this often removes the "P" altogether. Word will sound clipped.
As mentioned, you can also paste in a good sample as a replacement. Tedious if there are many plosives from "Bs & Ps".
If you are able to re-record the VO, IMHO, that would be the easiest solution if this occurs often in the sound track.
Here are some suggestions for future recording.
Mic selection, placement, use of a pop filter(screen) and vocal talent all should be considered.
Different mics respond differently to plosives. The Zoom mic can be sensitive to plosives.
Typically, the sound pressure waves for plosives are directly in front of the mouth and slightly down, therefore place the mic at or above the talents eyes/forehead, not below the talents mouth.
You can also move the mic off axis to the side of the talent. Plosives are most likely to occur when the mic diaphragms are at 90' to the speaker.
Sound pressure dissipates with distance, place the mic further from the talent.
Use a pop filter/screen/shield between the mic and lips. Separate the mic from the screen 1-3" and have the talent back-off from the screen till the plosives disappear. Monitor the input via headphones and have the talent recite the "Peter piper picked…" as a good test. Also it is important to monitor the VU meters to avoid clipping. Reduce the gain for recording. It is a position switch on the Zooms. Make sure no red peaks.
As to fixing problems in post, I normally would first use equalization (EQ) and apply a high pass filter. Most of the sample is showing problems around 50Hz so rolling off to 80-100 or so helps. Quite often this will take care of the problem.
If you click on the analyzer button in the channel eq it will show you sound patterns (wave forms) so you can eq out the problem frequencies.
I was still getting issues so I added a shelf and then a notch filter and was still getting a problem and then saw the square wave clip on one channel in an audio sample editor.
The problem with using Eq is that it will apply to the entire clip/track unless you automate it. This will color all audio in the clip/track. Not a big problem here as rolling off some bass with a high pass filter is not a bad idea. Another way to do this is to cut up the audio clip for just the problem areas and apply eq to the separated audio. You might add an audio Xfade between repaired sections.
If you use a DAW like LogicPro, then move the problem areas to another track and apply the corrections to the track, not the clips.
As mention earlier, there is some extra noise in the file you posted. You could add a noise gate to remove this if wanted.
Finally add compression. I always add eq first and then compression. Some others do it the opposite way, but I want to be able to fix the issues before squishing the sounds.
Happy editing!
Hope this helps, Greg
Please Log in to join the conversation.
20 Mar 2015 22:58 #61639
by VidGreg
Replied by VidGreg on topic How to Remove Plosives in FCP X Voiceover?
Just to show the wave form, here is a pic. The square pattern at top is the problem.
Please Log in to join the conversation.

Less
More
- Posts: 971
- Thank you received: 46
21 Mar 2015 11:45 #61652
by MsJustine
Replied by MsJustine on topic How to Remove Plosives in FCP X Voiceover?
How was the voice over recorded? I mean the room, big and large, or small? This is important as echo or the term we use standing waves, could affect the quality of the audio, as this voice over is very important it is best to spent some time creating a rough and ready sound booth..
It does not have to be expensive, in fact most of the stuff you will need you can get free from various suppliers as it is considered scrap.
Egg boxes help break up echo that reflects of vertical walls, and most rooms are box shaped that is 4 vertical walls with windows, this vertical aspect of walls is a problem as it causes sounds to "bounce" off the walls and return back to the microphone at different times, muddying the sound.
Using egg boxes taped to the walls prevents this, if you can cover windows with thick curtains or towels. If you can find old scrap foam this also helps.
For pop shields you can use old panti-hose over a round embroidery hoop, test, maybe 1 layer is enough, it does not have to be perfect, any large ring could work, the idea is to slow down the more powerful percussive P and B sounds.
Have the voice over artist stand instead of sitting, this helps with pressure on the body, it tends to be more uniform standing up, than sitting...
Having a few items to break up reflected sound can make a huge difference to the quality of the sounds...
It does not have to be expensive, in fact most of the stuff you will need you can get free from various suppliers as it is considered scrap.
Egg boxes help break up echo that reflects of vertical walls, and most rooms are box shaped that is 4 vertical walls with windows, this vertical aspect of walls is a problem as it causes sounds to "bounce" off the walls and return back to the microphone at different times, muddying the sound.
Using egg boxes taped to the walls prevents this, if you can cover windows with thick curtains or towels. If you can find old scrap foam this also helps.
For pop shields you can use old panti-hose over a round embroidery hoop, test, maybe 1 layer is enough, it does not have to be perfect, any large ring could work, the idea is to slow down the more powerful percussive P and B sounds.
Have the voice over artist stand instead of sitting, this helps with pressure on the body, it tends to be more uniform standing up, than sitting...
Having a few items to break up reflected sound can make a huge difference to the quality of the sounds...
Please Log in to join the conversation.
21 Mar 2015 12:50 #61653
by BenB
Replied by BenB on topic How to Remove Plosives in FCP X Voiceover?
Pantyhose do not work as pop filters. The air shoots full force right through them. Spend $25-$30 and get a pro quality filter. Keep the foam cover on the mic, also. It keeps down the sound of air molecules streaming over the mic ribbon.
Noise gates can cause a fake sound. If you hear room tone/noise during the voice, hating it out will sound worse than keeping it in.
Mic should not be up around forehead, too far away, you'll lose all the bottom end.
Be careful with egg cartons and electronics, very unsafe, flamible mixture.
I record slightly off axes, mouth level with mic, pop filter 2" from mic, mouth4" from mic. I get fantastic results. I've been recording voice work, both singing (totally different technique) and spoken almost daily for 2 decades now. I have a free spoken voice guide coming out soon, in conjunction with my voice coach (UofFL, opera singer, actress).
Noise gates can cause a fake sound. If you hear room tone/noise during the voice, hating it out will sound worse than keeping it in.
Mic should not be up around forehead, too far away, you'll lose all the bottom end.
Be careful with egg cartons and electronics, very unsafe, flamible mixture.
I record slightly off axes, mouth level with mic, pop filter 2" from mic, mouth4" from mic. I get fantastic results. I've been recording voice work, both singing (totally different technique) and spoken almost daily for 2 decades now. I have a free spoken voice guide coming out soon, in conjunction with my voice coach (UofFL, opera singer, actress).
Please Log in to join the conversation.

21 Mar 2015 13:55 #61658
by AlexMaxim
Replied by AlexMaxim on topic How to Remove Plosives in FCP X Voiceover?
@VidGreg, thank you so much for the fantastic overview! I will probably go with your suggestion of a rerecord.
@MsJustine, those are great tips, particularly regarding soundproofing! Thanks so much!
@BenB, thanks for detailing your vocal setup! The book sounds great...
@MsJustine, those are great tips, particularly regarding soundproofing! Thanks so much!
@BenB, thanks for detailing your vocal setup! The book sounds great...
Please Log in to join the conversation.
Less
More
- Posts: 971
- Thank you received: 46
21 Mar 2015 14:04 #61659
by MsJustine
Replied by MsJustine on topic How to Remove Plosives in FCP X Voiceover?
My suggestions are what we here in South Africa call "boer maak 'n plan" a farmer makes a plan, in a pinch you make do, the point was to not have a professional set up, that could costs $1000's but for a rough and ready set up, in a corner of a room, egg shell boxes, curtains on the windows, will help with the clean audio.
Pantihose works in a pinch, a few layers, the point really is to slow the "punch" of the compressive sounds, it is this compressive sounds that over drive the delicate capsule in the microphone...
I have a standing rule, if you tap my mics, you have bought them...NO TAPPING..force of the air can tear the mic capsule...
You want to create a "deadroom" a room or space that has very little reflection or technically called reverb from affecting the mic.
You can clean up in post, but if you can record clean audio it makes sense to do it before you have to clean in post.
Not want to step on toes, this is what we do here...rough and ready..
Pantihose works in a pinch, a few layers, the point really is to slow the "punch" of the compressive sounds, it is this compressive sounds that over drive the delicate capsule in the microphone...
I have a standing rule, if you tap my mics, you have bought them...NO TAPPING..force of the air can tear the mic capsule...
You want to create a "deadroom" a room or space that has very little reflection or technically called reverb from affecting the mic.
You can clean up in post, but if you can record clean audio it makes sense to do it before you have to clean in post.
Not want to step on toes, this is what we do here...rough and ready..
Please Log in to join the conversation.

21 Mar 2015 14:42 #61661
by joema
Although not obvious from the waveform display, clipping causes significant distortion, which can be seen on a spectral (frequency domain) display. This is why sophisticated apps like Izotope try to reconstruct the missing peak then re-scale the waveform, not just cut it off.
It's tempting to use automatic audio gain to avoid this, but that too often causes problems from the gain ramping up and down. That in turn complicates fixing background noise in post since the gain level was constantly changing.
Some external audio recorders can record at two or more gain levels simultaneously to provide a safety net for this. However the best approach is just using proper technique and always monitoring 100% of all audio in the field.
Replied by joema on topic How to Remove Plosives in FCP X Voiceover?
VidGreg wrote: Just to show the wave form, here is a pic. The square pattern at top is the problem.
Although not obvious from the waveform display, clipping causes significant distortion, which can be seen on a spectral (frequency domain) display. This is why sophisticated apps like Izotope try to reconstruct the missing peak then re-scale the waveform, not just cut it off.
It's tempting to use automatic audio gain to avoid this, but that too often causes problems from the gain ramping up and down. That in turn complicates fixing background noise in post since the gain level was constantly changing.
Some external audio recorders can record at two or more gain levels simultaneously to provide a safety net for this. However the best approach is just using proper technique and always monitoring 100% of all audio in the field.
Please Log in to join the conversation.
21 Mar 2015 18:27 #61674
by VidGreg
Replied by VidGreg on topic How to Remove Plosives in FCP X Voiceover?
Hi All,
Alex the OP stated that she wanted help avoiding plosives. The recording was made from a Zoom H4n. I'm assuming she used the onboard stereo mics which are x/y pattern, small capsule cardioids. So let's keep that in mind.
I have the a Zoom which I like and sometimes champion for its great versatility. For an external, battery powered recorder with XLR mic inputs and the cost, it is great for field work. IMHO much better than many consumer level camcorder/DSLR on board mics. The Zoom is sensitive, I sometimes use it as an overhead mic and sometimes I'll stick it on a pole. It actually does better backed away from subject.
Having said that, it is not the "best" especially for VO work in a controlled environment. I'd rather use a nice large diaphragm condenser mic through an interface to a computer.
BenB says… "Mic should not be up around forehead, too far away, you'll lose all the bottom end." This is exactly what is needed with this mic. The plosives are a direct result of close proximity and small capsules. Boom>to the bottom.
Ben says he can be in direct line 4" away and get great results. In my experience with this mic, peaks and plosives will result. Moving the mic up removes it from the airstream and it will be off axis as well which will also improve the Essses. Remember this is a x/y mic, so another benefit is to even out the left/right recordings. Even the small wave sample I posted shows different left/right patterns.
Use of a noise gate won't automatically… "cause a fake sound. If you hear room tone/noise during the voice, hating it out will sound worse than keeping it in."
Noise gates like all effects can be good or bad, depends on engineer. Sometimes it is what is needed. The OP only posted a small short recording that has some noise that will not improve the sound. Set the gate to the right level, it will only affect the clinking sound that is there, not the VO.
Joema… I agree with you about not using the "auto gain" even with this recorder, but FYI Zooms don't ride up and down. They only go down and stay there until the next take. Still I don't like it and prefer to set the levels. I agree to watch the levels thru out the recording as they don't stay set, and are dynamic so you can't see highest peak after the fact. Unfortunately, that is hard to do while actually recording on the small LCD on the ZOOM. You can monitor via headphones, which helps a little.
With the Zoom you can select Bass roll off, but my preference is to record as clean as possible and eq in post. But again this is a plosive and a clipped recording, so really mic placement and recording levels are the biggest issues.
Haven't had the pleasure of Izotope, so I sometimes draw the wave form. Guess that is what I get for being too cheap.
msJustine… I'm a DIY person myself. I also believe in room treatment and some of your recommendations are valid, but not really the egg crates. Curtains, clothes closets, book cases and couches can all help with reflections. Also vocal isolation GoBos and bass traps. However, plosives are direct blasts of air, not reverb.
I have both DIY and commercial pop screens. The best I have, IMHO. is a metal curved screen with a foam sheet. Very effective.
I also have made the embroidery hoop style pop screens, but I use fabric I bought at a fabric store. The fabric I use is denser than panty hose and since I don't have used panty hose laying around, actually cheaper. I use double layers of stretched fabric and again, IMHO, it is as effective as my commercial fabric pop screens. I used some single strand #10(?) electrical wire and a spring clamp to make it flexible and adjustable on the mic stand.
Sorry for being verbose, but thought we should remember the OPs question and her equipment. Unfortunately, $$$ is often a factor, so we make do with what we got or what we can afford.
Hope this helps, Greg
Alex the OP stated that she wanted help avoiding plosives. The recording was made from a Zoom H4n. I'm assuming she used the onboard stereo mics which are x/y pattern, small capsule cardioids. So let's keep that in mind.
I have the a Zoom which I like and sometimes champion for its great versatility. For an external, battery powered recorder with XLR mic inputs and the cost, it is great for field work. IMHO much better than many consumer level camcorder/DSLR on board mics. The Zoom is sensitive, I sometimes use it as an overhead mic and sometimes I'll stick it on a pole. It actually does better backed away from subject.
Having said that, it is not the "best" especially for VO work in a controlled environment. I'd rather use a nice large diaphragm condenser mic through an interface to a computer.
BenB says… "Mic should not be up around forehead, too far away, you'll lose all the bottom end." This is exactly what is needed with this mic. The plosives are a direct result of close proximity and small capsules. Boom>to the bottom.
Ben says he can be in direct line 4" away and get great results. In my experience with this mic, peaks and plosives will result. Moving the mic up removes it from the airstream and it will be off axis as well which will also improve the Essses. Remember this is a x/y mic, so another benefit is to even out the left/right recordings. Even the small wave sample I posted shows different left/right patterns.
Use of a noise gate won't automatically… "cause a fake sound. If you hear room tone/noise during the voice, hating it out will sound worse than keeping it in."
Noise gates like all effects can be good or bad, depends on engineer. Sometimes it is what is needed. The OP only posted a small short recording that has some noise that will not improve the sound. Set the gate to the right level, it will only affect the clinking sound that is there, not the VO.
Joema… I agree with you about not using the "auto gain" even with this recorder, but FYI Zooms don't ride up and down. They only go down and stay there until the next take. Still I don't like it and prefer to set the levels. I agree to watch the levels thru out the recording as they don't stay set, and are dynamic so you can't see highest peak after the fact. Unfortunately, that is hard to do while actually recording on the small LCD on the ZOOM. You can monitor via headphones, which helps a little.
With the Zoom you can select Bass roll off, but my preference is to record as clean as possible and eq in post. But again this is a plosive and a clipped recording, so really mic placement and recording levels are the biggest issues.
Haven't had the pleasure of Izotope, so I sometimes draw the wave form. Guess that is what I get for being too cheap.
msJustine… I'm a DIY person myself. I also believe in room treatment and some of your recommendations are valid, but not really the egg crates. Curtains, clothes closets, book cases and couches can all help with reflections. Also vocal isolation GoBos and bass traps. However, plosives are direct blasts of air, not reverb.
I have both DIY and commercial pop screens. The best I have, IMHO. is a metal curved screen with a foam sheet. Very effective.
I also have made the embroidery hoop style pop screens, but I use fabric I bought at a fabric store. The fabric I use is denser than panty hose and since I don't have used panty hose laying around, actually cheaper.
I use double layers of stretched fabric and again, IMHO, it is as effective as my commercial fabric pop screens. I used some single strand #10(?) electrical wire and a spring clamp to make it flexible and adjustable on the mic stand.Sorry for being verbose, but thought we should remember the OPs question and her equipment. Unfortunately, $$$ is often a factor, so we make do with what we got or what we can afford.
Hope this helps, Greg
Please Log in to join the conversation.

21 Mar 2015 18:39 #61675
by Redifer
Replied by Redifer on topic How to Remove Plosives in FCP X Voiceover?
This was easy to do in FCP7. Perhaps something similar can be done in X:
I would razor blade the audio around the Plosive, two or three frames on each side. Then I'd take that clip and EQ it so that everything 100Hz and down was lower (30 band EQ). This would eliminate the effect. Then I'd put a 2-frame crossfade transition where I razorbladed the audio track. I used to have to do this A LOT until I just engaged the 80Hz + highpass filter on my Zoom mic. Pop filters in front of the microphone itself don't seem to have much effect. I have two back to back and I'd still get lots of pops and plosives.
I would razor blade the audio around the Plosive, two or three frames on each side. Then I'd take that clip and EQ it so that everything 100Hz and down was lower (30 band EQ). This would eliminate the effect. Then I'd put a 2-frame crossfade transition where I razorbladed the audio track. I used to have to do this A LOT until I just engaged the 80Hz + highpass filter on my Zoom mic. Pop filters in front of the microphone itself don't seem to have much effect. I have two back to back and I'd still get lots of pops and plosives.
Please Log in to join the conversation.
21 Mar 2015 21:51 #61685
by AlexMaxim
Replied by AlexMaxim on topic How to Remove Plosives in FCP X Voiceover?
€MsJustine, joema, VidGreg + Redifer, thank you so much for this invaluable guidance!
It looks like we are going to go with the rerecord option using an external microphone (NT1a from Rode) together with a professional pop shield. So hopefully that should solve the issue. It's about a week's extra work, but that's small change in the grand scheme of things, and the end result should be so much better.
Thank you all so much for your help!
It looks like we are going to go with the rerecord option using an external microphone (NT1a from Rode) together with a professional pop shield. So hopefully that should solve the issue. It's about a week's extra work, but that's small change in the grand scheme of things, and the end result should be so much better.
Thank you all so much for your help!
Please Log in to join the conversation.
