


- Posts: 17
- Thank you received: 0
3 Post Moderation Rule for New Boarders (25 Jan 2021)
New boarders will have their posts moderated - Don't worry if you cannot see your post immediately.
motion tracking achorpoint
09 Sep 2017 15:33 #90411
by Arda
motion tracking achorpoint was created by Arda
Hi,
Does anyone know if it is possible to set an achorpoint when tracking a mask? So I can fixate the mask to one point in the image, instead of setting keyframes.
Thank you!
Does anyone know if it is possible to set an achorpoint when tracking a mask? So I can fixate the mask to one point in the image, instead of setting keyframes.
Thank you!
Please Log in to join the conversation.
- Karsten Schlüter
-

- Offline
- Moderator
-

Less
More
- Posts: 3790
- Thank you received: 718
11 Sep 2017 05:19 #90444
by Karsten Schlüter
Replied by Karsten Schlüter on topic motion tracking achorpoint
… can you post a screen-shot/illustration what you like to accomplish?
I'm a bit lost in your description …
You can track single points - which can be used as, for example one end of a line (other end fix position)
or…
you can track planes/4-point tracking - to replace for example roadsigns or skies or ….
But a 'masks anchor point'… <scratching head> .....
I'm a bit lost in your description …
You can track single points - which can be used as, for example one end of a line (other end fix position)
or…
you can track planes/4-point tracking - to replace for example roadsigns or skies or ….
But a 'masks anchor point'… <scratching head> .....
Please Log in to join the conversation.
11 Sep 2017 09:04 #90447
by Arda
Replied by Arda on topic motion tracking achorpoint
Dear Karsten,
Thank you for your reply. Sorry for my description
What I want to achieve is the movement between the first and the last screenshot, and that the light circle is fixed on the head of the person. When tracking by setting keyframes myself, it is not working smoothly. So the uplighted circle is not staying focussed on the persons head.
Thank you for your comment!
Thank you for your reply. Sorry for my description
What I want to achieve is the movement between the first and the last screenshot, and that the light circle is fixed on the head of the person. When tracking by setting keyframes myself, it is not working smoothly. So the uplighted circle is not staying focussed on the persons head.
Thank you for your comment!
Please Log in to join the conversation.
11 Sep 2017 09:08 #90448
by Arda
Replied by Arda on topic motion tracking achorpoint
and hereby the screenshots
Please Log in to join the conversation.
- Karsten Schlüter
-
- Offline
- Moderator
-
Less
More
- Posts: 3790
- Thank you received: 718
12 Sep 2017 07:05 - 12 Sep 2017 07:06 #90464
by Karsten Schlüter
nope, no screenshots …
just click on AddFile in your reply

and avoid 'monsters', convert png to jpg (with PreView.app) for example.....
Replied by Karsten Schlüter on topic motion tracking achorpoint
Arda wrote: and hereby the screenshots
nope, no screenshots …
just click on AddFile in your reply
and avoid 'monsters', convert png to jpg (with PreView.app) for example.....
Last edit: 12 Sep 2017 07:06 by Karsten Schlüter.
Please Log in to join the conversation.
12 Sep 2017 07:09 #90465
by Arda
Replied by Arda on topic motion tracking achorpoint
screenshots once again I hope..


Please Log in to join the conversation.
- Karsten Schlüter
-
- Offline
- Moderator
-
Less
More
- Posts: 3790
- Thank you received: 718
12 Sep 2017 07:26 - 12 Sep 2017 07:28 #90466
by Karsten Schlüter
Replied by Karsten Schlüter on topic motion tracking achorpoint
ahh, gottit, message received, 10-4 
What you want isn't called 'anchor point' but tracking …
twoandahalf options:
• Do you own Motion (50bucks)? it has a Tracker, you set for example the persons nose as reference and the mask will follow automatically
• TrackX - a commercial plugin (100bucks) which allows to track within FCPX…
• what do you mean by not smooth?
You can set the interpolation of keyframes to be 'edgy' or smooth…
help.apple.com/finalcutpro/mac/10.2/?lang=en#/ver8e3f1f04
for such a simple task, I would use keyframes…
What you want isn't called 'anchor point' but tracking …
twoandahalf options:
• Do you own Motion (50bucks)? it has a Tracker, you set for example the persons nose as reference and the mask will follow automatically
• TrackX - a commercial plugin (100bucks) which allows to track within FCPX…
• what do you mean by not smooth?
You can set the interpolation of keyframes to be 'edgy' or smooth…
help.apple.com/finalcutpro/mac/10.2/?lang=en#/ver8e3f1f04
for such a simple task, I would use keyframes…
Last edit: 12 Sep 2017 07:28 by Karsten Schlüter.
Please Log in to join the conversation.
12 Sep 2017 08:03 #90469
by Arda
Replied by Arda on topic motion tracking achorpoint
Thank you.
what is not smooth, is the zoom in the picture in combination with the movement of the highlighted area. I want the head stay in the middle of the lighted area, but it is difficult to give both images the same 'speed'.
But I will work it out! Thank you for your help!
what is not smooth, is the zoom in the picture in combination with the movement of the highlighted area. I want the head stay in the middle of the lighted area, but it is difficult to give both images the same 'speed'.
But I will work it out! Thank you for your help!
Please Log in to join the conversation.
- Karsten Schlüter
-
- Offline
- Moderator
-
Less
More
- Posts: 3790
- Thank you received: 718
12 Sep 2017 08:08 #90470
by Karsten Schlüter
Replied by Karsten Schlüter on topic motion tracking achorpoint
as a suggestion:
split the task into two:
First, apply the highlight effect and keyframe it.
When done, make it a Compound Clip. apply Ken Burns to that.....
split the task into two:
First, apply the highlight effect and keyframe it.
When done, make it a Compound Clip. apply Ken Burns to that.....
Please Log in to join the conversation.
13 Sep 2017 07:47 #90481
by Arda
Why didn't I think of this myself?? This is a very good solution... Thank you!
Replied by Arda on topic motion tracking achorpoint
Why didn't I think of this myself?? This is a very good solution... Thank you! Please Log in to join the conversation.
13 Sep 2017 08:06 - 13 Sep 2017 09:19 #90482
by Arda
Replied by Arda on topic motion tracking achorpoint
mmmmm, this is not working unfortunately, as he blows up everything, also the blurred borders...
So I made a compound clip from only the original and the shape mask, but then I have the problem that the blurred picture has to be in between these 2, to maintain the bordersize..
I think Motion is the only option...
So I made a compound clip from only the original and the shape mask, but then I have the problem that the blurred picture has to be in between these 2, to maintain the bordersize..
I think Motion is the only option...

Last edit: 13 Sep 2017 09:19 by Arda.
Please Log in to join the conversation.
- Karsten Schlüter
-
- Offline
- Moderator
-
Less
More
- Posts: 3790
- Thank you received: 718
13 Sep 2017 11:49 #90487
by Karsten Schlüter
Replied by Karsten Schlüter on topic motion tracking achorpoint
still lost, in what you try to accomplish.
From the very start: where does that blurred background comes from?
Part of the pic? Or made in FCPX?
What is your source, A or B?

2nd Q:
This is a still/photo, correct?
And you like highlight a person?
And then 'pan' the pic?

or…
is this video, and you like to 'attach' the highlight to that person?
From the very start: where does that blurred background comes from?
Part of the pic? Or made in FCPX?
What is your source, A or B?
2nd Q:
This is a still/photo, correct?
And you like highlight a person?
And then 'pan' the pic?
or…
is this video, and you like to 'attach' the highlight to that person?
Please Log in to join the conversation.
13 Sep 2017 12:12 - 13 Sep 2017 12:14 #90489
by Arda
Replied by Arda on topic motion tracking achorpoint
Thank you for thinking with me:)
This is only a picture, so no video.
There are 3 layers. I took 3 screenshots with specs of eachtof them.
I made a small 'video' of the movement, but I think I cannot upload here...

3 layers

1st layer, this is the source, a normal picture

2nd layer

3rd layer (layer mask)
This is only a picture, so no video.
There are 3 layers. I took 3 screenshots with specs of eachtof them.
I made a small 'video' of the movement, but I think I cannot upload here...
3 layers
1st layer, this is the source, a normal picture
2nd layer
3rd layer (layer mask)
Last edit: 13 Sep 2017 12:14 by Arda.
Please Log in to join the conversation.
- Karsten Schlüter
-
- Offline
- Moderator
-
Less
More
- Posts: 3790
- Thank you received: 718
13 Sep 2017 12:32 #90490
by Karsten Schlüter
Replied by Karsten Schlüter on topic motion tracking achorpoint
ok, up to there, I follow you!
Now, you want to pan/move the camera, right?
when the inner, sharp part moves, what shall happen with the blurred one? Moving too? Or static?
(I feel a bit like one of those pilots in an 'Airplane' movie, "there are two lamps in front of you, a red one and a green one…" :silly: )
Now, you want to pan/move the camera, right?
when the inner, sharp part moves, what shall happen with the blurred one? Moving too? Or static?
(I feel a bit like one of those pilots in an 'Airplane' movie, "there are two lamps in front of you, a red one and a green one…" :silly: )
Please Log in to join the conversation.
- Karsten Schlüter
-
- Offline
- Moderator
-
Less
More
- Posts: 3790
- Thank you received: 718
13 Sep 2017 13:07 - 13 Sep 2017 14:54 #90492
by Karsten Schlüter
Replied by Karsten Schlüter on topic motion tracking achorpoint
ok, verdict of the German jury:
easy, no Motion needed…
Step#1

Apply pic to timeline
Transform/zoom to 150%… wotever…

Apply Colour Correction, click on Mask, click on outside, lower overall exposure = highlight
Transformation, pos X to some value, set keyframe, playhead forward in time, second X-pos = pan
Step #2

double clip, make upper clip a Compound; …
Step#3 (formerly known as Step#4)

scale upper CC clip to 65%/you like, and trim clip from all 4 sides… => pan on blurred, moving! bg…
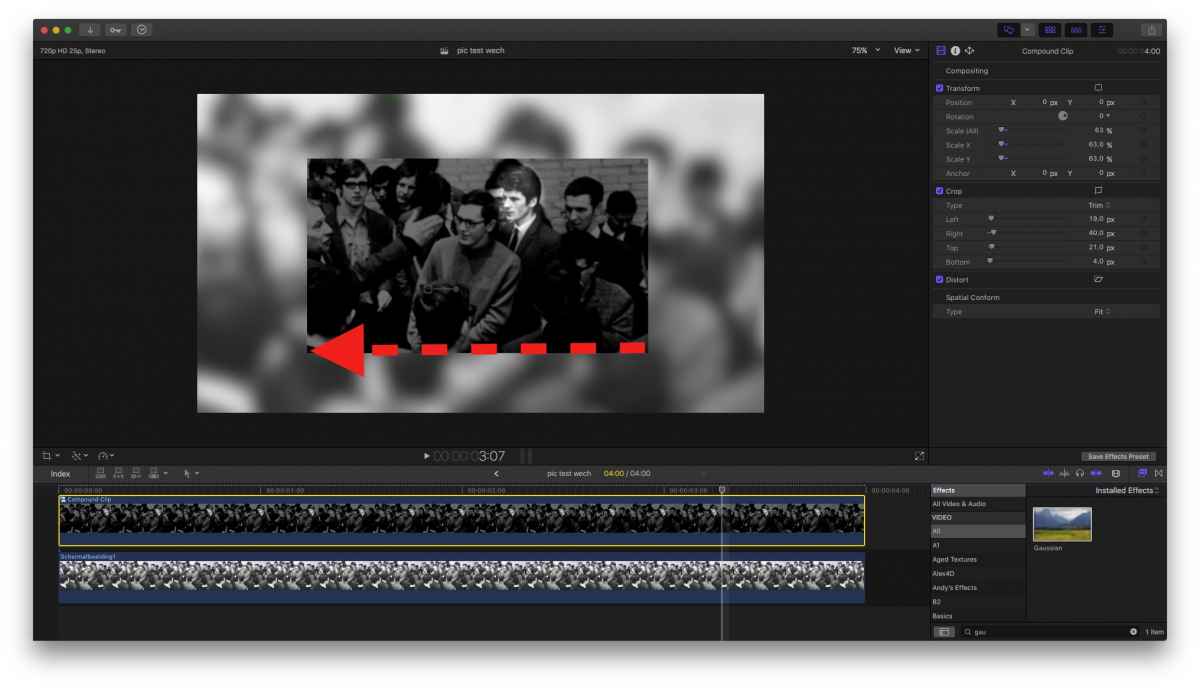
how's that?
easy, no Motion needed…
Step#1
Apply pic to timeline
Transform/zoom to 150%… wotever…
Apply Colour Correction, click on Mask, click on outside, lower overall exposure = highlight
Transformation, pos X to some value, set keyframe, playhead forward in time, second X-pos = pan
Step #2
double clip, make upper clip a Compound; …
Step#3 (formerly known as Step#4)
scale upper CC clip to 65%/you like, and trim clip from all 4 sides… => pan on blurred, moving! bg…
how's that?
Last edit: 13 Sep 2017 14:54 by Karsten Schlüter.
Please Log in to join the conversation.
13 Sep 2017 13:53 - 13 Sep 2017 13:59 #90493
by Arda
Replied by Arda on topic motion tracking achorpoint
Is step 3 maybe missing?
I am making a CC clip from one clip??
I don't want the blurred picture to move. Can I send you the little clip I shared?
I am making a CC clip from one clip??
I don't want the blurred picture to move. Can I send you the little clip I shared?
Last edit: 13 Sep 2017 13:59 by Arda.
Please Log in to join the conversation.
- Karsten Schlüter
-
- Offline
- Moderator
-
Less
More
- Posts: 3790
- Thank you received: 718
13 Sep 2017 13:59 #90495
by Karsten Schlüter
hahaha, forgive me, I can not count to 5.... 3
no, nothing missing… :silly:
yes, a compound from one clip:
this put the clip and its animation into a 'wrapper'.
… which allows us to apply further adjustments, such as Transformations, to the whole, animated clip...
Replied by Karsten Schlüter on topic motion tracking achorpoint
Arda wrote: Is step 3 maybe missing?
I am making a CC clip from one clip??
hahaha, forgive me, I can not count to 5.... 3
no, nothing missing… :silly:
yes, a compound from one clip:
this put the clip and its animation into a 'wrapper'.
… which allows us to apply further adjustments, such as Transformations, to the whole, animated clip...
Please Log in to join the conversation.
- Karsten Schlüter
-
- Offline
- Moderator
-
Less
More
- Posts: 3790
- Thank you received: 718
13 Sep 2017 17:02 #90502
by Karsten Schlüter
if you like …
karsten dot Schluter at gmail dot com
But it's really no witchcraft:
double clip
apply highlight
apply move (keyframe or Ken Burns)
compound it
resize/scale it.
but, if I can help you … don't forget to tell me the timing! 2secs? 10secs? half an hour
Replied by Karsten Schlüter on topic motion tracking achorpoint
Arda wrote: … I don't want the blurred picture to move. Can I send you the little clip I shared?
if you like …
karsten dot Schluter at gmail dot com
But it's really no witchcraft:
double clip
apply highlight
apply move (keyframe or Ken Burns)
compound it
resize/scale it.
but, if I can help you … don't forget to tell me the timing! 2secs? 10secs? half an hour
Please Log in to join the conversation.
