


- Posts: 32
- Thank you received: 0
3 Post Moderation Rule for New Boarders (25 Jan 2021)
New boarders will have their posts moderated - Don't worry if you cannot see your post immediately.
chroma keying green, blue, and making a silhoutte
- dans.klimkowski
-
 Topic Author
- Offline
- Junior Member
-

Less
More
11 Jan 2017 17:27 - 11 Jan 2017 17:35 #84767
by dans.klimkowski
chroma keying green, blue, and making a silhoutte was created by dans.klimkowski
I'm trying to process a chroma key for a blue part of the screen, a green part of the screen, and make a silhoutte out of my body. Haven't been able to get it to work yet- not sure if its possible or I'm just not doing the right combination of steps in the right order. Could anyone please offer advice?
Here is a photo to explain what i mean:
www.dropbox.com/s/nlchs5vvrbj8pba/Screen...%2012.22.20%20PM.png ?
I can process the blue and green independently by making two seperate chroma effects, and creating compound clips to add different backgrounds for each. And with just one chroma effect. i can use black and white effect to make my body into a silhoutte against the chroma'd background. But i havent been able to get it to work with all three effects together. Anybody have any ideas/thoughts on the order that it must be done in? or is this just not possible?
(btw-ignore that the pants i'm wearing that are also blue that was an accident)
Here is a photo to explain what i mean:
www.dropbox.com/s/nlchs5vvrbj8pba/Screen...%2012.22.20%20PM.png ?
I can process the blue and green independently by making two seperate chroma effects, and creating compound clips to add different backgrounds for each. And with just one chroma effect. i can use black and white effect to make my body into a silhoutte against the chroma'd background. But i havent been able to get it to work with all three effects together. Anybody have any ideas/thoughts on the order that it must be done in? or is this just not possible?
(btw-ignore that the pants i'm wearing that are also blue that was an accident)
Last edit: 11 Jan 2017 17:35 by dans.klimkowski.
Please Log in to join the conversation.


11 Jan 2017 18:11 #84769
by JoeEditor
Replied by JoeEditor on topic chroma keying green, blue, and making a silhoutte
Why do the two colors together?
I have a tutorial a very, very long time ago about doing amazing things once a chroma key is pulled. Use it as the source for an Image Mask on that layer.
www3.artbeats.com/assets/video_tutorials...es/keyer_as_mask.mov
I have a tutorial a very, very long time ago about doing amazing things once a chroma key is pulled. Use it as the source for an Image Mask on that layer.
www3.artbeats.com/assets/video_tutorials...es/keyer_as_mask.mov
Please Log in to join the conversation.
- Karsten Schlüter
-

- Offline
- Moderator
-

Less
More
- Posts: 3790
- Thank you received: 718
12 Jan 2017 16:28 #84791
by Karsten Schlüter
you have THREE diff. colours for keying :woohoo:
green, blue and black ....
plus why the stand BEFORE the blue popup????
Would be much easier, using the green corner alone ... anyhow:
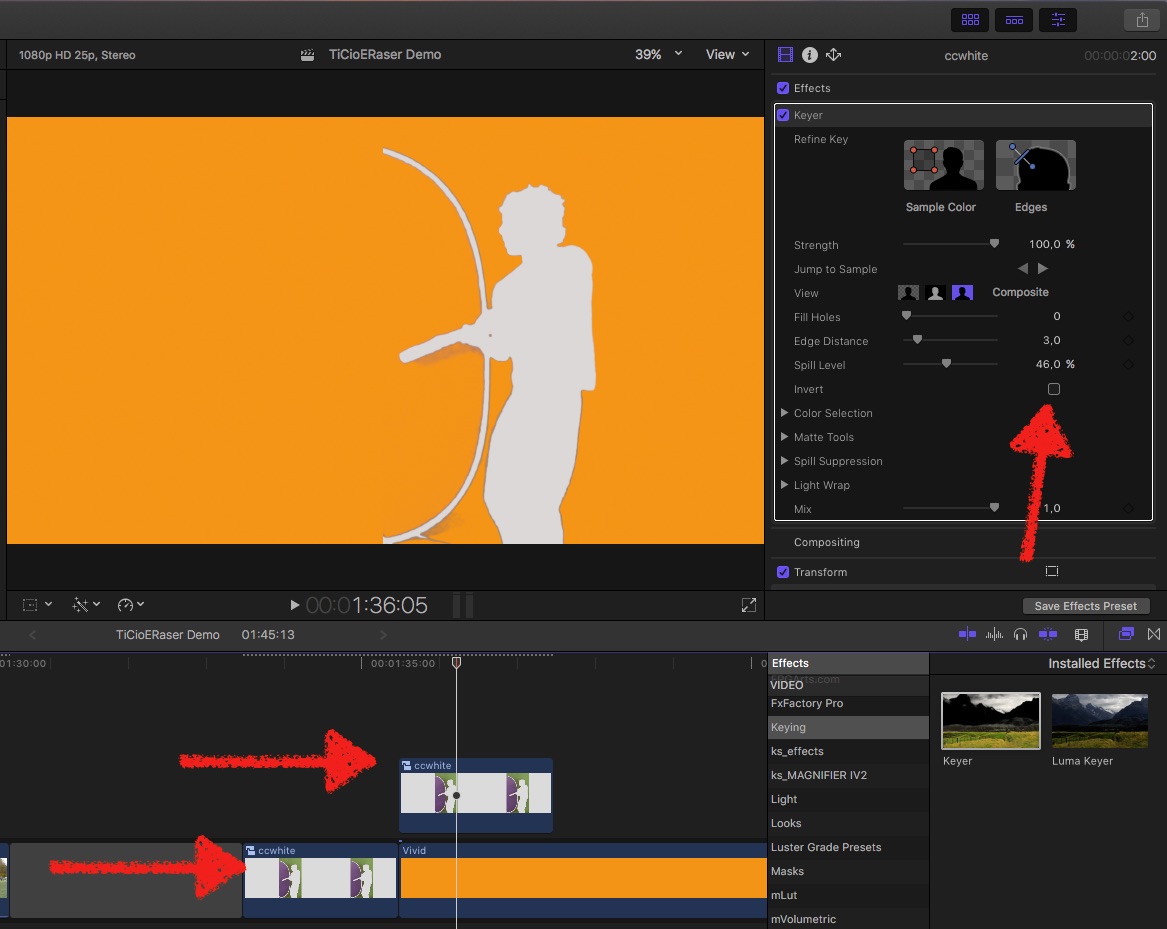
what I have done here is, keying green and INVERT the key to create the white silhouette , compound that, key again, now replacing the green with orange.
You can tweak the keyer to accept both colours, but the black frame of the popup - no chance.
record again, just in green. and care for your pants ..............
Replied by Karsten Schlüter on topic chroma keying green, blue, and making a silhoutte
dans.klimkowski wrote: … havent been able to get it to work with all three effects together. …)
you have THREE diff. colours for keying :woohoo:
green, blue and black ....
plus why the stand BEFORE the blue popup????
Would be much easier, using the green corner alone ... anyhow:
what I have done here is, keying green and INVERT the key to create the white silhouette , compound that, key again, now replacing the green with orange.
You can tweak the keyer to accept both colours, but the black frame of the popup - no chance.
record again, just in green. and care for your pants ..............
Please Log in to join the conversation.
- dans.klimkowski
-
Topic Author
- Offline
- Junior Member
-
Less
More
- Posts: 32
- Thank you received: 0
15 Jan 2017 18:10 #84859
by dans.klimkowski
Thanks, im downloading and will check it out. Always interested in learning more about chroma techniques.
Doing the 2 colors so that one can change into something else and one can stay the same. I'm thinking about making the green background into something like a starry night, and making the blue background into something like a wormhole. I'm hitting the blue background with a stick to a make drum sound (its connected to a drum synthesizer).
Replied by dans.klimkowski on topic chroma keying green, blue, and making a silhoutte
FCPX.guru wrote: Why do the two colors together?
I have a tutorial a very, very long time ago about doing amazing things once a chroma key is pulled. Use it as the source for an Image Mask on that layer.
www3.artbeats.com/assets/video_tutorials...es/keyer_as_mask.mov
Thanks, im downloading and will check it out. Always interested in learning more about chroma techniques.
Doing the 2 colors so that one can change into something else and one can stay the same. I'm thinking about making the green background into something like a starry night, and making the blue background into something like a wormhole. I'm hitting the blue background with a stick to a make drum sound (its connected to a drum synthesizer).
Please Log in to join the conversation.
- dans.klimkowski
-
Topic Author
- Offline
- Junior Member
-
Less
More
- Posts: 32
- Thank you received: 0
15 Jan 2017 18:34 #84861
by dans.klimkowski
lol a bit crazy, but would make for some cool effects if it works
1. the stand is just there because i was testing it and was lazily avoiding turning the pop up screen around (its green on the other side)- when i actually do it, the stand wont be there.
2. I figured that about the black frame of the popup. Was thinking i might be able to work around that by using the matte tools, which seem to give the chroma effect a blurred effect around edges (would appreciate if anybody knows any good ways of doing this- i'm a beginner to the matte stuff). Or if that doesnt work, i could cover the black in blue tape.
3."what I have done here is, keying green and INVERT the key to create the white silhouette , compound that, key again, now replacing the green with orange.
You can tweak the keyer to accept both colours, but the black frame of the popup - no chance."
hmm this is interesting, thanks. I've just tried it (its my first time using invert) and am a bit confused though- a few follow up questions:
a) why did it create a white silhoutte? When i invert, it goes black.
b) Is this inverting the blue and green seperately? Your timeline seems to show a green background and purple pop-up - not sure where the purple came from. When i invert it after processing the green , it turns the green into a light grey and it turns both me and the popup blue screen into a black. In this situation, i cant chroma the blue seperately because there is no blue. Am i doing something wong/differently?
c) what do you mean by tweak the chroma to accept both colors? would that be tweaking the chroma to accept them both (by making them into the same thing) simultaneously or into two different things? I thought it would be done with two seperate chroma effects.
BTW, does anybody know is there an easy way to quote multiple posts/passages of a post in one reply on this forum?
Replied by dans.klimkowski on topic chroma keying green, blue, and making a silhoutte
Karsten Schlüter wrote:
dans.klimkowski wrote: … havent been able to get it to work with all three effects together. …)
you have THREE diff. colours for keying :woohoo:
green, blue and black ....
plus why the stand BEFORE the blue popup????
record again, just in green. and care for your pants ..............
lol a bit crazy, but would make for some cool effects if it works
1. the stand is just there because i was testing it and was lazily avoiding turning the pop up screen around (its green on the other side)- when i actually do it, the stand wont be there.
2. I figured that about the black frame of the popup. Was thinking i might be able to work around that by using the matte tools, which seem to give the chroma effect a blurred effect around edges (would appreciate if anybody knows any good ways of doing this- i'm a beginner to the matte stuff). Or if that doesnt work, i could cover the black in blue tape.
3."what I have done here is, keying green and INVERT the key to create the white silhouette , compound that, key again, now replacing the green with orange.
You can tweak the keyer to accept both colours, but the black frame of the popup - no chance."
hmm this is interesting, thanks. I've just tried it (its my first time using invert) and am a bit confused though- a few follow up questions:
a) why did it create a white silhoutte? When i invert, it goes black.
b) Is this inverting the blue and green seperately? Your timeline seems to show a green background and purple pop-up - not sure where the purple came from. When i invert it after processing the green , it turns the green into a light grey and it turns both me and the popup blue screen into a black. In this situation, i cant chroma the blue seperately because there is no blue. Am i doing something wong/differently?
c) what do you mean by tweak the chroma to accept both colors? would that be tweaking the chroma to accept them both (by making them into the same thing) simultaneously or into two different things? I thought it would be done with two seperate chroma effects.
BTW, does anybody know is there an easy way to quote multiple posts/passages of a post in one reply on this forum?
Please Log in to join the conversation.
- dans.klimkowski
-
Topic Author
- Offline
- Junior Member
-
Less
More
- Posts: 32
- Thank you received: 0
15 Jan 2017 20:04 #84862
by dans.klimkowski
Replied by dans.klimkowski on topic chroma keying green, blue, and making a silhoutte
Following up with FCPX Guru-
Just watched your vid and thanks again for sharing! Some really cool stuff in there i didnt know about- image mask is awesome!
I've played around with it and am still not sure how this would work for the 3 chroma key setup i'm trying though.... maybe i'm missing something? Or maybe its just not possible, i dont know
Just watched your vid and thanks again for sharing! Some really cool stuff in there i didnt know about- image mask is awesome!
I've played around with it and am still not sure how this would work for the 3 chroma key setup i'm trying though.... maybe i'm missing something? Or maybe its just not possible, i dont know
Please Log in to join the conversation.
- Karsten Schlüter
-
- Offline
- Moderator
-
Less
More
- Posts: 3790
- Thank you received: 718
16 Jan 2017 07:13 #84868
by Karsten Schlüter
cause I 'told' it so, see below 6 steps recipe …
cause I 'told' it so, see below …
cause … ok here we go:
(and, btw: click 'quote' on reply, copy/paste quote as you like, edit it, done)
you're photo with your <cough> impressive set-up:
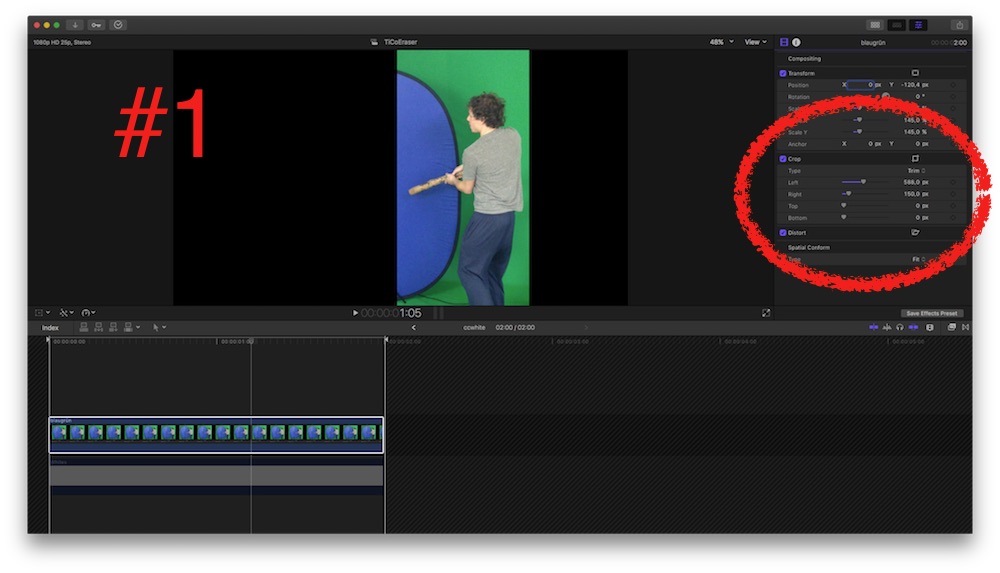
scaled it, cropped it, added the 'Keyer' (the inactive clip below it in a minute):
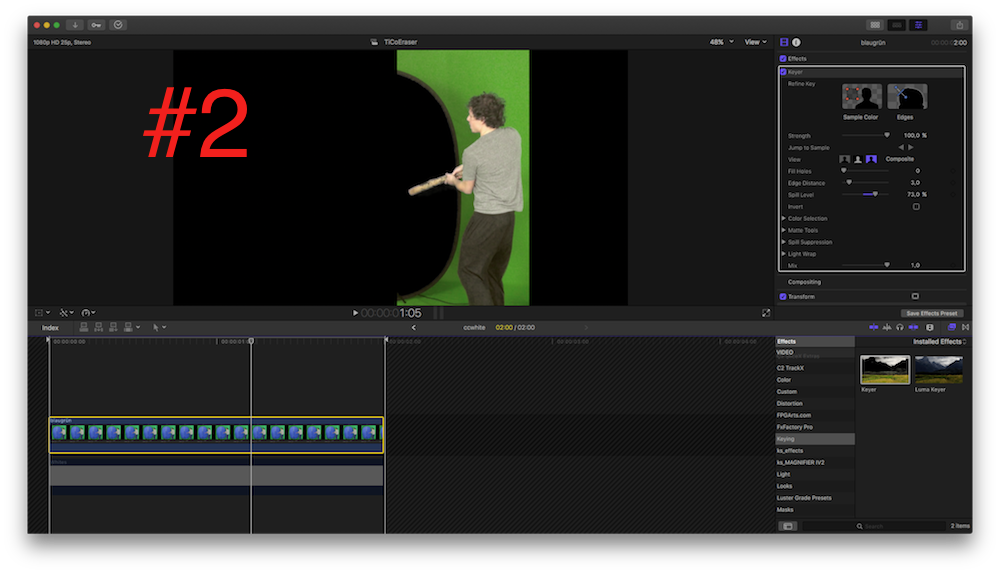
The Keyer automatically has chosen Blue as key colour…
I don't want that, so slider 'Strength' to zero, and choosing a new Sample Colour (square with red dots)
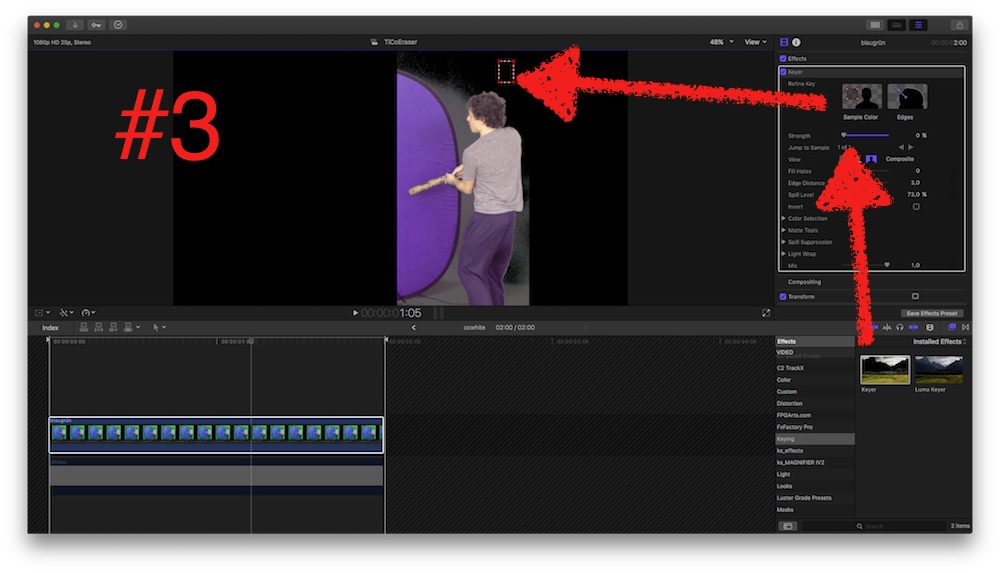
… which results in this muddy, bad key of 'black'= nothing below to key.
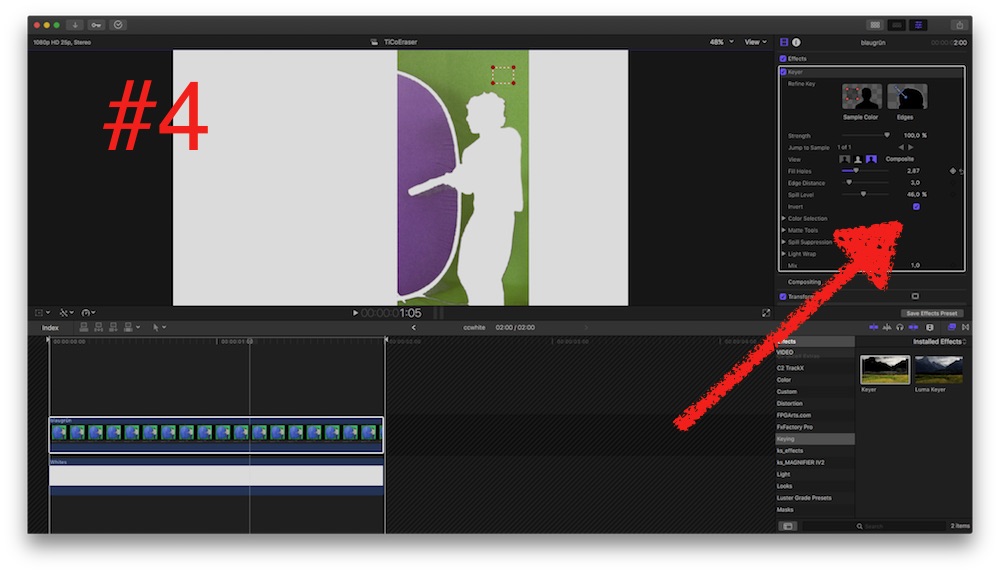
You've spoken of silhouette, old iPod ad comes to mind, so my to-be-keyed content is a solid white.
Now checkbox 'Invert' …
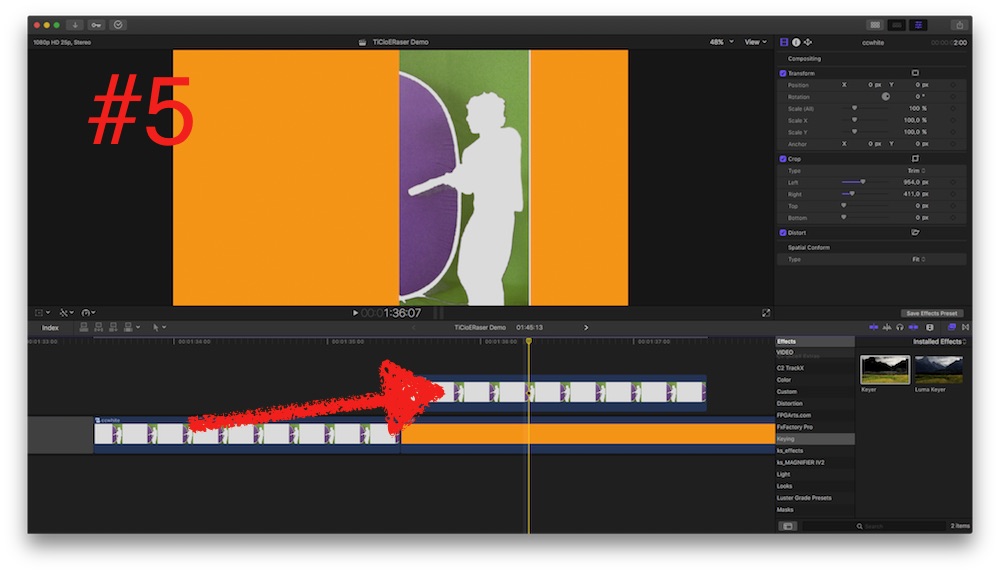
I make this a compound (!) and drag it over an orange-solid...
again, applying a Keyer to that compound, this time Keyer decides Green as key-colour:
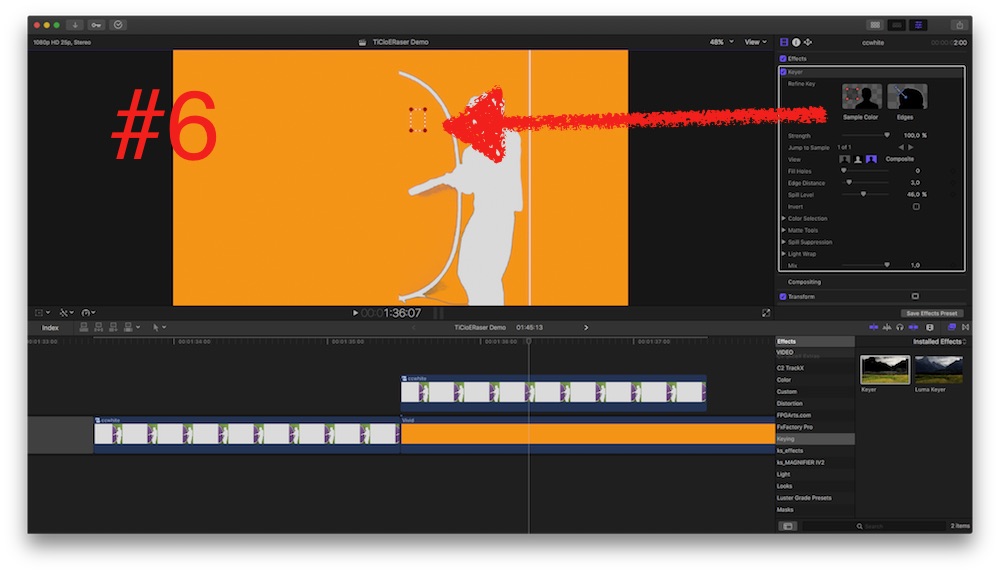
finally tweaking the Sample Colour (your Blue is a bit greenish
DONE!
What's complete useless in your workflow: the assumption the need of diff. key-colours for diff. layers of content!
the colour-keying is for keying you. Full Stop.
A comp of star field plus wormhole is another, SINGLE layer.
Love to explain my school kids: imagine you looking from top a staple of glass plates; 'empty' allows to see what's underneath; any content 'covers' what's below.
That simple ...
Replied by Karsten Schlüter on topic chroma keying green, blue, and making a silhoutte
dans.klimkowski wrote: … just tried it …
a) why did it create a white silhoutte? …
cause I 'told' it so, see below 6 steps recipe …
dans.klimkowski wrote: … b) Is this inverting the blue and green seperately? Your timeline seems to show a green background and purple pop-up - not sure where the purple came from. …
cause I 'told' it so, see below …
dans.klimkowski wrote: …… c) what do you mean by tweak the chroma to accept both colors? …
cause … ok here we go:
(and, btw: click 'quote' on reply, copy/paste quote as you like, edit it, done)
you're photo with your <cough> impressive set-up:
scaled it, cropped it, added the 'Keyer' (the inactive clip below it in a minute):
The Keyer automatically has chosen Blue as key colour…
I don't want that, so slider 'Strength' to zero, and choosing a new Sample Colour (square with red dots)
… which results in this muddy, bad key of 'black'= nothing below to key.
You've spoken of silhouette, old iPod ad comes to mind, so my to-be-keyed content is a solid white.
Now checkbox 'Invert' …
I make this a compound (!) and drag it over an orange-solid...
again, applying a Keyer to that compound, this time Keyer decides Green as key-colour:
finally tweaking the Sample Colour (your Blue is a bit greenish
DONE!
What's complete useless in your workflow: the assumption the need of diff. key-colours for diff. layers of content!
the colour-keying is for keying you. Full Stop.
A comp of star field plus wormhole is another, SINGLE layer.
Love to explain my school kids: imagine you looking from top a staple of glass plates; 'empty' allows to see what's underneath; any content 'covers' what's below.
That simple ...
Please Log in to join the conversation.
- Karsten Schlüter
-
- Offline
- Moderator
-
Less
More
- Posts: 3790
- Thank you received: 718
16 Jan 2017 09:50 - 16 Jan 2017 09:51 #84876
by Karsten Schlüter
Replied by Karsten Schlüter on topic chroma keying green, blue, and making a silhoutte
just to illustrate my last comment about layers:
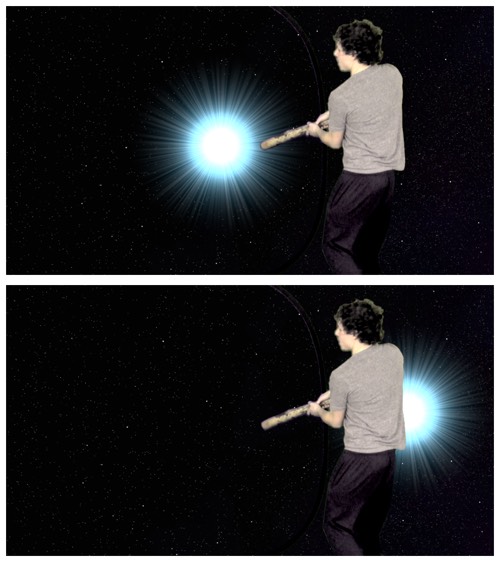
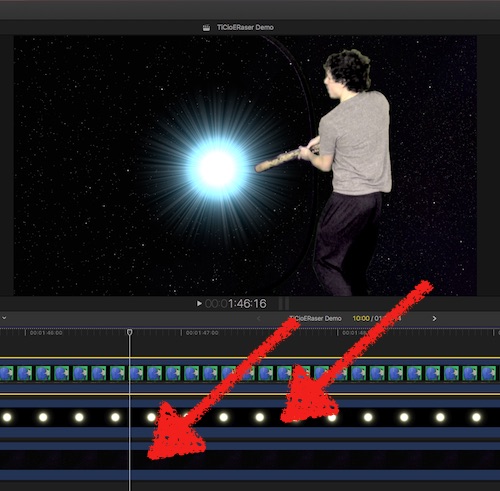
the key is for 'masking' you, independently what's going on 'behind' it ..…
you see: two lanes, one for the stars, one for the worm-hole - ONE key for you:
the key is for 'masking' you, independently what's going on 'behind' it ..…
you see: two lanes, one for the stars, one for the worm-hole - ONE key for you:
Last edit: 16 Jan 2017 09:51 by Karsten Schlüter.
Please Log in to join the conversation.
16 Jan 2017 12:58 #84880
by JoeEditor
Replied by JoeEditor on topic chroma keying green, blue, and making a silhoutte
I'd say only use the green, get rid of the blue. You can composite anything on top of anything else, you don't need two colors keyed to do that with. I think that is overkill, and creating more hassle than it's worth. Absolutely unnecessary to do that to achieve your goal.
Please Log in to join the conversation.
- Karsten Schlüter
-
- Offline
- Moderator
-
Less
More
- Posts: 3790
- Thank you received: 718
16 Jan 2017 13:40 #84885
by Karsten Schlüter
Replied by Karsten Schlüter on topic chroma keying green, blue, and making a silhoutte
What Ben says.
Additionally invest in your Green Screen. More light, more distance (to avoid spill) and more light on subject. FCPX does Marvel on keying, but the shown Situation ist really ... Borderline
In my school Project we often do Greenscreen simply outdoors - Tons of light. For Free. Perfekt on cloudy Days. And enough space for 3-5m distance to Green and a a-mile-away Cam with some 150mm to put everything together.
Additionally invest in your Green Screen. More light, more distance (to avoid spill) and more light on subject. FCPX does Marvel on keying, but the shown Situation ist really ... Borderline
In my school Project we often do Greenscreen simply outdoors - Tons of light. For Free. Perfekt on cloudy Days. And enough space for 3-5m distance to Green and a a-mile-away Cam with some 150mm to put everything together.
Please Log in to join the conversation.
- dans.klimkowski
-
Topic Author
- Offline
- Junior Member
-
Less
More
- Posts: 32
- Thank you received: 0
16 Jan 2017 15:17 - 16 Jan 2017 16:15 #84889
by dans.klimkowski
This makes total sense now, thanks for explaining! I just tried it again with another layer (adding a blue circle generator shape), behind the keyed image and it works perfectly + makes it easier to set up (I just need to tweak the shape in Pixelmator I guess as fcp doesn’t allow much of that it seems)
www.dropbox.com/s/3x9uqi3j48axlzw/Screen....18.09%20AM.png?dl=0
https://www.dropbox.com/s/3x9uqi3j48axlzw/Screen%20Shot%202017-01-16%20at%209.18.09%20AM.png?dl=0
Thank you for the in depth walkthrough , I really appreciate it. I understand everything else that you’ve written but I’m a bit confused on these things-
A) In the timeline pic you’ve shown with the stars and the wormhole- the bottom clip is the stars background and the middle clip is the just the wormhole (the bright white blue circular thing)- is this correct? So the middle clip is that wormhole circular thing that was over a background that was keyed out so that it looks like it is in the stars background. Am I understanding what you did here correctly?
B . ) why do you add the inactive clip in step 1? And is that a gap clip? I never add one of those before I key (and when I just tried it didn’t seem to add anything to the process)
C) I’m still missing how you’re silhouette in #4 applies to my body but not to the blue screen. When I do silhouette like this (and ive tried to follow the exact steps you provided), it applies it to both my body and the blue screen.
https://www.dropbox.com/s/3ogx9sla1t3hfwi/Screen%20Shot%202017-01-16%20at%2010.08.04%20AM.png?dl=0
D)"… which results in this muddy, bad key of 'black'= nothing below to key."
by muddy, do you mean the partially grey/partially black area (where the shadows of the popup caused a not-so-great chroma process)? I get that effect when my strength is at 0 as well, but when I put the strength back on 100, it doesn’t seem to be an issues (except for in small corners). I think I can remove this by increasing the distance from the green screens- if thats true, then theres no issue right?
(Though there are some times that I need to delete the effect and rekey it because the grey is everywhere even at 100, for some reason it doesn’t always work right the first time)
"Additionally invest in your Green Screen. More light, more distance (to avoid spill) and more light on subject. FCPX does Marvel on keying, but the shown Situation ist really ... Borderline
In my school Project we often do Greenscreen simply outdoors - Tons of light. For Free. Perfekt on cloudy Days. And enough space for 3-5m distance to Green and a a-mile-away Cam with some 150mm to put everything together."
Thanks for the additional advice. I’m all up for doing it outdoors when I can, but I need to get my indoor setup working well too (it doubles as a music recording studio, so this is where I have my instruments, microphones, and computer set up). Because I didnt take full care in this test, I only have the popup about a foot away from the green screen, though I can be about 1-2 meters in front of it when I position everything correctly in this space. I’ve had a lot of issues with lighting as I’ve been setting the studio up over the past year and have added quite a few lights (a 85W, 105W, and 3 45W soft boxes/umbrellas are lighting me and two 12 foot green screens that make an L in the corner of the room). I thought that my lighting was finally pretty good (but still have some occasional issues)- would appreciate if you could specify where there should be better/more lighting.
Replied by dans.klimkowski on topic chroma keying green, blue, and making a silhoutte
FCPX.guru wrote: I'd say only use the green, get rid of the blue. You can composite anything on top of anything else, you don't need two colors keyed to do that with. I think that is overkill, and creating more hassle than it's worth. Absolutely unnecessary to do that to achieve your goal.
Karsten Schlüter wrote:
What's complete useless in your workflow: the assumption the need of diff. key-colours for diff. layers of content!
the colour-keying is for keying you. Full Stop.
A comp of star field plus wormhole is another, SINGLE layer.
Love to explain my school kids: imagine you looking from top a staple of glass plates; 'empty' allows to see what's underneath; any content 'covers' what's below.
That simple ...
This makes total sense now, thanks for explaining! I just tried it again with another layer (adding a blue circle generator shape), behind the keyed image and it works perfectly + makes it easier to set up (I just need to tweak the shape in Pixelmator I guess as fcp doesn’t allow much of that it seems)
www.dropbox.com/s/3x9uqi3j48axlzw/Screen....18.09%20AM.png?dl=0
https://www.dropbox.com/s/3x9uqi3j48axlzw/Screen%20Shot%202017-01-16%20at%209.18.09%20AM.png?dl=0
Thank you for the in depth walkthrough , I really appreciate it. I understand everything else that you’ve written but I’m a bit confused on these things-
A) In the timeline pic you’ve shown with the stars and the wormhole- the bottom clip is the stars background and the middle clip is the just the wormhole (the bright white blue circular thing)- is this correct? So the middle clip is that wormhole circular thing that was over a background that was keyed out so that it looks like it is in the stars background. Am I understanding what you did here correctly?
B . ) why do you add the inactive clip in step 1? And is that a gap clip? I never add one of those before I key (and when I just tried it didn’t seem to add anything to the process)
C) I’m still missing how you’re silhouette in #4 applies to my body but not to the blue screen. When I do silhouette like this (and ive tried to follow the exact steps you provided), it applies it to both my body and the blue screen.
https://www.dropbox.com/s/3ogx9sla1t3hfwi/Screen%20Shot%202017-01-16%20at%2010.08.04%20AM.png?dl=0
D)"… which results in this muddy, bad key of 'black'= nothing below to key."
by muddy, do you mean the partially grey/partially black area (where the shadows of the popup caused a not-so-great chroma process)? I get that effect when my strength is at 0 as well, but when I put the strength back on 100, it doesn’t seem to be an issues (except for in small corners). I think I can remove this by increasing the distance from the green screens- if thats true, then theres no issue right?
(Though there are some times that I need to delete the effect and rekey it because the grey is everywhere even at 100, for some reason it doesn’t always work right the first time)
"Additionally invest in your Green Screen. More light, more distance (to avoid spill) and more light on subject. FCPX does Marvel on keying, but the shown Situation ist really ... Borderline
In my school Project we often do Greenscreen simply outdoors - Tons of light. For Free. Perfekt on cloudy Days. And enough space for 3-5m distance to Green and a a-mile-away Cam with some 150mm to put everything together."
Thanks for the additional advice. I’m all up for doing it outdoors when I can, but I need to get my indoor setup working well too (it doubles as a music recording studio, so this is where I have my instruments, microphones, and computer set up). Because I didnt take full care in this test, I only have the popup about a foot away from the green screen, though I can be about 1-2 meters in front of it when I position everything correctly in this space. I’ve had a lot of issues with lighting as I’ve been setting the studio up over the past year and have added quite a few lights (a 85W, 105W, and 3 45W soft boxes/umbrellas are lighting me and two 12 foot green screens that make an L in the corner of the room). I thought that my lighting was finally pretty good (but still have some occasional issues)- would appreciate if you could specify where there should be better/more lighting.
Last edit: 16 Jan 2017 16:15 by dans.klimkowski.
Please Log in to join the conversation.
- Karsten Schlüter
-
- Offline
- Moderator
-
Less
More
- Posts: 3790
- Thank you received: 718
16 Jan 2017 16:30 #84891
by Karsten Schlüter
yep. Should mention, that wormhole-thingie comes with an alpha-channel… so, no key necessary
That is the white solid from step #4 - me just lazy to delete it… (darn, I knew it would confuse you… ) I didn't built that example in order I explained to you…
ok, more detail:
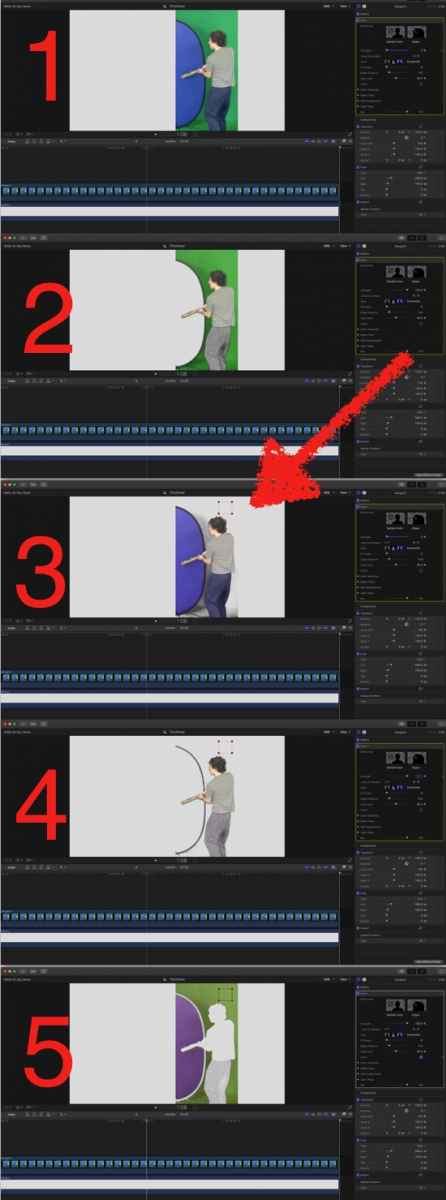
1: your clip, cropped, a white solid underneath = Preview shows White in the cropped parts.
2: applied Keyer, Keyer picks wrong colour = Blue, now the blue parts are transparent too, so blue= white. Not wanted…
3 Slider Strength to zero, 'Sample Colour'-selector over Green…
4 … now Green = key = white, slider Strength to 100% - almost anything keying
5 Invert: YOU are transparent = showing white underneath, green screen and blue popup visible…
Yep, that is so-called 'spill' and/or the colours of your trousers and/or low light - adjust sliders 'Spill Level' and 'Fill Holes' …
for heaven's sake - forget that second colour!!! The distance of that pop-up doesn't matter - YOUR distance, the distance of the to-be-keyed subject is of importance! You don't want to key the pop-up, don't you?? … which, bytheway, has no spill problem, due to its black border..
'Watts' are in days of LED and flat-lights highly irrelevant (just swapped a 'bulb' in my kitchen: 50W tungsten = 6W LED = same amount of brightness) -no need to talk about 'heat' but light: how much Lumen do your lights create…
or, more practical, vive versa:
looks like, your poor cam operates at >3200 ISO and +12dB gain, right?
You find thousands of advices for a home-brewn green-'box', use 4-8 China-balls with some 250W 'eco' bulbs (1-2000 Lumen) to illuminate the green; other DIY solution: LED hoses (cheap at xmas) to build 'flooders'=long vertical lights; or long tube-lights (the cri-factor is for green screen irrelevant)
And extra lights and flags for subjects …
Replied by Karsten Schlüter on topic chroma keying green, blue, and making a silhoutte
dans.klimkowski wrote: …This makes total sense now, thanks for explaining! …
…
A) In the timeline pic you’ve shown …- is this correct? So the middle clip is … Am I understanding what you did here correctly? …
yep. Should mention, that wormhole-thingie comes with an alpha-channel… so, no key necessary
)dans.klimkowski wrote: …
why do you add the inactive clip in step 1? …
That is the white solid from step #4 - me just lazy to delete it… (darn, I knew it would confuse you… ) I didn't built that example in order I explained to you…
dans.klimkowski wrote: … C) I’m still missing how you’re silhouette in #4 applies to my body but not to the blue screen.
ok, more detail:
1: your clip, cropped, a white solid underneath = Preview shows White in the cropped parts.
2: applied Keyer, Keyer picks wrong colour = Blue, now the blue parts are transparent too, so blue= white. Not wanted…
3 Slider Strength to zero, 'Sample Colour'-selector over Green…
4 … now Green = key = white, slider Strength to 100% - almost anything keying
5 Invert: YOU are transparent = showing white underneath, green screen and blue popup visible…
dans.klimkowski wrote: … … think I can remove this by increasing the distance from the green screens- if thats true, then theres no issue right?
Yep, that is so-called 'spill' and/or the colours of your trousers and/or low light - adjust sliders 'Spill Level' and 'Fill Holes' …
dans.klimkowski wrote: … … I only have the popup about a foot away from the green screen, though I can be about 1-2 meters in front of it when I position everything correctly in this space.
for heaven's sake - forget that second colour!!! The distance of that pop-up doesn't matter - YOUR distance, the distance of the to-be-keyed subject is of importance! You don't want to key the pop-up, don't you?? … which, bytheway, has no spill problem, due to its black border..
dans.klimkowski wrote: … I’ve had a lot of issues with lighting as I’ve been setting the studio up over the past year and have added quite a few lights (a 85W, 105W, and 3 45W soft boxes …
'Watts' are in days of LED and flat-lights highly irrelevant (just swapped a 'bulb' in my kitchen: 50W tungsten = 6W LED = same amount of brightness) -no need to talk about 'heat' but light: how much Lumen do your lights create…
or, more practical, vive versa:
looks like, your poor cam operates at >3200 ISO and +12dB gain, right?
You find thousands of advices for a home-brewn green-'box', use 4-8 China-balls with some 250W 'eco' bulbs (1-2000 Lumen) to illuminate the green; other DIY solution: LED hoses (cheap at xmas) to build 'flooders'=long vertical lights; or long tube-lights (the cri-factor is for green screen irrelevant)
And extra lights and flags for subjects …
Please Log in to join the conversation.
- dans.klimkowski
-
Topic Author
- Offline
- Junior Member
-
Less
More
- Posts: 32
- Thank you received: 0
17 Jan 2017 18:06 - 17 Jan 2017 18:07 #84930
by dans.klimkowski
Replied by dans.klimkowski on topic chroma keying green, blue, and making a silhoutte
Thanks again so much!
Your explanations of 1-5 make complete sense now, I followed those steps and got the same result.
Thanks for explaining that, I wasn’t sure about the terms. I’ve just tried adjusting those sliders with this shot, still had a bit of spill/shadows showing up (I suppose its from the closeness to the green screen, the lighting, and/or the camera). I’ll continue to experiment with those sliders in future shots
Yes I agree, I should have explained it better. Since I now know the right way to do it, I won’t be using the popup for this purpose any more. I meant to say that the distance from me to the green screen can be 1-2 meters.
Reading your responses about my lighting set up prompted me to test my lights again for other (non-silhouette) shots. I realized/remembered that there are some issues that I think upgrading my camera/lighting setup might be able to fix. Could you please offer advice on whether this is true and what the best way to upgrade it would be? (Or perhaps it just requires me to experiment more with the spill level and fill holes and other software variables?)
There are two main issues that I have (both are only occasional and aren’t usually a huge deal, but they do mess up some shots)”
1. There's slight moving granulation that happens sometimes at the edges of my hair (and sometimes other objects). This has gotten better since adding more lights, but is still quite visible in some shots (especially if I try zooming in)
2. There’s a bit of a green halo/border around my body.
Am I better off upgrading the lights or the camera to fix these issues (or both)?
I suppose so, it was shot with an iPhone 5c, I’m not very knowledgable about camera stats. How did you find that out- from looking in my inspector in the screenshot? I’m not sure how to find it out (other than doing an internet search from which i haven’t been able to find those stats in yet, lol).
The best camera I have is a Nikon s6900 (which I haven’t been able to find the gain stat for but seems to have 3200 or 6400 ISO when in auto mode). It still has those issues (it seems like to the same degree as the iphone camera, though I’ve never manually adjusted the ISO). (I also have a Lumix fz-300K with better specs and it picks up video a bit better and reduces those issues, but I have been planning to sell it for different camera because its so big and heavy…. Because I’m working in a small space its been more helpful to have a small point and shoot camera that can be mounted on a microphone boom stand than one that needs to be mounted on a tripod. Have been deciding if I should get another s6900 or look into a different camera)
Should I upgrade my camera? Is there any type of camera (or specific specs to look out for) that would be best for these purposes?
Thanks for explaining that, I have been confused about the lightbulb stats and wasn’t sure about using options other than photography softboxes/umbrellas. I’m trying to find the amount of lumens that my lights create but it doesn’t seem to say it anywhere. I’ve just looked into the ideas you provided (china balls, etc). I think it might be easier to continue using the stands I have and just upgrade the lightbulbs in the umbrellas/softboxes …. or do you think its better to use some of those DIY ideas?
If I can just get a better lightbulb for my stands, is there something to look for to determine the lumens of a lightbulb? Is it some combination of the size of the bulb and the 6500k stat (which I’m learning is the color temperature)?
"And extra lights and flags for subjects …"
I’d never used flags before or heard of them. Just watched a brief video and it seem that they have interesting applications, but I don’t understand how I would use them with green screens. It seems like they’re used to create/modify shadows on the background and/or the subject- but isn’t my goal to eliminate shadows and dark spots from both the subject and the background? Whenever I have dark spots it makes the processing muddier. Or maybe I’m missing something and flags are definitely something I should try using?
(Not sure if its helpful, but these are the lights I have so far:
Umbrellas
www.amazon.com/gp/product/B005FHZ2SI/ref...ilpage?ie=UTF8&psc=1
3 45W 6500k
Soft box 1
* 1 x 85w 5500 CFL Bulb
www.amazon.com/gp/product/B0091V467C/ref...ilpage?ie=UTF8&psc=1
Soft box 2
105W Photography Photo CFL 6500K
www.amazon.com/gp/product/B005DFP6M4/ref...ilpage?ie=UTF8&psc=1 )
Finally, was just reading that different color temperatures can cause difficulties in editing green screens. Is it possible that the fact I have 1 light at 5500k and the others at 6500k could be causing problems?
Your explanations of 1-5 make complete sense now, I followed those steps and got the same result.
Karsten Schlüter wrote:
Yep, that is so-called 'spill' and/or the colours of your trousers and/or low light - adjust sliders 'Spill Level' and 'Fill Holes' …
Thanks for explaining that, I wasn’t sure about the terms. I’ve just tried adjusting those sliders with this shot, still had a bit of spill/shadows showing up (I suppose its from the closeness to the green screen, the lighting, and/or the camera). I’ll continue to experiment with those sliders in future shots
Karsten Schlüter wrote: "for heaven's sake - forget that second colour!!! The distance of that pop-up doesn't matter…”
Yes I agree, I should have explained it better. Since I now know the right way to do it, I won’t be using the popup for this purpose any more. I meant to say that the distance from me to the green screen can be 1-2 meters.
Reading your responses about my lighting set up prompted me to test my lights again for other (non-silhouette) shots. I realized/remembered that there are some issues that I think upgrading my camera/lighting setup might be able to fix. Could you please offer advice on whether this is true and what the best way to upgrade it would be? (Or perhaps it just requires me to experiment more with the spill level and fill holes and other software variables?)
There are two main issues that I have (both are only occasional and aren’t usually a huge deal, but they do mess up some shots)”
1. There's slight moving granulation that happens sometimes at the edges of my hair (and sometimes other objects). This has gotten better since adding more lights, but is still quite visible in some shots (especially if I try zooming in)
2. There’s a bit of a green halo/border around my body.
Am I better off upgrading the lights or the camera to fix these issues (or both)?
Karsten Schlüter wrote: "looks like, your poor cam operates at >3200 ISO and +12dB gain, right?”
I suppose so, it was shot with an iPhone 5c, I’m not very knowledgable about camera stats. How did you find that out- from looking in my inspector in the screenshot? I’m not sure how to find it out (other than doing an internet search from which i haven’t been able to find those stats in yet, lol).
The best camera I have is a Nikon s6900 (which I haven’t been able to find the gain stat for but seems to have 3200 or 6400 ISO when in auto mode). It still has those issues (it seems like to the same degree as the iphone camera, though I’ve never manually adjusted the ISO). (I also have a Lumix fz-300K with better specs and it picks up video a bit better and reduces those issues, but I have been planning to sell it for different camera because its so big and heavy…. Because I’m working in a small space its been more helpful to have a small point and shoot camera that can be mounted on a microphone boom stand than one that needs to be mounted on a tripod. Have been deciding if I should get another s6900 or look into a different camera)
Should I upgrade my camera? Is there any type of camera (or specific specs to look out for) that would be best for these purposes?
Karsten Schlüter wrote: "'Watts' are in days of LED and flat-lights highly irrelevant (just swapped a 'bulb' in my kitchen: 50W tungsten = 6W LED = same amount of brightness) -no need to talk about 'heat' but light: how much Lumen do your lights create… "
"You find thousands of advices for a home-brewn green-'box', use 4-8 China-balls with some 250W 'eco' bulbs (1-2000 Lumen) to illuminate the green; other DIY solution: LED hoses (cheap at xmas) to build 'flooders'=long vertical lights; or long tube-lights (the cri-factor is for green screen irrelevant)"
Thanks for explaining that, I have been confused about the lightbulb stats and wasn’t sure about using options other than photography softboxes/umbrellas. I’m trying to find the amount of lumens that my lights create but it doesn’t seem to say it anywhere. I’ve just looked into the ideas you provided (china balls, etc). I think it might be easier to continue using the stands I have and just upgrade the lightbulbs in the umbrellas/softboxes …. or do you think its better to use some of those DIY ideas?
If I can just get a better lightbulb for my stands, is there something to look for to determine the lumens of a lightbulb? Is it some combination of the size of the bulb and the 6500k stat (which I’m learning is the color temperature)?
"And extra lights and flags for subjects …"
I’d never used flags before or heard of them. Just watched a brief video and it seem that they have interesting applications, but I don’t understand how I would use them with green screens. It seems like they’re used to create/modify shadows on the background and/or the subject- but isn’t my goal to eliminate shadows and dark spots from both the subject and the background? Whenever I have dark spots it makes the processing muddier. Or maybe I’m missing something and flags are definitely something I should try using?
(Not sure if its helpful, but these are the lights I have so far:
Umbrellas
www.amazon.com/gp/product/B005FHZ2SI/ref...ilpage?ie=UTF8&psc=1
3 45W 6500k
Soft box 1
* 1 x 85w 5500 CFL Bulb
www.amazon.com/gp/product/B0091V467C/ref...ilpage?ie=UTF8&psc=1
Soft box 2
105W Photography Photo CFL 6500K
www.amazon.com/gp/product/B005DFP6M4/ref...ilpage?ie=UTF8&psc=1 )
Finally, was just reading that different color temperatures can cause difficulties in editing green screens. Is it possible that the fact I have 1 light at 5500k and the others at 6500k could be causing problems?
Last edit: 17 Jan 2017 18:07 by dans.klimkowski.
Please Log in to join the conversation.
- Karsten Schlüter
-
- Offline
- Moderator
-
Less
More
- Posts: 3790
- Thank you received: 718
18 Jan 2017 06:24 #84938
by Karsten Schlüter
uhm, well - what qualifies me to answer all your Qs is, I'm the no-budget-expert here, teaching 'video' a few hours at my sons school - we set the standards for 'worst green screen (ever)' … :S
but … some posts in some thread don't de-mystify colour-keying in general and the excellent FCPX-effect in detail. I can and am not willing to explain that multi-layered topic …
for a start, the ripple-twins, my preferred source for advice have to confess, have some minutes worth watching:
or …
(that is a years old tut, but generally correct in 2017 too)
watch the linked tuts … but general advice: there's no such thing as 'enough light' when colour keying' :lol:
again, several reasons:
low light = creating 'grain', spill, too little res of camera, too much compression of rec-codec … yaddayadda
So, money doesn't matter?
bigger room, better even green bg, more light, better camera, recording 4:2:2 proRes :woohoo:
ok, no-budget: light light light! More light!
there's ton of excellent and free advice how to build and light your perfect green-screen (including the lights)
not first choice for a 'camera', a device with a lens and sensor, rice-corn-sized, hm?
ok, that's what at hand … for colour-keying, colour-resolution is of highest importance, 'we' can not tweak that, what you CAN do, get the app filmicPro, set iPhone manually to ISO 100/200, 30fps, 1/60th speed and add so much light to your set 'til you see a picture on display....
it's not the hardware, but the grey-ware in your head creating quality …
learn about the basics, add light to your set (did I mention that?), add more light, do tests and add more light.
best=$$$$.
best would be BMPC (or like), recording in 4:2:2 prores - but even that asks for - whole class please! - … light.
there's always something 'better' … ok, <philosophicalOff>
the whole trick with keying is evenness. Your bulbs and umbrellas and boxes are points, although all diffusing. I own a cheap app, Veescope, allowing to test your green-screen lighting… you'll be surprised how uneven and just bad lit your set is. Add more lights, did I mention…?
Therefor my no-budget recommendation of going outdoors - perfect, on cloudy days diffused light - and tons of it! And of same colour/Kelvin!
… to cover your subject from spill and unwanted light, thats simple.
Your background asks for the whole room flooded in bright light, your subject most probably not (Rembrandt light anybody?)
That's it for today, recap page 55 to … oops, old habits.
No, young padawan, long way you go have to…
did I mention more lights & light? ..........
Replied by Karsten Schlüter on topic chroma keying green, blue, and making a silhoutte
dans.klimkowski wrote: … Could you please offer advice on whether this is true and what the best way to upgrade it would be? (Or perhaps it just requires me to experiment more with the spill level and fill holes and other software variables?) …
uhm, well - what qualifies me to answer all your Qs is, I'm the no-budget-expert here, teaching 'video' a few hours at my sons school - we set the standards for 'worst green screen (ever)' … :S
but … some posts in some thread don't de-mystify colour-keying in general and the excellent FCPX-effect in detail. I can and am not willing to explain that multi-layered topic …
for a start, the ripple-twins, my preferred source for advice have to confess, have some minutes worth watching:
or …
(that is a years old tut, but generally correct in 2017 too)
dans.klimkowski wrote: … … There's slight moving granulation that happens sometimes at the edges of my hair (and sometimes other objects). This has gotten better since adding more lights, …
watch the linked tuts … but general advice: there's no such thing as 'enough light' when colour keying' :lol:
dans.klimkowski wrote: … There’s a bit of a green halo/border around my body. …
again, several reasons:
low light = creating 'grain', spill, too little res of camera, too much compression of rec-codec … yaddayadda
dans.klimkowski wrote: … Am I better off upgrading the lights or the camera to fix these issues (or both)? …
So, money doesn't matter?
bigger room, better even green bg, more light, better camera, recording 4:2:2 proRes :woohoo:
ok, no-budget: light light light! More light!
there's ton of excellent and free advice how to build and light your perfect green-screen (including the lights)
dans.klimkowski wrote: … it was shot with an iPhone 5c, I’m not very knowledgable about camera stats. …
not first choice for a 'camera', a device with a lens and sensor, rice-corn-sized, hm?
ok, that's what at hand … for colour-keying, colour-resolution is of highest importance, 'we' can not tweak that, what you CAN do, get the app filmicPro, set iPhone manually to ISO 100/200, 30fps, 1/60th speed and add so much light to your set 'til you see a picture on display....
dans.klimkowski wrote: … Have been deciding if I should get another s6900 or look into a different camera) …
it's not the hardware, but the grey-ware in your head creating quality …
learn about the basics, add light to your set (did I mention that?), add more light, do tests and add more light.
dans.klimkowski wrote: … Should I upgrade my camera? Is there any type of camera (or specific specs to look out for) that would be best for these purposes? …
best=$$$$.
best would be BMPC (or like), recording in 4:2:2 prores - but even that asks for - whole class please! - … light.
dans.klimkowski wrote: … think it might be easier to continue using the stands I have and just upgrade the lightbulbs in the umbrellas/softboxes …. or do you think its better to use some of those DIY ideas? …
there's always something 'better' … ok, <philosophicalOff>
the whole trick with keying is evenness. Your bulbs and umbrellas and boxes are points, although all diffusing. I own a cheap app, Veescope, allowing to test your green-screen lighting… you'll be surprised how uneven and just bad lit your set is. Add more lights, did I mention…?
Therefor my no-budget recommendation of going outdoors - perfect, on cloudy days diffused light - and tons of it! And of same colour/Kelvin!
dans.klimkowski wrote: … I’d never used flags before or heard of them. Just watched a brief video and it seem that they have interesting applications, but I don’t understand how I would use them with green screens. …
… to cover your subject from spill and unwanted light, thats simple.
Your background asks for the whole room flooded in bright light, your subject most probably not (Rembrandt light anybody?)
That's it for today, recap page 55 to … oops, old habits.
No, young padawan, long way you go have to…
did I mention more lights & light? ..........
Please Log in to join the conversation.
