


- Posts: 5
- Thank you received: 0
3 Post Moderation Rule for New Boarders (25 Jan 2021)
New boarders will have their posts moderated - Don't worry if you cannot see your post immediately.
Keying and Masking assistance please
17 Feb 2016 12:37 - 18 Feb 2016 10:58 #73449
by smoulders
Keying and Masking assistance please was created by smoulders
Hi there.
I am brand new to the forum so thanks for having me.
I am creating a logo sequence for a food orientated video my wife and I are making.
I filmed an overhead shot of her creating a word by laying out different vegetables to form letters.
This was filmed using a not partiularly great light, using large sheets of white paper as a background (on reflection a large white table cloth would have been better).
Not surprisingly the paper background came out far from a perfect white so I have been playing around with the Keyer effect to completely white out everything but the vegetables to form the logo.
I started by connecting a White generated clip underneath the vegetable footage.
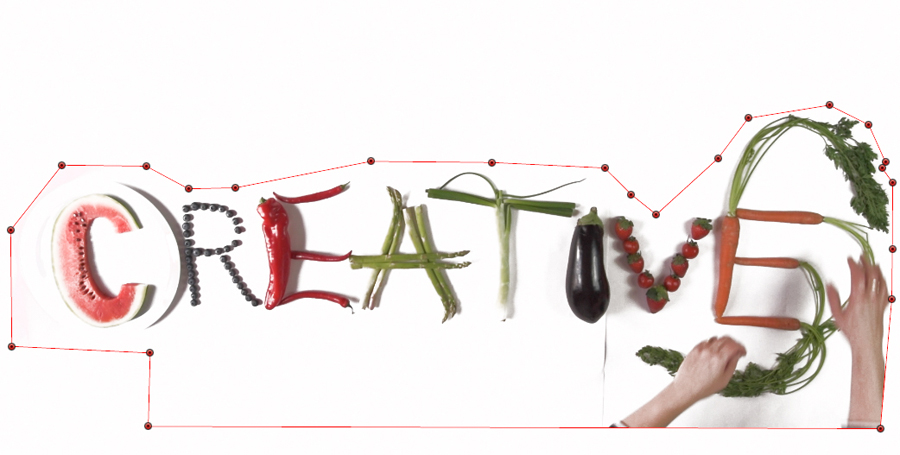
I drew a mask as tightly round the wording as poss, also leaving her hands flying in and out at the bottom as the letters are formed
I then took the Strength parameter in final cuts Keyer effect to 0% so I could use the Sample colour tool to start making things white.
I have been really impressed with the tool, but I am having problems with the letter 'C'(the Water melon) as you can see from the picture attached. As it is a pinkish colour with lots of white in it, after applying the keying effect it has lots its colour and vibrancy.
I have tried to leave that area unaffected by the keyer using a shape mask covering that area but I can only mask out the whole video as oposed to the key effect. I tried applying that mask to the underlying White background but that inverts the colour of everything.
Could anyone set me off in the right direction?
On a similar note as the strawberries are laid out the shadows created there are a bit harsh. It would be nice to mask them as they are laid out but after lots of experimenting I am struggling.
Any advice much appreciated.
Cheers
Nick
I am brand new to the forum so thanks for having me.
I am creating a logo sequence for a food orientated video my wife and I are making.
I filmed an overhead shot of her creating a word by laying out different vegetables to form letters.
This was filmed using a not partiularly great light, using large sheets of white paper as a background (on reflection a large white table cloth would have been better).
Not surprisingly the paper background came out far from a perfect white so I have been playing around with the Keyer effect to completely white out everything but the vegetables to form the logo.
I started by connecting a White generated clip underneath the vegetable footage.
I drew a mask as tightly round the wording as poss, also leaving her hands flying in and out at the bottom as the letters are formed
I then took the Strength parameter in final cuts Keyer effect to 0% so I could use the Sample colour tool to start making things white.
I have been really impressed with the tool, but I am having problems with the letter 'C'(the Water melon) as you can see from the picture attached. As it is a pinkish colour with lots of white in it, after applying the keying effect it has lots its colour and vibrancy.
I have tried to leave that area unaffected by the keyer using a shape mask covering that area but I can only mask out the whole video as oposed to the key effect. I tried applying that mask to the underlying White background but that inverts the colour of everything.
Could anyone set me off in the right direction?
On a similar note as the strawberries are laid out the shadows created there are a bit harsh. It would be nice to mask them as they are laid out but after lots of experimenting I am struggling.
Any advice much appreciated.
Cheers
Nick
Last edit: 18 Feb 2016 10:58 by smoulders.
Please Log in to join the conversation.
- Karsten Schlüter
-

- Offline
- Moderator
-

Less
More
- Posts: 3790
- Thank you received: 718
18 Feb 2016 07:31 #73492
by Karsten Schlüter
no, nope, no attachment, no pic ...
have you tried to apply a color-mask, and then simply color correct the white ... ?
Replied by Karsten Schlüter on topic Keying and Masking assistance please
smoulders wrote: … as you can see from the picture attached.…
no, nope, no attachment, no pic ...
have you tried to apply a color-mask, and then simply color correct the white ... ?
Please Log in to join the conversation.
18 Feb 2016 11:04 - 18 Feb 2016 11:42 #73496
by smoulders
Replied by smoulders on topic Keying and Masking assistance please
Hi KArsten
Thanks for the reply.
I used the Add file at the bottom of the new post and then insert which inserted this:
But no picture appears. Any ideas?
I have not tried a colour mask and would be interested to hear more. First off it might be handy if I can get this pic attached.
EDIT - I can see that the code it shows in the preview for the image does not display now. am I missing something when it comes to attaching images to a forum post?
Thanks for the reply.
I used the Add file at the bottom of the new post and then insert which inserted this:
But no picture appears. Any ideas?
I have not tried a colour mask and would be interested to hear more. First off it might be handy if I can get this pic attached.
EDIT - I can see that the code it shows in the preview for the image does not display now. am I missing something when it comes to attaching images to a forum post?
Last edit: 18 Feb 2016 11:42 by smoulders.
Please Log in to join the conversation.
- Karsten Schlüter
-
- Offline
- Moderator
-
Less
More
- Posts: 3790
- Thank you received: 718
18 Feb 2016 11:42 #73497
by Karsten Schlüter
Replied by Karsten Schlüter on topic Keying and Masking assistance please
when I try to attach .png (=screenshots) I fail... for fcp.co, I convert any shots to jpg ... 
concerning 'masking by color'
help.apple.com/finalcutpro/mac/10.2/?lang=en#/ver40b008a7
without seeing your problem, but by your desription, you like a whiter white, right? and color correcting the whole pic = pushing the lights, probably doesn't givce the intended look...
color-keying-white is optional, but no easy task..
concerning 'masking by color'
help.apple.com/finalcutpro/mac/10.2/?lang=en#/ver40b008a7
without seeing your problem, but by your desription, you like a whiter white, right? and color correcting the whole pic = pushing the lights, probably doesn't givce the intended look...
color-keying-white is optional, but no easy task..
Please Log in to join the conversation.
18 Feb 2016 11:57 #73498
by smoulders
Replied by smoulders on topic Keying and Masking assistance please
Hopefully this Jpeg will work.
Please Log in to join the conversation.

18 Feb 2016 15:06 #73501
by BenB
Replied by BenB on topic Keying and Masking assistance please
Be sure your attachments are JPEG, and neither width or hight exceeds 1000 pixels. That usually works for me.
Please Log in to join the conversation.
- Karsten Schlüter
-
- Offline
- Moderator
-
Less
More
- Posts: 3790
- Thank you received: 718
18 Feb 2016 17:46 #73509
by Karsten Schlüter
nope .....
Replied by Karsten Schlüter on topic Keying and Masking assistance please
smoulders wrote: Hopefully this Jpeg will work.
nope .....
Please Log in to join the conversation.
18 Feb 2016 20:23 #73512
by smoulders
Replied by smoulders on topic Keying and Masking assistance please
Ha ha
Sorry about this.
The 2nd time I added it, I converted to a JPEG but it was larger than 1000 pixels.
Resaved smaller so it should work. Everytime I post the moderator has to check so its taking several hours each time. Do all posts get checked before being submitted?
Sorry about this.
The 2nd time I added it, I converted to a JPEG but it was larger than 1000 pixels.
Resaved smaller so it should work. Everytime I post the moderator has to check so its taking several hours each time. Do all posts get checked before being submitted?
Please Log in to join the conversation.
- Karsten Schlüter
-
- Offline
- Moderator
-
Less
More
- Posts: 3790
- Thank you received: 718
19 Feb 2016 04:40 #73527
by Karsten Schlüter
Replied by Karsten Schlüter on topic Keying and Masking assistance please
ok, color masking ... underrated feature :lol:
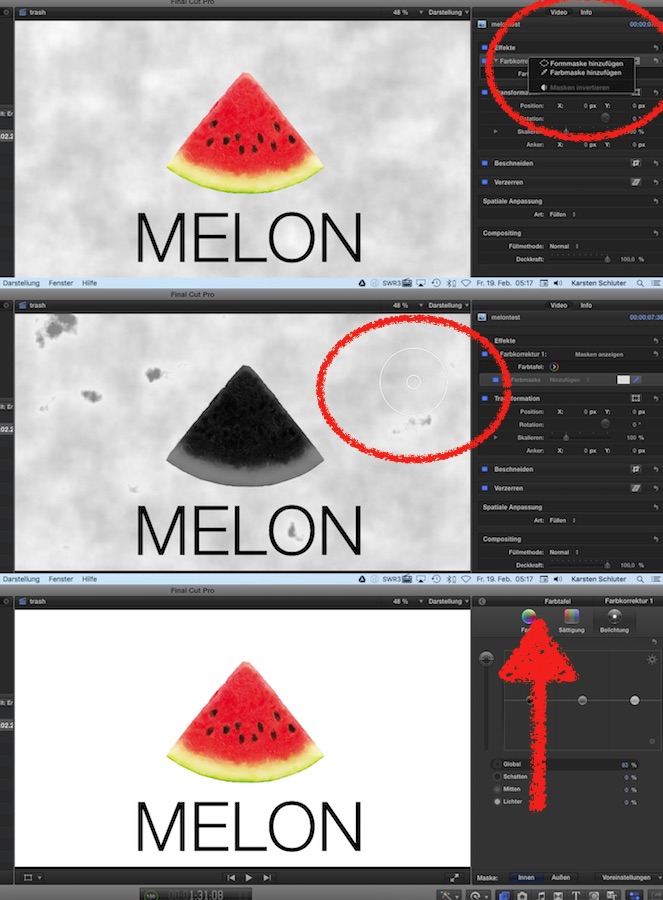
in 4 easy steps....
obligatory link to some rippletraining ... :
www.rippletraining.com/free-videos/learn...-in-final-cut-pro-x/
What's great with Color Masks: it doesn't matter wether cam or content moves, the selected color is kept corrected....
conc. moderator checking:
We had a pest of spams here, so 'newbies' get special treatment ...
in 4 easy steps....
- apply a Color Correction effect to your clip
- in the Inspector, apply Color Mask from drop-down menu (sorry for screen grabs in German - me lazy to switch to English)
- use the eye-dropper to select color; click'n drag mouse to 'widen' selection
- crank up exposure => all white whiter ... incl. whites 'inside' other forms, such as the O ....
obligatory link to some rippletraining ... :
www.rippletraining.com/free-videos/learn...-in-final-cut-pro-x/
What's great with Color Masks: it doesn't matter wether cam or content moves, the selected color is kept corrected....
conc. moderator checking:
We had a pest of spams here, so 'newbies' get special treatment ...
Please Log in to join the conversation.
19 Feb 2016 12:04 #73534
by smoulders
Replied by smoulders on topic Keying and Masking assistance please
Wow.
Thats absolutely fantastic. I really appreciate your help. I will give this a whirl this weekend.
MAny thanks indeed.
Thats absolutely fantastic. I really appreciate your help. I will give this a whirl this weekend.
MAny thanks indeed.
Please Log in to join the conversation.


19 Feb 2016 12:59 #73535
by Blackburn
Replied by Blackburn on topic Keying and Masking assistance please
^^
Very cool!
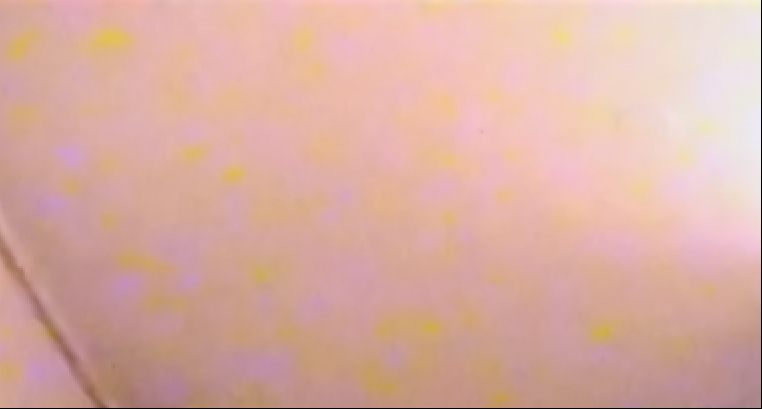
I have what is perhaps a related question: Some of my DV recordings from ages past, with artificial and inadequate lighting, have unsightly color splotches which I've wondered how to correct.
Here's a white ceiling, though you wouldn't know it from all the yellow and lilac splotches.
Is there a way to correct this while keeping overall good color balance?
Very cool!
I have what is perhaps a related question: Some of my DV recordings from ages past, with artificial and inadequate lighting, have unsightly color splotches which I've wondered how to correct.
Here's a white ceiling, though you wouldn't know it from all the yellow and lilac splotches.
Is there a way to correct this while keeping overall good color balance?
Please Log in to join the conversation.
- Karsten Schlüter
-
- Offline
- Moderator
-
Less
More
- Posts: 3790
- Thank you received: 718
19 Feb 2016 17:19 - 19 Feb 2016 17:26 #73550
by Karsten Schlüter
looks like a hell of a party.... :silly:
SCNR!!!
I'd try this:
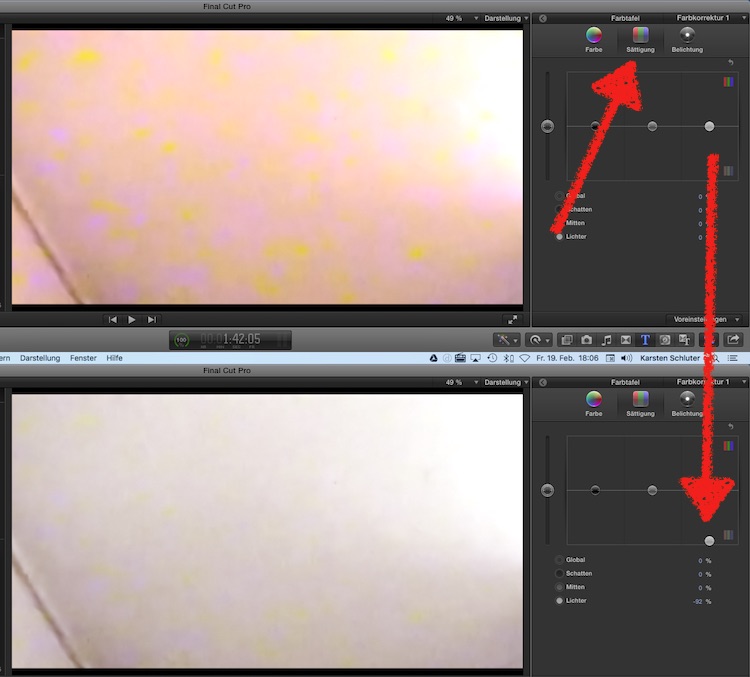
Color Correction effect, tab Saturation, and zero the Lights-puck
>> that desaturates any 'colored whites' to 'greyed whites'... >> less obvious
guess, you like to keep a bit of structure, so I wouldn't replace it by a solid white ....
With an elaborated color-tool as Color Finale, you could select the white even better, by bending curves .... but haven't persuade myself yet investing time&money in professional grading tools, so, no idea how to accomplish it with that. Or Ressolve... bit above my head ....
Replied by Karsten Schlüter on topic Keying and Masking assistance please
Blackburn wrote: …Here's a white ceiling, though you wouldn't know it from all the yellow and lilac splotches.
Is there a way to correct this while keeping overall good color balance?
...
looks like a hell of a party.... :silly:
SCNR!!!
I'd try this:
Color Correction effect, tab Saturation, and zero the Lights-puck
>> that desaturates any 'colored whites' to 'greyed whites'... >> less obvious
guess, you like to keep a bit of structure, so I wouldn't replace it by a solid white ....
With an elaborated color-tool as Color Finale, you could select the white even better, by bending curves .... but haven't persuade myself yet investing time&money in professional grading tools, so, no idea how to accomplish it with that. Or Ressolve... bit above my head ....
Last edit: 19 Feb 2016 17:26 by Karsten Schlüter.
Please Log in to join the conversation.
- Karsten Schlüter
-
- Offline
- Moderator
-
Less
More
- Posts: 3790
- Thank you received: 718
20 Feb 2016 07:08 - 20 Feb 2016 07:13 #73563
by Karsten Schlüter
Glad you like it
Forgot to mention: keep an eye on the scopes! don't over-exposure...
same feature is avail in paint-apps, such as PIXELMATOR:

somehow someone managed to throw a deed, our school earned in a video-contest, on the floor and having a party on it.. left before, right after some treatment:
select the color of the stains, widen it a bit and replace selection by original color, working much faster than stamping&cloning; in this case, 'flat' colors is ok, it's a graphic... ok, I killed in the lower left, under the Panasonic sign, some design element ... anyhow. The prepped jpg now is in use in a year-in-review video.... looking like new :silly:
color-masking is the little, underrated brother of green-screen/color-key ... very handy for 'fixing'....
Replied by Karsten Schlüter on topic Keying and Masking assistance please
smoulders wrote: Wow. Thats absolutely fantastic.…
Glad you like it
Forgot to mention: keep an eye on the scopes! don't over-exposure...
same feature is avail in paint-apps, such as PIXELMATOR:
somehow someone managed to throw a deed, our school earned in a video-contest, on the floor and having a party on it.. left before, right after some treatment:
select the color of the stains, widen it a bit and replace selection by original color, working much faster than stamping&cloning; in this case, 'flat' colors is ok, it's a graphic... ok, I killed in the lower left, under the Panasonic sign, some design element ...
anyhow. The prepped jpg now is in use in a year-in-review video.... looking like new :silly:color-masking is the little, underrated brother of green-screen/color-key ... very handy for 'fixing'....
Last edit: 20 Feb 2016 07:13 by Karsten Schlüter.
Please Log in to join the conversation.
