


- Posts: 786
- Thank you received: 21
3 Post Moderation Rule for New Boarders (25 Jan 2021)
New boarders will have their posts moderated - Don't worry if you cannot see your post immediately.
Learning Green Screen and keying
- Jonathan Levin
-
 Topic Author
- Offline
- Platinum Member
-

Less
More
18 Jan 2016 21:42 - 18 Jan 2016 21:46 #72351
by Jonathan Levin
Learning Green Screen and keying was created by Jonathan Levin
Hi everyone.
I thought I'd use a day off to experiment with green screen and keying techniques. I am very new to this but I have been getting requests for GS work so now is the perfect time to work on this thing.
The background I am working with is a Westcott 130 9x12 cloth background. $70.00US at B&H.
The set-up: Background on supports and carefully tensioned to avoid wrinkles and creases. Lighting on background consisted of to Lowell Omni's with barn-doors and diffused with Tough-lux. Light was pretty even throughout my frame area.
Subject (myself) 12 feet away from background, one key light, and two backlight/hair lights.
Nikon D800e with Atomos Ninja Blade set to Pro Res HQ. ENORMOUS files, but apparently good for keying. Camer- ISO 800 30th f/4. Background definately out of focus. Good! The video was then brought into FCP X for keying.
Here is the the original set up-
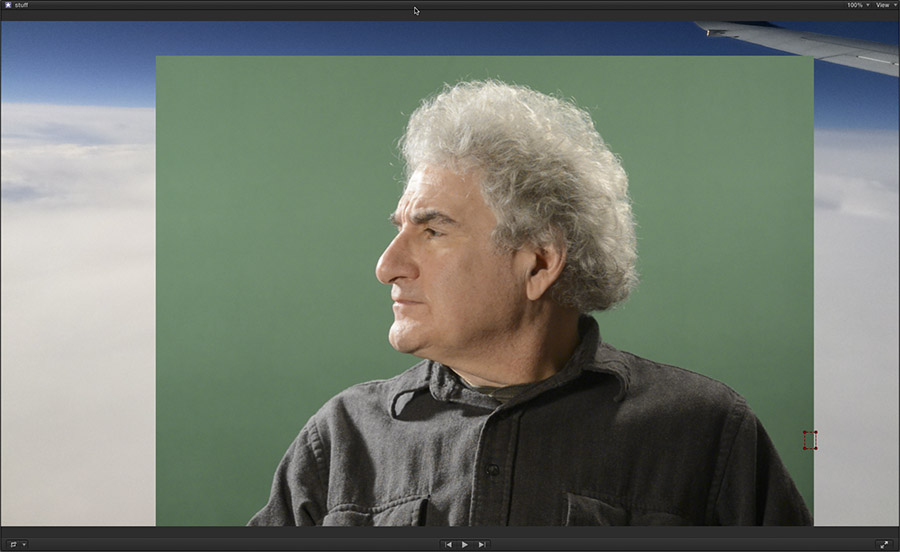
Here is just the clip with the keyer added, and the only thing I did here was pull a small selection to key out a tiny bit of something on the right side of the image and use the trim tool to bring background close into me-
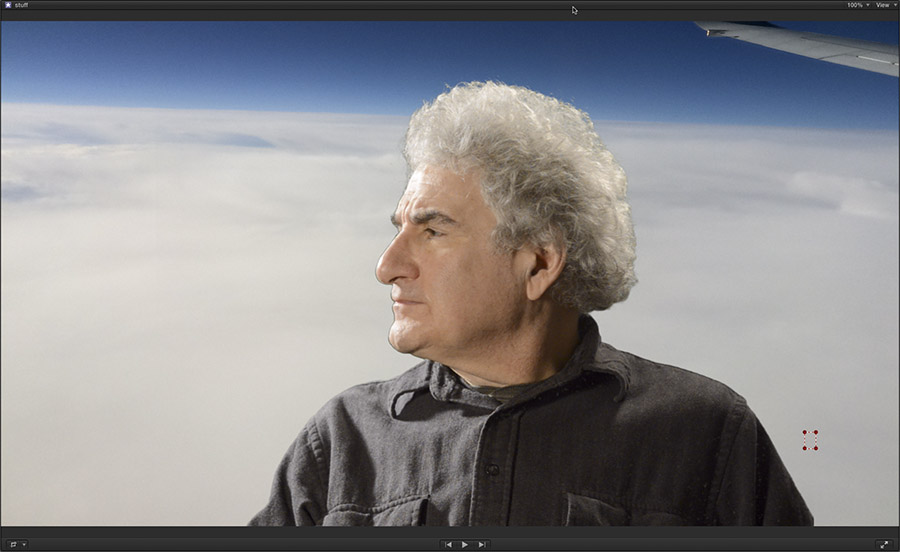
I noticed that on this part of my test, I had a slight fringe along my ugly face and if I could tighten that up a bit. After playing around a bit, I found that if I went into Matte Tools within the Keyer and then use the Shrink/Expand adjuster, I could get less of the fringing. But then my shirt developed some "holes" that I was able to adjust out by carefully using the fill holes adjuster-
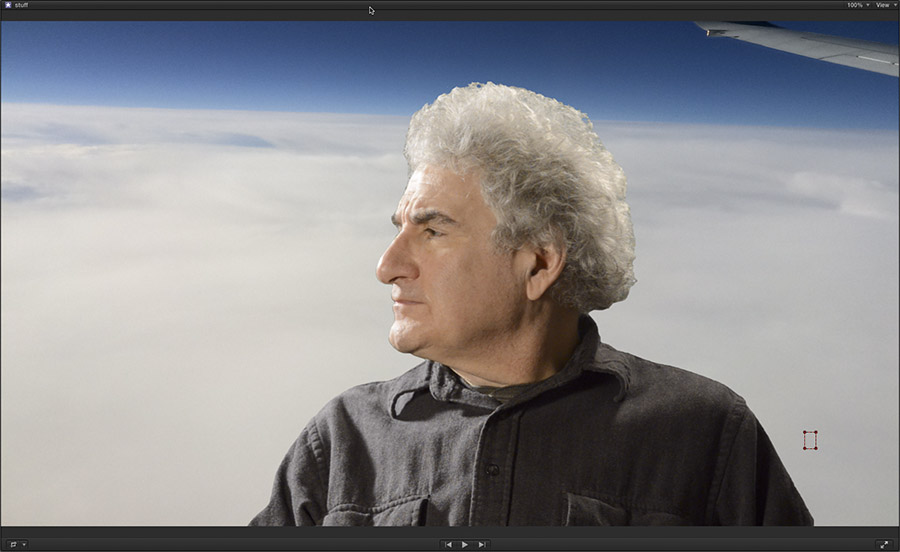
That looks better! One thing I can tell you is that sharp focus from front to back on subject being keyed is really important. I could be wrong, but it seems like that is necessary in order to get a decent key. Though i did not experiment with it today, I understand that using a tiny bit of "Light Wrap" can give a more organic quality. That's tomorrow.
Another thing I notice is because of my wild hair-do, err, don't, this causes issues in playback where certain backgrounds cause the ends of my hair to sort of flicker. I suppose if I used some kind of conditioner on my hair, it might make my key better!
I know that BenB is doing some kind of keyer tutorial video that we all anxiously await.
Thanks for everyones help on the "Portable Green Screen Recommendations" thread.
I'll add more as I test some more.
Jonathan
I thought I'd use a day off to experiment with green screen and keying techniques. I am very new to this but I have been getting requests for GS work so now is the perfect time to work on this thing.
The background I am working with is a Westcott 130 9x12 cloth background. $70.00US at B&H.
The set-up: Background on supports and carefully tensioned to avoid wrinkles and creases. Lighting on background consisted of to Lowell Omni's with barn-doors and diffused with Tough-lux. Light was pretty even throughout my frame area.
Subject (myself) 12 feet away from background, one key light, and two backlight/hair lights.
Nikon D800e with Atomos Ninja Blade set to Pro Res HQ. ENORMOUS files, but apparently good for keying. Camer- ISO 800 30th f/4. Background definately out of focus. Good! The video was then brought into FCP X for keying.
Here is the the original set up-
Here is just the clip with the keyer added, and the only thing I did here was pull a small selection to key out a tiny bit of something on the right side of the image and use the trim tool to bring background close into me-
I noticed that on this part of my test, I had a slight fringe along my ugly face and if I could tighten that up a bit. After playing around a bit, I found that if I went into Matte Tools within the Keyer and then use the Shrink/Expand adjuster, I could get less of the fringing. But then my shirt developed some "holes" that I was able to adjust out by carefully using the fill holes adjuster-
That looks better! One thing I can tell you is that sharp focus from front to back on subject being keyed is really important. I could be wrong, but it seems like that is necessary in order to get a decent key. Though i did not experiment with it today, I understand that using a tiny bit of "Light Wrap" can give a more organic quality. That's tomorrow.
Another thing I notice is because of my wild hair-do, err, don't, this causes issues in playback where certain backgrounds cause the ends of my hair to sort of flicker. I suppose if I used some kind of conditioner on my hair, it might make my key better!
I know that BenB is doing some kind of keyer tutorial video that we all anxiously await.
Thanks for everyones help on the "Portable Green Screen Recommendations" thread.
I'll add more as I test some more.
Jonathan
Last edit: 18 Jan 2016 21:46 by Jonathan Levin.
Please Log in to join the conversation.
- Jonathan Levin
-
Topic Author
- Offline
- Platinum Member
-
Less
More
- Posts: 786
- Thank you received: 21
18 Jan 2016 21:44 #72352
by Jonathan Levin
Replied by Jonathan Levin on topic Learning Green Screen and keying
Oh, and one other thing: I can't figure out for the life of me how and when to use the Edges tool thing. It just seems to make my entire image fade away. I thought this would help with getting rid of the fringe around my kisser.
Please Log in to join the conversation.
- Karsten Schlüter
-

- Offline
- Moderator
-

Less
More
- Posts: 3790
- Thank you received: 718
19 Jan 2016 09:48 #72355
by Karsten Schlüter
Replied by Karsten Schlüter on topic Learning Green Screen and keying
you can learn a lot In Under 5 Minutes from Steve/rippletraining 
www.rippletraining.com/free-videos/learn...-in-final-cut-pro-x/
But there's an extended version avail too, with more in-depth detail, in two parts:
www.rippletraining.com/free-videos/learn...-in-final-cut-pro-x/
But there's an extended version avail too, with more in-depth detail, in two parts:
Please Log in to join the conversation.


19 Jan 2016 12:50 #72358
by BenB
Replied by BenB on topic Learning Green Screen and keying
Don't forget the soften and erode sliders in the matte tools.
Plus, working with the tools in the Spill Suppressor section help a great deal.
Lightwrap is not only for a more realistic look, but also fights against green spill from your screen.
The Edges on-screen tool, I've worked with a lot, and have concluded it is totally useless except in a very rare few cases. It is supposed to help you adjust an edge softness, but I don't find it worth the time.
Be sure to read ALL of the user manual, as there is very valuable info there (surprisingly).
help.apple.com/finalcutpro/mac/10.2/#/ver40b003bc
Plus, working with the tools in the Spill Suppressor section help a great deal.
Lightwrap is not only for a more realistic look, but also fights against green spill from your screen.
The Edges on-screen tool, I've worked with a lot, and have concluded it is totally useless except in a very rare few cases. It is supposed to help you adjust an edge softness, but I don't find it worth the time.
Be sure to read ALL of the user manual, as there is very valuable info there (surprisingly).
help.apple.com/finalcutpro/mac/10.2/#/ver40b003bc
Please Log in to join the conversation.
- Jonathan Levin
-
Topic Author
- Offline
- Platinum Member
-
Less
More
- Posts: 786
- Thank you received: 21
19 Jan 2016 22:11 #72390
by Jonathan Levin
Replied by Jonathan Levin on topic Learning Green Screen and keying
Thanks Karsten. I actually watched those and a bunch of other videos last night to get some more information.
BenB- Thanks for steering me toward those adjustments. I think that part of what makes things complicated and not just in FCP, but all types of image editing apps is that the organization of all the sliders and adjusters is mostly out of order.
For example: In the Keyer you have (in this order) Refine key, Strength, Fill holes, Edge Distance, Spill Level, Invert(?), and then Color Selection, Matte Tools, Spill Suppression, and Light Wrap.
It seems that the adjustments should be "stacked" in some order that they would be used. 1, 2, 3, 4. And I know that in tweaking stuff, there is a lot of back and forth.
Another example is the Color Correctors color board. which from left to right is color, saturation, and then exposure. If I recall correctly, I think that you are supposed to adjust exposure, then color, and finally saturation. I guess arranging things in some order of use would make sense.
But per your suggestions, my keys are looking really quite good.
I am rethinking the idea that the keyed subject need to be in focus front through back. I am now thinking it might make sense to have focus fall off around subject to better blend with background, assuming background is of a softer focus. But then if you have titles, oh well, never mind.
Jonathan
BenB- Thanks for steering me toward those adjustments. I think that part of what makes things complicated and not just in FCP, but all types of image editing apps is that the organization of all the sliders and adjusters is mostly out of order.
For example: In the Keyer you have (in this order) Refine key, Strength, Fill holes, Edge Distance, Spill Level, Invert(?), and then Color Selection, Matte Tools, Spill Suppression, and Light Wrap.
It seems that the adjustments should be "stacked" in some order that they would be used. 1, 2, 3, 4. And I know that in tweaking stuff, there is a lot of back and forth.
Another example is the Color Correctors color board. which from left to right is color, saturation, and then exposure. If I recall correctly, I think that you are supposed to adjust exposure, then color, and finally saturation. I guess arranging things in some order of use would make sense.
But per your suggestions, my keys are looking really quite good.
I am rethinking the idea that the keyed subject need to be in focus front through back. I am now thinking it might make sense to have focus fall off around subject to better blend with background, assuming background is of a softer focus. But then if you have titles, oh well, never mind.
Jonathan
Please Log in to join the conversation.

20 Jan 2016 04:44 #72397
by bobmax48
Replied by bobmax48 on topic Learning Green Screen and keying
I have had mixed results with the FCPX keyer. Most of my editing is green screen footage. I really like the Hawaiki Keyer but for some reason I am having a conflict with the plugin and some other plugin installed in FCPX. Right now I am trying to finish up 50 videos shot on green screen before I tackle the problem with the keyer. Don't get me wrong I really like the Hawaii Keyerand hope to sometime in the near future be using it again.
Please Log in to join the conversation.
- Karsten Schlüter
-
- Offline
- Moderator
-
Less
More
- Posts: 3790
- Thank you received: 718
20 Jan 2016 08:26 #72401
by Karsten Schlüter
hmm, but that is the exact order one would use it:
the two 'tools' fix automatically major issues, using some smart UI
Strength is a simple slider action to bring back detail…
Fill holes improves the mask
… and so on.
It's top/down simple/complexm asking for deeper understanding color keying...-
And concerning Color Board - that arrangement is plain historically, as far as I see it. 'Other' CC have the same order, had the same order, way before FCPX…
Some is just 'tradition', e.g. JKL could be any other key-combo, such as BNM, or for 'lefties' SDF...
Replied by Karsten Schlüter on topic Learning Green Screen and keying
Jonathan Levin wrote: …I think that part of what makes things complicated and not just in FCP, but all types of image editing apps is that the organization of all the sliders and adjusters is mostly out of order.
For example: In the Keyer you have (in this order) Refine key, Strength, Fill holes, Edge Distance, Spill Level, Invert(?), and then Color Selection, Matte Tools, Spill Suppression, and Light Wrap....
hmm, but that is the exact order one would use it:
the two 'tools' fix automatically major issues, using some smart UI
Strength is a simple slider action to bring back detail…
Fill holes improves the mask
… and so on.
It's top/down simple/complexm asking for deeper understanding color keying...-
And concerning Color Board - that arrangement is plain historically, as far as I see it. 'Other' CC have the same order, had the same order, way before FCPX…
Some is just 'tradition', e.g. JKL could be any other key-combo, such as BNM, or for 'lefties' SDF...
Please Log in to join the conversation.
20 Jan 2016 12:34 #72405
by BenB
Replied by BenB on topic Learning Green Screen and keying
Karsten is correct, that is the order you generally use the tools.
The color board on the other hand, is assbjckwards, in so many ways...
The color board on the other hand, is assbjckwards, in so many ways...
Please Log in to join the conversation.
