


3 Post Moderation Rule for New Boarders (25 Jan 2021)
New boarders will have their posts moderated - Don't worry if you cannot see your post immediately.
Stacking two Colour filters: loss of information ?

I have a question concerning color grading within FCPX.
I am finishing a project shot with a Sony A7s (internal recorder), so it's compressed 8 bits information. I shot it with a tweaked Cine2 profile.
- I first add a colour filter (HyColour Pro) to each clip, for a pre-grading, centering more or less the luma information. I make sure that no information is lost (in shadows nor highlights)
- Then I add an adjustment layer on top of the whole film that increases contrast
- Finally I give another look at my indivudals clips, re-adjusting shadows and highlights in order to avoid information again in the shadows and highlights
My concern is the following: I know that with some RAW or ProRes footage, the clips are pretty robust and can go through different layers of grading.
But with this footage, I'm not sure. Is it safe to stack different layers of grading, or do I "damage" it doing so ?
Thank you so much for your advice, I am quite a newbie in grading.
Please Log in to join the conversation.
- DmitriZigany
-

- Offline
- Platinum Member
-

- Posts: 730
- Thank you received: 26
That is the main reason I want to get an O7Q or Shogun for my FS700 to get 10bit ProRes files for heavy grading.
Please Log in to join the conversation.
My concern is that sometimes one layer might "do the opposite" of the other layer, and that's where I'm wondering if it's bad.
I'm still a newbie in color correction.
Please Log in to join the conversation.

Please Log in to join the conversation.


You can completely crush the blacks in one CC and in the next one lift the blacks again until they are back to normal. The same goes for the midtones and the highlights, the color tab adjustments and the saturation tab adjustments.
When you make extreme corrections in one CC layer, you might not be able to completely neutralize them in the second CC layer, because you can only adjust in 1% increments and this might be too course in some cases.
Of course the bit depth of your source material is the limiting factor. 10 bit footage allows for more adjustments than 8 bit footage.
Please Log in to join the conversation.
- Karsten Schlüter
-

- Offline
- Moderator
-

- Posts: 3790
- Thank you received: 718
rjvddoes wrote: ..... when you stack several grades, the total result of the added grades is the same as when you would have just one single grade doing identical corrections all in one.....
Is it so? When I plaster in a first 'correcttion' some silly effect which makes my lights clip to a straight line, and later add to tha clip an effect, which lower the lights, the 'plain white' shows detail back again?
… that's an interesting fact, I did'nt know - thanks for sharing!!
Please Log in to join the conversation.
What I described goes only for adjustments (or effects for that matter) that do not clip your video.
An adjustment in the color board won't clip your source material internally. On the other hand, there are effects that do and once that happens, you can't recover what has been clipped.
You can try this out by putting a clip in the timeline, place a duplicate on top and crop this clip halfway vertically.
Open your waveform monitor to see what is happening. It might help in some cases to reduce the waveform brightness and to set it to monochrome.
On the top clip add 2 color corrections. In CC 1 crush the blacks. In CC 2 raise the blacks and try to restore the waveform until the composite of the clip and its duplicate look like one clip again.
Try it out for all other controls in the color board. It can happen that you won't be able to neutralize your correction. The reason might be that if you lower the blacks to 2% for instance, mathematically you would have to raise the blacks in the next CC layer to an extend that might be beyond the range of the slider.
Please Log in to join the conversation.
I've made a test:
- If I stack two CC on the same clip, and crush the blacks on the first, I can indeed get them back on the second ! (but with a different percentage than just the opposite, which I don't understand)
- However, if I try to "cancel" the effect on an adjustment layer on top of the clip, it's too late, the blacks are definitely lost.
Then, I have made the same test with HyColour Pro, but in none of the cases I can "cancel" the first effect.
Can somebody try with Color Finale ?
Please Log in to join the conversation.
I think that has to do with the way the render pipeline is structured in FCPX. As long as you stay in the color board itself you can go extreme. Although you are pulling the blacks down, their negative values will be recalculated with the compensating values of the second correction in the color board.
Although the scopes show the blacks going below zero, in reality the signal is clamped at 0% on the low end and at 109% at the high end. When overlaying and adjustment layer the output of this pipeline is fed into the adjustment layer pipeline. Since it is fed a clamped signal you won't be able to recover all the information that was available in the source before the corrections in the color board were made.
Please Log in to join the conversation.
Please Log in to join the conversation.
The curves in CF are very useful because you can set as many points on the curves as you like. This makes it possible to pin your curve at certain points and only make corrections in small portions of the curve.
You can stack several layers of corrections as and change the order of the layers. This will yield different results.
By the way, the render pipeline is not only limited to the color board alone. Every effect in the Effect stack in the info panel is belonging to one pipeline. That is why the order of stacking matters in there too. An adjustment layer has its own Effects stack and therefore its own pipeline. The output of each individual pipeline is always clamped between 0 and 109. When there is an effect in the stack that clamps the signal at a lower value, as the broadcast safe filter, this lower value will be fed to the output of course.
Please Log in to join the conversation.
Please Log in to join the conversation.
Please Log in to join the conversation.
- Karsten Schlüter
-
- Offline
- Moderator
-
- Posts: 3790
- Thank you received: 718
What I described goes only for adjustments (or effects for that matter) that do not clip your video.
yeah, RJ, fully understood - I tend to overexaggerate in discussions, just to make my point clear. Although a hoobyist (=prefer to paste 'looks'), I do know, cc should be done on a per-clip-base, and should be done .. what is the word in English? with <translate> tact ... less is more ... and never clip clips ...
Anyhow: My material mostly asks for 'repair' not 'shine' :woohoo:
Thanks for explanation, esp. in words my ol' brain catches up ...
Please Log in to join the conversation.

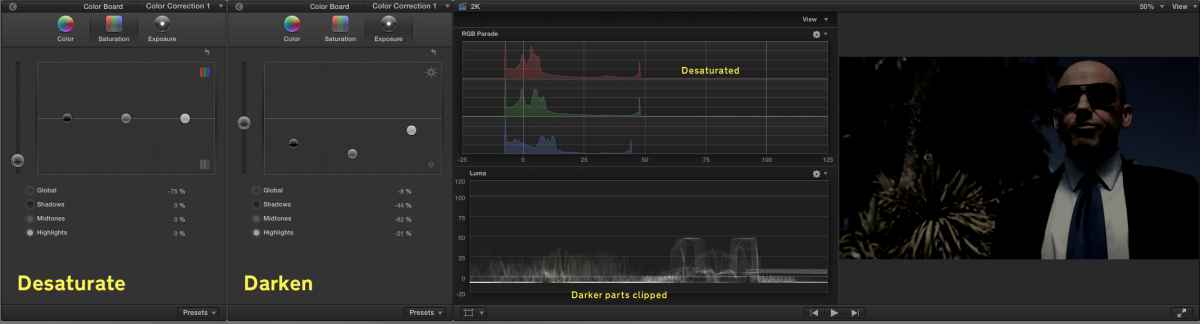
For example, here are two color corrections:
The first desaturates and darkens:
The second saturates and brightens:
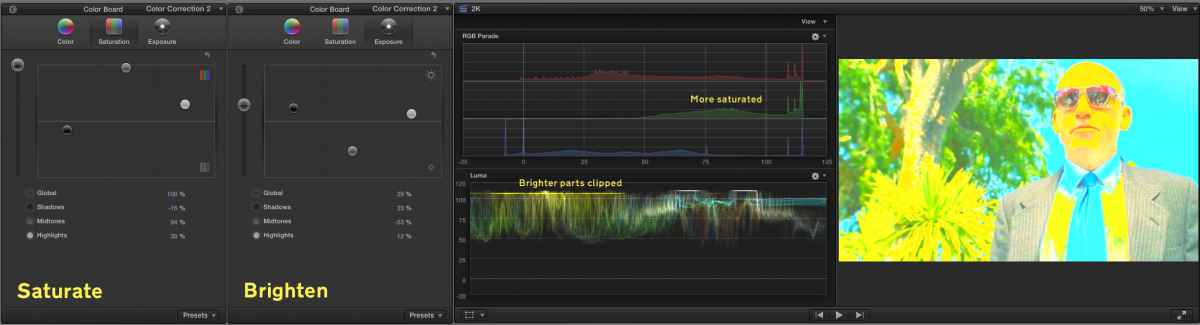
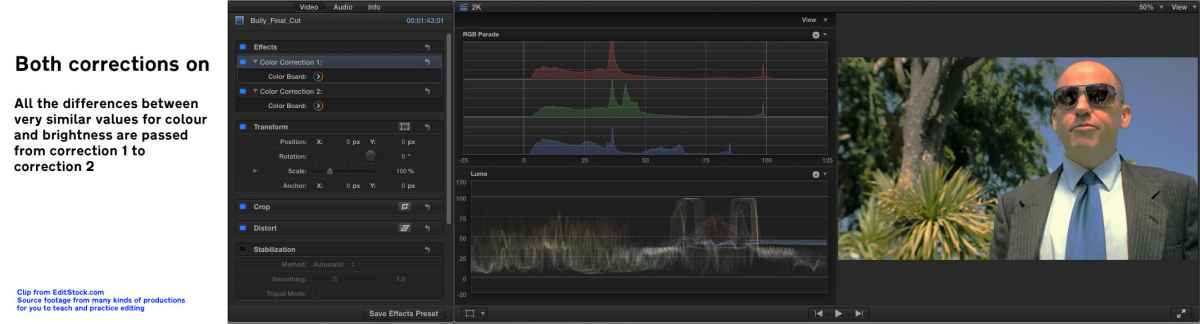
Because the precision of numbers Final Cut uses to pass information between effects can carry a lot of detail - such as the difference between 0.0011 and 0.0012 - later effects in the pipeline can take that information and find all the detail in it.
Here is the clip with both effects applied:
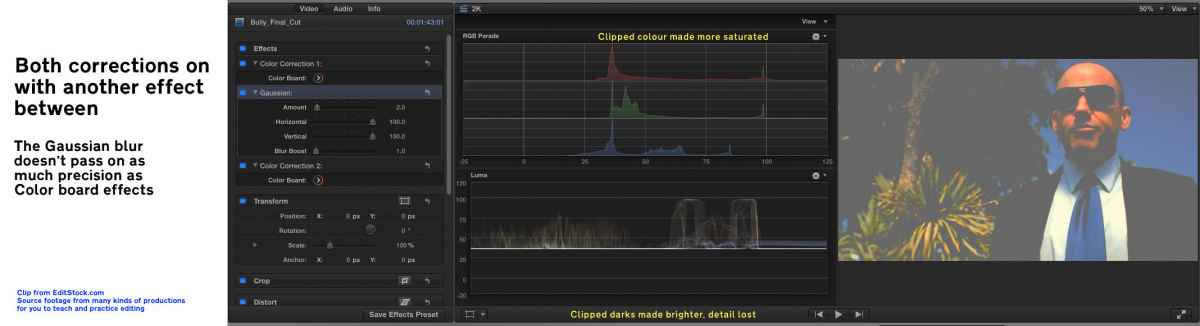
However, if you insert a filter in between, there's a chance it won't be able to pass on the detail - the two numbers above would be stored as 0.001 and 0.001, the same value.
Here is the clip with a very mild Gaussian blur applied between corrections:
Alex
Please Log in to join the conversation.
Please Log in to join the conversation.
- Karsten Schlüter
-
- Offline
- Moderator
-
- Posts: 3790
- Thank you received: 718
Alex4D "… The thing to watch out for is …" full quote
Awesome! You're a sensei, Alex!

btw: your website is fun to read and exüberant of valueable info - keep on!
Please Log in to join the conversation.
Turns out I was wrong about why it is bad to combine some effects with others. Nick Shaw pointed out on Twitter that the problem with putting the Gaussian blur effect in there was that it clips brightness and colour values to a range of 1-100 compared to a wider range for Color Board effects. Revised explanation on my blog .
TL; DR - use scopes to check what effects do to your footage.
Alex
Please Log in to join the conversation.
