


- Posts: 17
- Thank you received: 0
3 Post Moderation Rule for New Boarders (25 Jan 2021)
New boarders will have their posts moderated - Don't worry if you cannot see your post immediately.
I need help color matching... or how I learned to hate my lighting.
- PhreaKwenCi
-
 Topic Author
- Offline
- New Member
-

Less
More
02 Aug 2014 02:02 #50862
by PhreaKwenCi
I'm trying to get a color close to a scene from a tv show, I've got the clip, but Im so new to this, I don't know how to get it to match, I know where the color wheel is, but I don't have enough technical know how to do it correctly and get all my clips to match.
here's the scene I'm trying to match color and lighting too...
Remember, I'm a complete newb to editing, so please be gentle, this is my first project and I'm trying to learn on the fly. I don't really know how to tweak color, vs saturation vs exposure. and all the little details in between BUT I REALLY WANNA LEARN!!!
Thanks!
here's the scene I'm trying to match color and lighting too...
Remember, I'm a complete newb to editing, so please be gentle, this is my first project and I'm trying to learn on the fly. I don't really know how to tweak color, vs saturation vs exposure. and all the little details in between BUT I REALLY WANNA LEARN!!!
Thanks!
Please Log in to join the conversation.
- ronny courtens
-

- Offline
- Moderator
-

Less
More
- Posts: 4455
- Thank you received: 962
02 Aug 2014 02:15 #50864
by ronny courtens
Replied by ronny courtens on topic I need help color matching... or how I learned to hate my lighting.
Ouch, you are facing a huge learning curve here. Getting this kind of result requires a good knowledge of color grading. And there is no standard advice we can give because everything depends on how your original video looks and on the quality of your footage.
If all your shots have been recorded the same way the good news is that you will only need to color correct one shot and you can paste the correction onto the others. But even then you might need to make minor adjustments to some shots to make them match.
Can you post a screenshot of one of your clips? Maybe we can give you some basic hints to get you started, based on the specific video you have shot.
- Ronny
If all your shots have been recorded the same way the good news is that you will only need to color correct one shot and you can paste the correction onto the others. But even then you might need to make minor adjustments to some shots to make them match.
Can you post a screenshot of one of your clips? Maybe we can give you some basic hints to get you started, based on the specific video you have shot.
- Ronny
Please Log in to join the conversation.
- PhreaKwenCi
-
Topic Author
- Offline
- New Member
-
Less
More
- Posts: 17
- Thank you received: 0
02 Aug 2014 03:18 - 02 Aug 2014 03:22 #50865
by PhreaKwenCi
Replied by PhreaKwenCi on topic I need help color matching... or how I learned to hate my lighting.
Yes, I can post a link to my rough cut on vimeo. Would that do? it's very rough. Still need to audio sync, clean up and of course color correct and effects. I'm still making some choices with the editing, but it's for a friends class project.
Here's the link:
vimeo.com/102382253
password is: newbie
I realize theres a big learning curve, but goonies never say die. If I can beat cancer, I can learn how to do this.
Here's the link:
vimeo.com/102382253
password is: newbie
I realize theres a big learning curve, but goonies never say die. If I can beat cancer, I can learn how to do this.
Last edit: 02 Aug 2014 03:22 by PhreaKwenCi.
Please Log in to join the conversation.
- ronny courtens
-
- Offline
- Moderator
-
Less
More
- Posts: 4455
- Thank you received: 962
02 Aug 2014 10:03 - 02 Aug 2014 10:05 #50871
by ronny courtens
Replied by ronny courtens on topic I need help color matching... or how I learned to hate my lighting.
Hey Jan-David,
In spite of the lighting inconsistencies in some of the shots your footage is not too hard to correct as the image quality is quite decent.
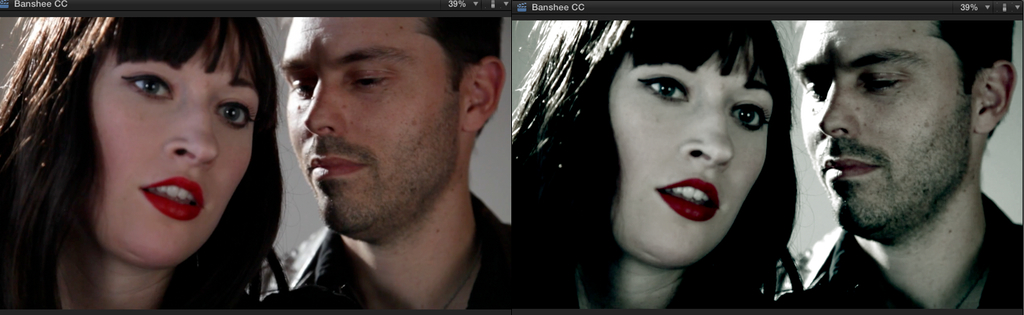
Here's a primary correction (no secondary corrections used) I did on the dominant scenes in the edit (before/after):
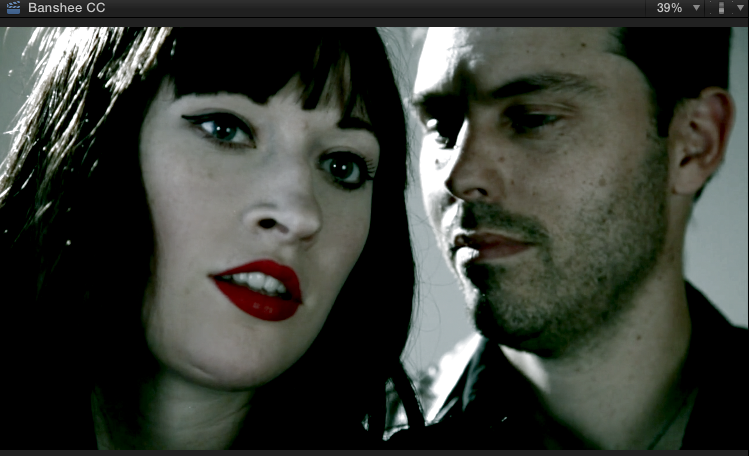
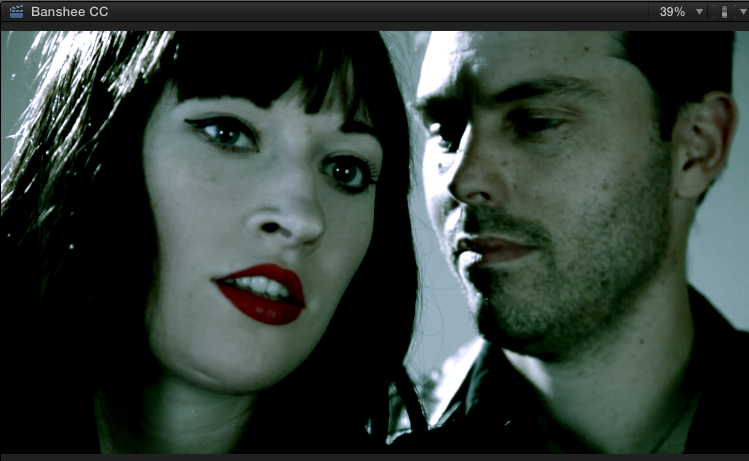
From here you can easily tweak as you wish, pushing or subtracting green or blue in the mid tones or highlights:
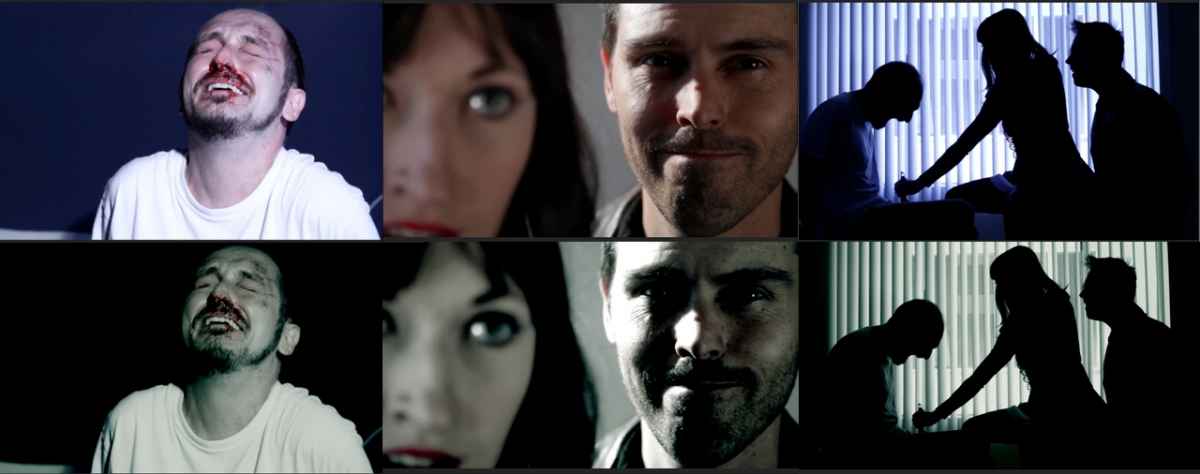
Of course you will need to do separate corrections for the couple of scenes that are much brighter or have more blue to match them up with the average scenes (up = before, down = after):
These examples are quite rough, I did them in 10 minutes. But if this comes close to what you are looking for, post back and I will explain you how to achieve this yourself using only the FCP X color board.
- Ronny
In spite of the lighting inconsistencies in some of the shots your footage is not too hard to correct as the image quality is quite decent.
Here's a primary correction (no secondary corrections used) I did on the dominant scenes in the edit (before/after):
From here you can easily tweak as you wish, pushing or subtracting green or blue in the mid tones or highlights:
Of course you will need to do separate corrections for the couple of scenes that are much brighter or have more blue to match them up with the average scenes (up = before, down = after):
These examples are quite rough, I did them in 10 minutes. But if this comes close to what you are looking for, post back and I will explain you how to achieve this yourself using only the FCP X color board.
- Ronny
Last edit: 02 Aug 2014 10:05 by ronny courtens.
Please Log in to join the conversation.
- PhreaKwenCi
-
Topic Author
- Offline
- New Member
-
Less
More
- Posts: 17
- Thank you received: 0
02 Aug 2014 18:48 - 02 Aug 2014 18:50 #50893
by PhreaKwenCi
Replied by PhreaKwenCi on topic I need help color matching... or how I learned to hate my lighting.
Man, Ronny! That's awesome!!! Yes, I'd love that! Thank you so much!!
Also, as you noticed the lighting is different, because we actually had to do reshoots (The shots of the actor being beat up, the leg stab and at the end when you see the actress stabs his leg again are all from one day) we had to do reshoots for various reasons (booms in shot, blurred shots, Close ups being unusable or forgotten) and the same DP wasn't available so we had to shoot with a different one. In your honest opinion, is it too stark a difference? does it feel like you're watching too different scenes cut together? or does it still play?
This is my nightmare thought. that it just doesn't play.... ugh..
Also, as you noticed the lighting is different, because we actually had to do reshoots (The shots of the actor being beat up, the leg stab and at the end when you see the actress stabs his leg again are all from one day) we had to do reshoots for various reasons (booms in shot, blurred shots, Close ups being unusable or forgotten) and the same DP wasn't available so we had to shoot with a different one. In your honest opinion, is it too stark a difference? does it feel like you're watching too different scenes cut together? or does it still play?
This is my nightmare thought. that it just doesn't play.... ugh..
Last edit: 02 Aug 2014 18:50 by PhreaKwenCi.
Please Log in to join the conversation.
- PhreaKwenCi
-
Topic Author
- Offline
- New Member
-
Less
More
- Posts: 17
- Thank you received: 0
02 Aug 2014 22:37 #50896
by PhreaKwenCi
Replied by PhreaKwenCi on topic I need help color matching... or how I learned to hate my lighting.
I played around with color correction for the last 3 hours... this is what I got:
vimeo.com/102422617
password is the same as the previous.
vimeo.com/102422617
password is the same as the previous.
Please Log in to join the conversation.
- ronny courtens
-
- Offline
- Moderator
-
Less
More
- Posts: 4455
- Thank you received: 962
03 Aug 2014 09:56 #50902
by ronny courtens
Replied by ronny courtens on topic I need help color matching... or how I learned to hate my lighting.
Hi Jan-David,
I had a look at your video. The overall shots are good, I see you have abandoned the idea of making the video look like the video you had posted. Your shots are less intensive and more blue-ish. If that's what you are looking for, it's okay.
But you will have to better match the overall shots with the shots of the actor being hit and the backlight shots of the stabbing. These have much more contrast in them and their tint has much more blue in it than the overall shots. So either you match them to the overall shots by lowering the highlights in Exposure, or you match he overall shots to the hit and stab shots by upping the highlights of the overall shots in Exposure. You have plenty of headroom on the scopes to do this. The first option will slightly wash out the hit and stab shots, the second option will add more pouch to the overall shots.
To make the edit play well it will be very important to make the hit and stab shots less blue. They have been recorded with more contrast and more blue light than the overall shots, this has to be compensated. As it is now there is too much difference to make the scenes match.
I have to go now, but I will come back tonight (Belgian time) to show you some screenshots of color board settings that can get you started.
- Ronny
I had a look at your video. The overall shots are good, I see you have abandoned the idea of making the video look like the video you had posted. Your shots are less intensive and more blue-ish. If that's what you are looking for, it's okay.
But you will have to better match the overall shots with the shots of the actor being hit and the backlight shots of the stabbing. These have much more contrast in them and their tint has much more blue in it than the overall shots. So either you match them to the overall shots by lowering the highlights in Exposure, or you match he overall shots to the hit and stab shots by upping the highlights of the overall shots in Exposure. You have plenty of headroom on the scopes to do this. The first option will slightly wash out the hit and stab shots, the second option will add more pouch to the overall shots.
To make the edit play well it will be very important to make the hit and stab shots less blue. They have been recorded with more contrast and more blue light than the overall shots, this has to be compensated. As it is now there is too much difference to make the scenes match.
I have to go now, but I will come back tonight (Belgian time) to show you some screenshots of color board settings that can get you started.
- Ronny
Please Log in to join the conversation.
- Squamish ed
-
- Offline
- Elite Member
-

Less
More
- Posts: 238
- Thank you received: 20
03 Aug 2014 18:53 #50912
by Squamish ed
Ed
Replied by Squamish ed on topic I need help color matching... or how I learned to hate my lighting.
Have you looked at these free colour grading tutorials from Denver Riddle?
www.fcp.co/final-cut-pro/tutorials/477-a...-grading-within-fcpx
They offer a good overview of the process. Hope these add a bit to your knowledge - they were really useful for me. I'm a neophyte too and am also benefitting from the help Ronny is giving you. Go Ronny!
They offer a good overview of the process. Hope these add a bit to your knowledge - they were really useful for me. I'm a neophyte too and am also benefitting from the help Ronny is giving you. Go Ronny!
Ed
Please Log in to join the conversation.
- PhreaKwenCi
-
Topic Author
- Offline
- New Member
-
Less
More
- Posts: 17
- Thank you received: 0
03 Aug 2014 21:07 #50914
by PhreaKwenCi
Replied by PhreaKwenCi on topic I need help color matching... or how I learned to hate my lighting.
I was trying to match the exact color in the posted video from Banshee, I thought I was close, apparently I'm not. It seems almost a blue green color.
Thanks Ronny, I allowed for the 2nd & 3rd video to be Downloaded off of vimeo so you can edit it.
Also if you'd like to see the clip from the show I'm basing the color off of, I can post a link on dropbox to that.
Yeah, I'd love to get the green up more in the blue tinted scenes. What do you mean by the 2nd option will have more pouch?
I'd love your help, you've been amazing!!
Also thanks Squamish! I'm looking into that right now!
Thanks Ronny, I allowed for the 2nd & 3rd video to be Downloaded off of vimeo so you can edit it.
Also if you'd like to see the clip from the show I'm basing the color off of, I can post a link on dropbox to that.
Yeah, I'd love to get the green up more in the blue tinted scenes. What do you mean by the 2nd option will have more pouch?
I'd love your help, you've been amazing!!
Also thanks Squamish! I'm looking into that right now!
Please Log in to join the conversation.
- ronny courtens
-
- Offline
- Moderator
-
Less
More
- Posts: 4455
- Thank you received: 962
04 Aug 2014 19:27 #50965
by ronny courtens
Replied by ronny courtens on topic I need help color matching... or how I learned to hate my lighting.
Yes it's a very good idea to watch these tutorials, you will learn a lot about color correction in general and how to use the tools in FCP X. I have downloaded your video but I'm very busy right now. I will get up early in the morning to post my color settings for your clips and give you some advice on how to use these settings to achieve what you want. Sorry for the delay.
- Ronny
- Ronny
Please Log in to join the conversation.
- PhreaKwenCi
-
Topic Author
- Offline
- New Member
-
Less
More
- Posts: 17
- Thank you received: 0
05 Aug 2014 04:34 #50979
by PhreaKwenCi
Replied by PhreaKwenCi on topic I need help color matching... or how I learned to hate my lighting.
No problem, I appreciate your help, I'm working on syncing audio in the mean time 
Please Log in to join the conversation.
- ronny courtens
-
- Offline
- Moderator
-
Less
More
- Posts: 4455
- Thank you received: 962
05 Aug 2014 11:42 - 05 Aug 2014 14:46 #50983
by ronny courtens
Replied by ronny courtens on topic I need help color matching... or how I learned to hate my lighting.
Okay, here we go.
As we said before you have some takes that have been shot with different lighting (and I guess also a different camera) than the dominant takes in your edit.
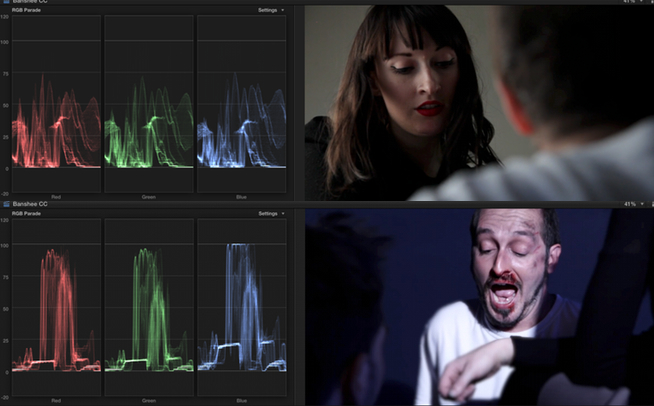
These takes all belong to the same scene as the dominant takes and they will have to match up with them. So we will have to create different gradings for these particular shots.
1. The dominant shots (the interrogators)
I have taken a scene with shadows, highlights and skin tones from your Youtube movie and have put it in the FCP X Event Viewer against your clips on the timeline as a reference for the grades. Your dominant shots were well lit and have balanced colors, so we will not need to do much with these except create the green harsh mood.
This is relatively easy.
- Always start with Exposure and slightly lower the Midtones to create the harsh mood, then lower the Shadows a little to add some darkness to the scene.
- Then go to the Color tab and add some green to the Highlights and a tone of blue to the Midtones and Shadows.
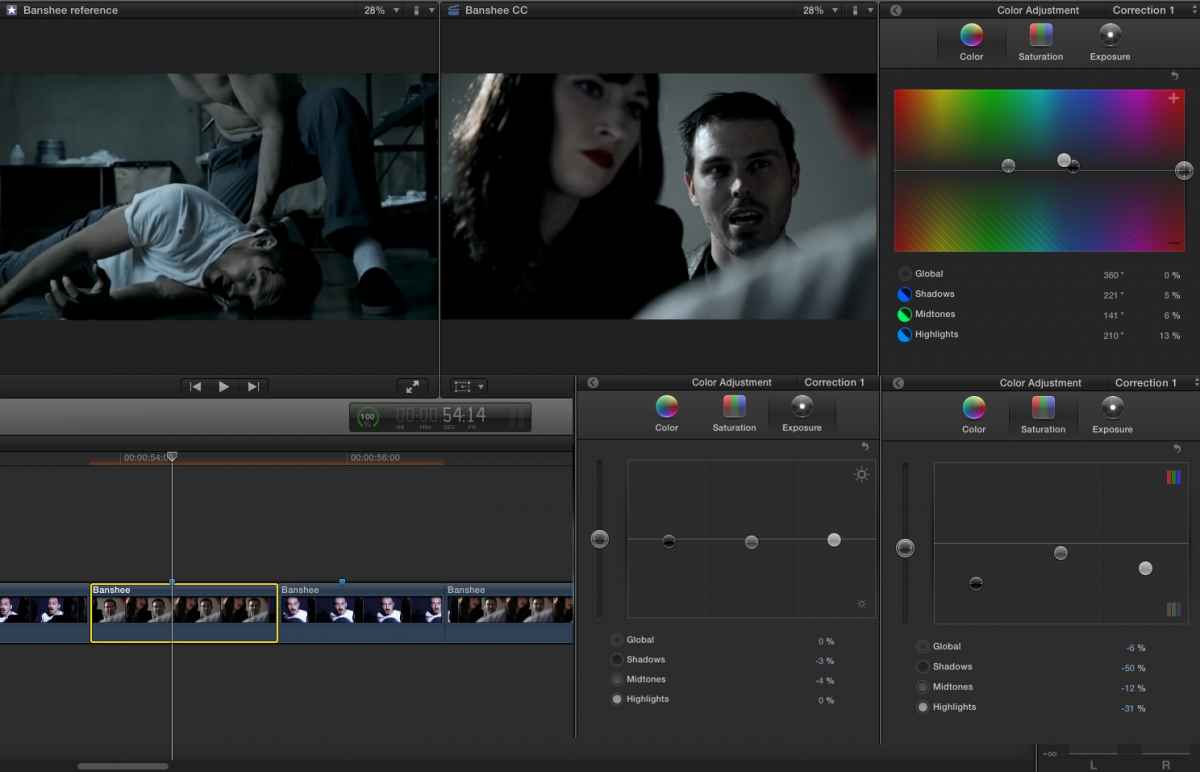
- Finally the most important correction for this kind of mood: Saturation. Do a Global desaturation of 6%, then drop the Shadows to 50% to achieve the greenish/blue balance in the dark parts of the clip. Then lower the Highlights (taking green out of the lightest areas) and the Midtones (taking blue out of the skin tone).
This is the result, with all the settings in detail:
2. The victim shots
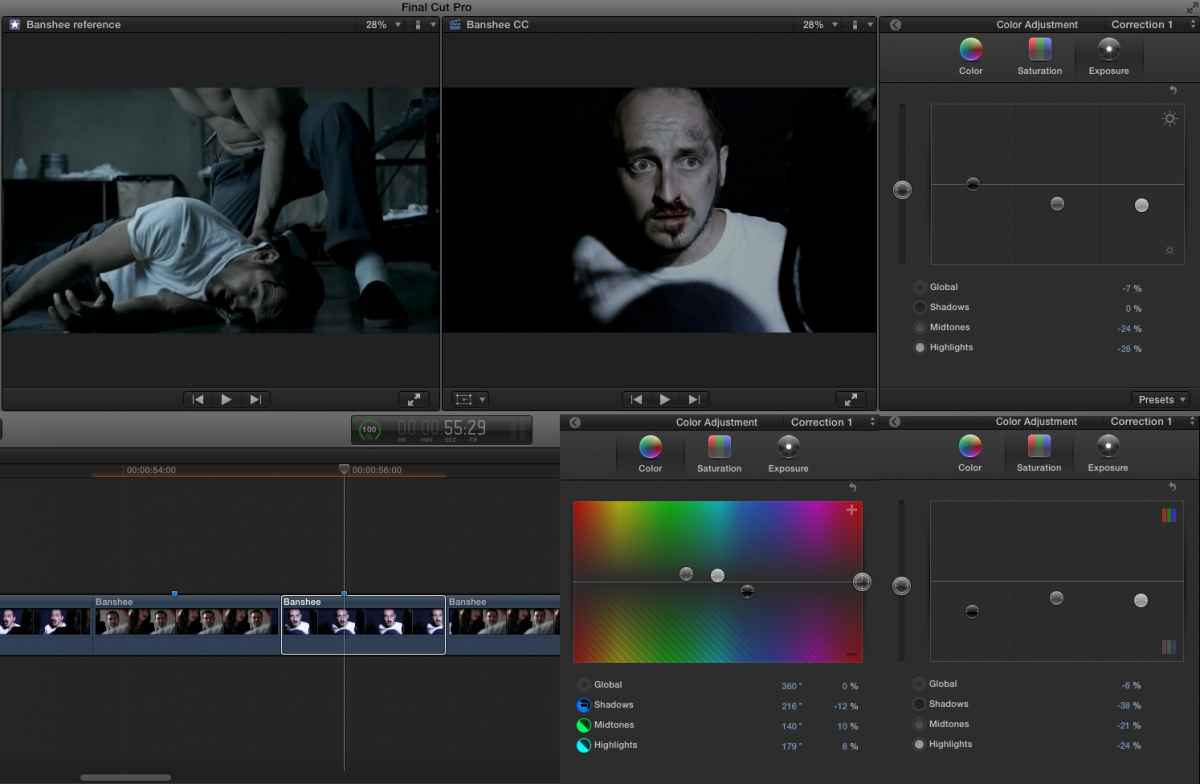
These have been recorded with too much blue light and the Highlights are over-exposed, so we will have to apply a different grade to these shots to match them with the other ones. Copy-paste the previous correction onto a victim clip, then make the following adjustments:
3. The establishing shot.
This will require a secondary correction. The establishing shot was much lighter than the medium and close shots, due to the light falling in from the window. If you apply the same correction as the dominant shots (correction 1) this is what you get:
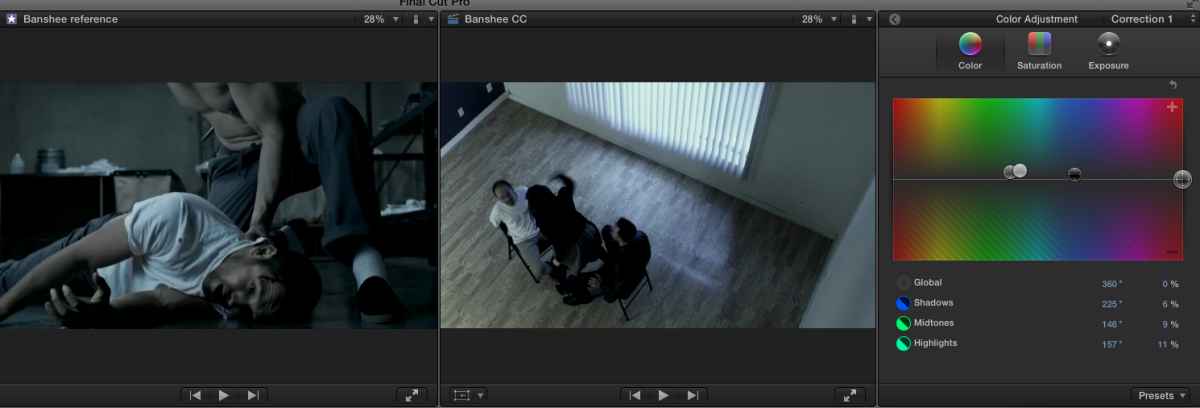
Not too bad in fact, but we should make the room darker to preserve the grim mood of the trailer. If we make the overall shot darker the actors will be too much in the dark and the focus on the actors will get lost. So next to the first correction that we copied from our interrogator shot we will add a second correction and use a mask to separately correct the room and the actors.
To add a second correction press the + button in the Color inspector. A new correction (Correction 2) will be added. In Correction 2 press the Add Mask button. This will add a mask OSC on top of the video. Drag on the inner and outer circles of the max until your mask covers the actors like this:
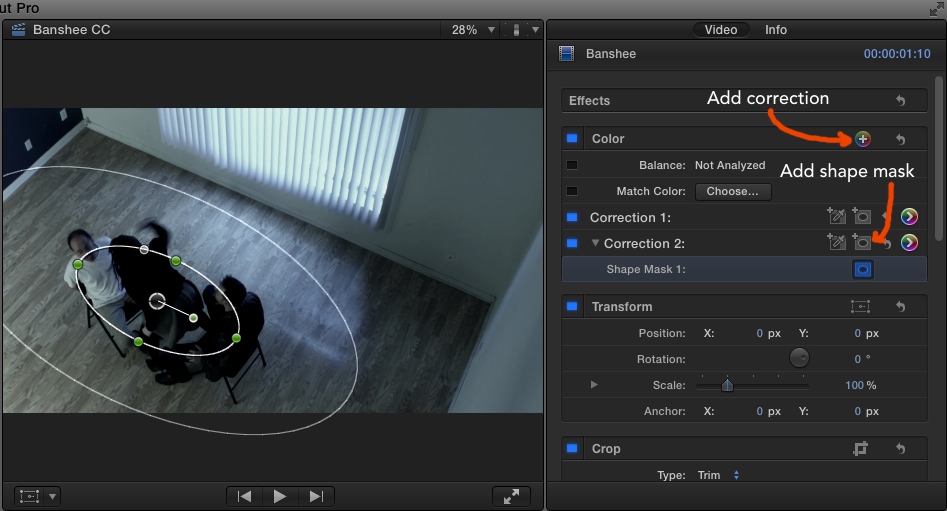
Now press the > button next to Correction 2 to go open the Color Correction tools. As we only need to create a darker mood we will only use the Exposure parameters.
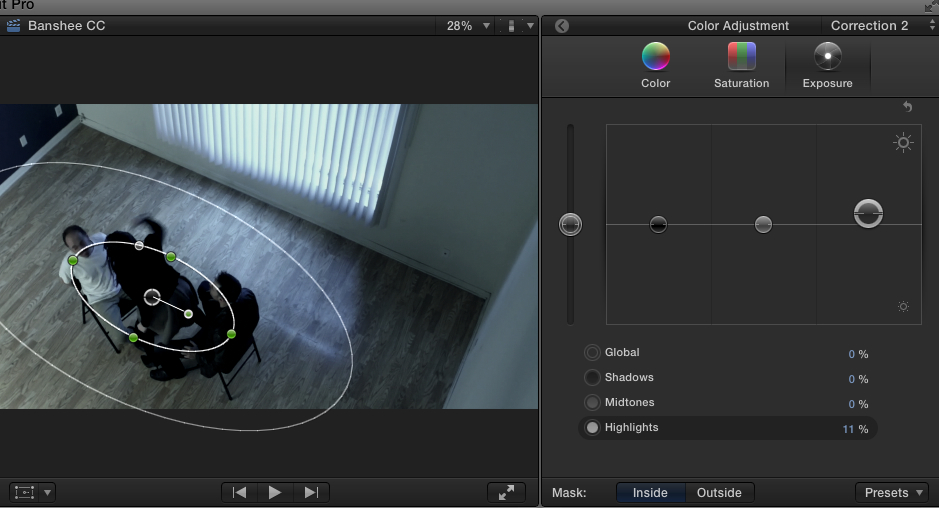
Click on the Inside button next to "Mask" so the correction only affects what is inside the mask. Then push the Highlights to 11%
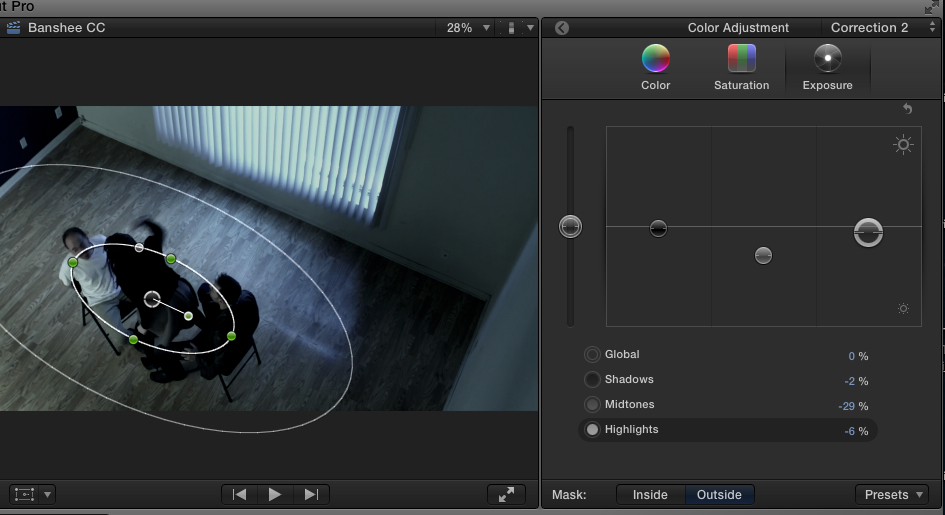
Now we are going to deal with the outside of the mask, so click the Outside button. Then adjust the Exposure for the room like this:
Now you get a much better overall balance with a darkened room while the actors still get all the focus:
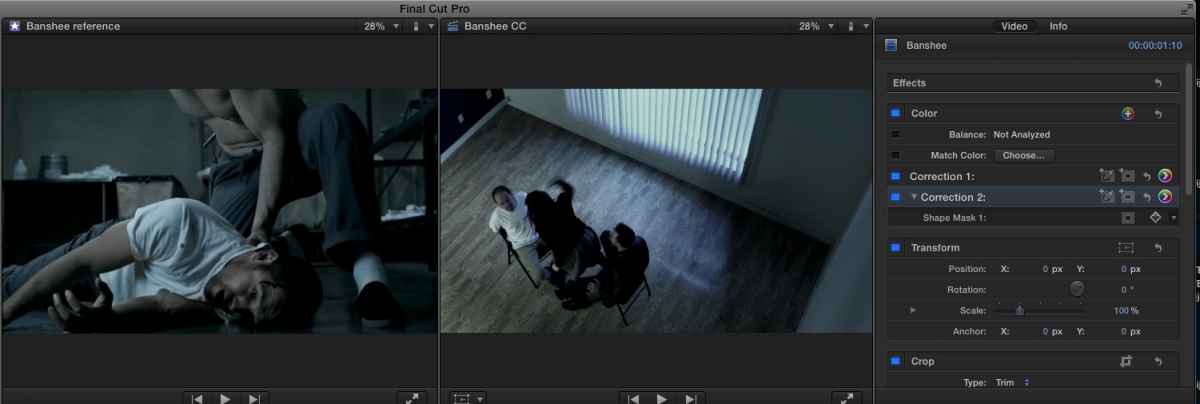
The difference is not that obvious here due to the compression of the screenshots, but on my monitor the corrections makes a clear difference. If you want to further darken the room just remember to do your Exposure corrections in the Outside of the mask.
I hope these settings will give you a good idea of how to start grading your shots. Once you have graded a clip you can apply the same correction to all similar clips on the timeline. However be aware of the fact that you still may need to make subtle adjustments for every single clip. The slightest changes inside a clip (a person moving into the shadow) will also affect the grade. When you make adjustments always start with Exposure, then Color, then Saturation. I have graded the first minute of your trailer and I only have needed to make a few extra adjustments to better match some clips with the preceding or following ones.
If you have any problems or questions, post back. I will be out of the country until Friday, but I will check the forum whenever I have the time.
- Ronny
As we said before you have some takes that have been shot with different lighting (and I guess also a different camera) than the dominant takes in your edit.
These takes all belong to the same scene as the dominant takes and they will have to match up with them. So we will have to create different gradings for these particular shots.
1. The dominant shots (the interrogators)
I have taken a scene with shadows, highlights and skin tones from your Youtube movie and have put it in the FCP X Event Viewer against your clips on the timeline as a reference for the grades. Your dominant shots were well lit and have balanced colors, so we will not need to do much with these except create the green harsh mood.
This is relatively easy.
- Always start with Exposure and slightly lower the Midtones to create the harsh mood, then lower the Shadows a little to add some darkness to the scene.
- Then go to the Color tab and add some green to the Highlights and a tone of blue to the Midtones and Shadows.
- Finally the most important correction for this kind of mood: Saturation. Do a Global desaturation of 6%, then drop the Shadows to 50% to achieve the greenish/blue balance in the dark parts of the clip. Then lower the Highlights (taking green out of the lightest areas) and the Midtones (taking blue out of the skin tone).
This is the result, with all the settings in detail:
2. The victim shots
These have been recorded with too much blue light and the Highlights are over-exposed, so we will have to apply a different grade to these shots to match them with the other ones. Copy-paste the previous correction onto a victim clip, then make the following adjustments:
3. The establishing shot.
This will require a secondary correction. The establishing shot was much lighter than the medium and close shots, due to the light falling in from the window. If you apply the same correction as the dominant shots (correction 1) this is what you get:
Not too bad in fact, but we should make the room darker to preserve the grim mood of the trailer. If we make the overall shot darker the actors will be too much in the dark and the focus on the actors will get lost. So next to the first correction that we copied from our interrogator shot we will add a second correction and use a mask to separately correct the room and the actors.
To add a second correction press the + button in the Color inspector. A new correction (Correction 2) will be added. In Correction 2 press the Add Mask button. This will add a mask OSC on top of the video. Drag on the inner and outer circles of the max until your mask covers the actors like this:
Now press the > button next to Correction 2 to go open the Color Correction tools. As we only need to create a darker mood we will only use the Exposure parameters.
Click on the Inside button next to "Mask" so the correction only affects what is inside the mask. Then push the Highlights to 11%
Now we are going to deal with the outside of the mask, so click the Outside button. Then adjust the Exposure for the room like this:
Now you get a much better overall balance with a darkened room while the actors still get all the focus:
The difference is not that obvious here due to the compression of the screenshots, but on my monitor the corrections makes a clear difference. If you want to further darken the room just remember to do your Exposure corrections in the Outside of the mask.
I hope these settings will give you a good idea of how to start grading your shots. Once you have graded a clip you can apply the same correction to all similar clips on the timeline. However be aware of the fact that you still may need to make subtle adjustments for every single clip. The slightest changes inside a clip (a person moving into the shadow) will also affect the grade. When you make adjustments always start with Exposure, then Color, then Saturation. I have graded the first minute of your trailer and I only have needed to make a few extra adjustments to better match some clips with the preceding or following ones.
If you have any problems or questions, post back. I will be out of the country until Friday, but I will check the forum whenever I have the time.
- Ronny
Last edit: 05 Aug 2014 14:46 by ronny courtens.
Please Log in to join the conversation.

05 Aug 2014 17:15 #50991
by BenB
Replied by BenB on topic I need help color matching... or how I learned to hate my lighting.
Just to throw it out there, but a very comprehensive, and in-depth professional resource for learning color grading/correction is the Color Correction Handbook, by Alexis Van Hurkman.
Please Log in to join the conversation.
- PhreaKwenCi
-
Topic Author
- Offline
- New Member
-
Less
More
- Posts: 17
- Thank you received: 0
06 Aug 2014 05:24 #51008
by PhreaKwenCi
Replied by PhreaKwenCi on topic I need help color matching... or how I learned to hate my lighting.
YOU ARE AWESOME. I BOW TO YOUR GREATNESS!
Seriously, I expected some helpful stuff, but you Sir, have just taught me more in this post, then all the lynda training and color correction tutorials I've been reading all week long.
If you're ever in LA, I'm buying you the biggest drink I can find.
Seriously, I expected some helpful stuff, but you Sir, have just taught me more in this post, then all the lynda training and color correction tutorials I've been reading all week long.
If you're ever in LA, I'm buying you the biggest drink I can find.
Please Log in to join the conversation.
- PhreaKwenCi
-
Topic Author
- Offline
- New Member
-
Less
More
- Posts: 17
- Thank you received: 0
06 Aug 2014 08:26 - 06 Aug 2014 08:30 #51012
by PhreaKwenCi
Replied by PhreaKwenCi on topic I need help color matching... or how I learned to hate my lighting.
Ok, on the victim clips, my concern is that they look really dark compared to the interrogator clips. I love the color, so I'm trying to determine the correct way to brighten them so they're not as drastically dark. What's the best way to do that and keep color continuity?
And for the MCU of the girl whose punching and above the victim, I think I need to bring the brightness down on her so that it matches the guy, but again I don't want to lose color and mood continuity.
I'm in love with how it's looking, I can't tell you how excited I am and I'll be amazingly happy when I can post it for you to see!
And for the MCU of the girl whose punching and above the victim, I think I need to bring the brightness down on her so that it matches the guy, but again I don't want to lose color and mood continuity.
I'm in love with how it's looking, I can't tell you how excited I am and I'll be amazingly happy when I can post it for you to see!
Last edit: 06 Aug 2014 08:30 by PhreaKwenCi.
Please Log in to join the conversation.
- PhreaKwenCi
-
Topic Author
- Offline
- New Member
-
Less
More
- Posts: 17
- Thank you received: 0
17 Oct 2014 01:43 #54260
by PhreaKwenCi
Replied by PhreaKwenCi on topic I need help color matching... or how I learned to hate my lighting.
Wanted to share this with you folks and especially with you Ronny. Thanks again for all your help!
vimeo.com/m/106470569
Let me know what you think!
vimeo.com/m/106470569
Let me know what you think!
Please Log in to join the conversation.
- ronny courtens
-
- Offline
- Moderator
-
Less
More
- Posts: 4455
- Thank you received: 962
17 Oct 2014 01:56 #54262
by ronny courtens
Replied by ronny courtens on topic I need help color matching... or how I learned to hate my lighting.
Well, I'm impressed. You have matched the shots very well and the color continuity is preserved in spite of the very different colors on the original footage. Well done.
- Ronny
- Ronny
Please Log in to join the conversation.
