


- Posts: 63
- Thank you received: 0
3 Post Moderation Rule for New Boarders (25 Jan 2021)
New boarders will have their posts moderated - Don't worry if you cannot see your post immediately.
Audio muted, but audio still sounds in generated master file
17 May 2013 18:14 #25949
by Dinky
Hi all,
I am playing around with FCP X trial and imported an iMovie project to see what FCP X makes of it. Apart from a couple of crashes because of content FCP could not locate, that did not go too bad. Except for one thing, which I don't think has anything to do with the import from iMovie: when I mute the audio in my clips and generate a master file, the resulting file has the audio NOT muted. Playing the video inside FCP gives the expected result (no audio), but the export for some reason ignores the muting
Does anybody know hoe to fix this ?
I am playing around with FCP X trial and imported an iMovie project to see what FCP X makes of it. Apart from a couple of crashes because of content FCP could not locate, that did not go too bad. Except for one thing, which I don't think has anything to do with the import from iMovie: when I mute the audio in my clips and generate a master file, the resulting file has the audio NOT muted. Playing the video inside FCP gives the expected result (no audio), but the export for some reason ignores the muting
Does anybody know hoe to fix this ?
Please Log in to join the conversation.

17 May 2013 19:51 #25952
by Dawar
Replied by Dawar on topic Audio muted, but audio still sounds in generated master file
If you mute by deselecting audio roles, this will not affect your exported file. It affects only monitoring.
To properly mute audio, disable audio channels in the inspector, or disable audio clips by hitting V.
To properly mute audio, disable audio channels in the inspector, or disable audio clips by hitting V.
Please Log in to join the conversation.

17 May 2013 20:03 #25956
by BenB
Replied by BenB on topic Audio muted, but audio still sounds in generated master file
You can, during export, specify to include or not include specific roles, too.
If you use the "V" shortcut to mute a clip in a Timeline, a standard export will not include it, it is muted in the export.
If you use the "V" shortcut to mute a clip in a Timeline, a standard export will not include it, it is muted in the export.
Please Log in to join the conversation.
18 May 2013 15:28 #25973
by Dinky
Replied by Dinky on topic Audio muted, but audio still sounds in generated master file
Thanks for your responses, however they do not answer my question. I DO want audio, but only in the clips I designate. Anyway, there appears to be a problem when importing iMovie projects into FCPX. Initially it looks like the clips that have muted audio in iMovie also have their audio muted after import (as it should), however, not all seems what it looks like.... I noticed this when I had terminated FCPX and started it up again. Now for some reason all clips had normal audio, even the ones that had muted audio earlier ???!!!! So I had to set the volume to zero again. This time the generated master file was generated correctly.
FCPX has more of these weird things. For example, a fully rendered project (even shared as a master file) will sometimes start re-rendering when opened a next time. It looks like for some reason saving of projects in FCPX is not saving all information.
FCPX has more of these weird things. For example, a fully rendered project (even shared as a master file) will sometimes start re-rendering when opened a next time. It looks like for some reason saving of projects in FCPX is not saving all information.
Please Log in to join the conversation.
- derrek_clay
-

- Offline
- New Member
-

Less
More
- Posts: 1
- Thank you received: 0
04 Nov 2014 10:08 #55472
by derrek_clay
Replied by derrek_clay on topic Audio muted, but audio still sounds in generated master file
I have a fix - or rather, a workaround.
WARNING: It is lengthy, but still far better than starting a new project from scratch.
I had this same issue and none of my transitions/clips were at custom speeds, nor did I have anything else weird going on. Unfortunately there is nothing you can do within iMovie to fix this, at least there wasn't for me. iMovie is BY FAR the buggiest software I have ever used and if you haven't already spent hours slaving away on a project, you are so much better off using just about anything else to edit your video.
...But let's assume you have already spent many hours working on your project and you don't want to start all over. Well then, you have at least one option.
It's a pain in the neck, but it's infinitely better than restarting your project from scratch.
This will require:
A software called Soundflower (which is free) and some kind of audio editing software (I use Logic, but really any should work).
1.) You're going to need to export your video with the messed up audio. Typically if you're audio is messing up, you're video is at least usually working just fine (at least it always does for me).
2.) You're going to need to open that video in your audio software and import only the audio. If your software doesn't give you this option, then you're going to need to record the audio from your video using the audio software and Soundflower. You can find tutorials on how to do this, but it's honestly pretty straightforward once you start playing around with you Mac's audio I/O settings. Remember to have your computer's volume all the way up when doing this.
3.) Watch/listen to your video and make notes of where the audio errors occur. I HIGHLY RECOMMEND writing down times too, as they will be extremely helpful later.
4.) Now were going to rip some working audio from the iMovie project itself. Go back into your iMovie project and only play back audio while in the edit window for this step. Do NOT play your project back in full screen.
This part is key: if you try to play back your project from the beginning the audio will usually still mess up. So, what you're gonna have to do is go back on your edit window timeline right before these errors occur and play that specific clip back while recording this working audio with Soundflower and your audio software. Essentially we're only recording the parts of the audio where these errors occur, so try to do this in order if you can. Try to leave several seconds of audio in before the error - that way we can use it as reference when we construct our new audio track.
5.) Now in your audio software you should have your original error-filled audio track and the new clips that we just captured. This part can be painstaking if you're not familiar with audio editing softwares, but as you'll learn, it's really not that hard.
You're going to look at your original audio track and compare it to your new working audio clips. You should be able to notice where those new clips are supposed to go by looking at the identical (or close to identical) waveform shapes in your original audio track. The two should correspond with one another. If you don't understand what I mean right now, you will when you start playing around with the audio. This is why marking times is very important.
Take your new clips and split them up if you haven't already, that way you can drag them around and edit them separately from one another. Essentially your going to line these new clips up with original and then replace the original parts with new ones.
We need to get this as precise as possible, so start off by getting them as close as you can with your naked eye, and then use a zoom tool to zoom in as much as possible so that you can get them lined up PERFECTLY, or at least extremely close. In some softwares you can just drag these new clips on top of the old track, but most of the time you will need to actually cut out the old piece and replace it with the new one. In doing this, zoom in and make sure that you are NOT cutting out a bigger space than your new clip will fill - otherwise you will have small gaps in your audio.
VERY IMPORTANT: Also make sure that this new audio track starts at the EXACT SAME time as your original - otherwise your new audio will be out of sync.
I know this part can really suck if you're not used to audio editing, but at this point, there is little other choice.
6.) Once you are done with this, export your newly pieced together audio track.
7.) Now open iMovie and create a NEW project. Re-import the video that you exported earlier that has the messed up audio. This might take a while, so just be patient.
8.) Then right click the clip and select "Detach Audio". This will do just that - allowing you to edit the audio separately from the video. Now delete this audio.
9.) Now, import the new, perfect audio track that we just made and make sure that it starts at the start of the project. Make sure it's in sync and that everything works.
Now just export your new video with the working audio and you should be done. Since we have given iMovie the audio with no editing actually being done in iMovie, it does not have to generate its own audio now and you should have absolutely no errors now - unless there is some that you forgot to take out earlier.
YOU'RE FINALLY DONE!!!
I know this entire process sucks, but if you're that far into your project, there is little else that you can do. Now you've learned your lesson:
DON'T USE IMOVIE EVER AGAIN.
I hope this helped!
WARNING: It is lengthy, but still far better than starting a new project from scratch.
I had this same issue and none of my transitions/clips were at custom speeds, nor did I have anything else weird going on. Unfortunately there is nothing you can do within iMovie to fix this, at least there wasn't for me. iMovie is BY FAR the buggiest software I have ever used and if you haven't already spent hours slaving away on a project, you are so much better off using just about anything else to edit your video.
...But let's assume you have already spent many hours working on your project and you don't want to start all over. Well then, you have at least one option.
It's a pain in the neck, but it's infinitely better than restarting your project from scratch.
This will require:
A software called Soundflower (which is free) and some kind of audio editing software (I use Logic, but really any should work).
1.) You're going to need to export your video with the messed up audio. Typically if you're audio is messing up, you're video is at least usually working just fine (at least it always does for me).
2.) You're going to need to open that video in your audio software and import only the audio. If your software doesn't give you this option, then you're going to need to record the audio from your video using the audio software and Soundflower. You can find tutorials on how to do this, but it's honestly pretty straightforward once you start playing around with you Mac's audio I/O settings. Remember to have your computer's volume all the way up when doing this.
3.) Watch/listen to your video and make notes of where the audio errors occur. I HIGHLY RECOMMEND writing down times too, as they will be extremely helpful later.
4.) Now were going to rip some working audio from the iMovie project itself. Go back into your iMovie project and only play back audio while in the edit window for this step. Do NOT play your project back in full screen.
This part is key: if you try to play back your project from the beginning the audio will usually still mess up. So, what you're gonna have to do is go back on your edit window timeline right before these errors occur and play that specific clip back while recording this working audio with Soundflower and your audio software. Essentially we're only recording the parts of the audio where these errors occur, so try to do this in order if you can. Try to leave several seconds of audio in before the error - that way we can use it as reference when we construct our new audio track.
5.) Now in your audio software you should have your original error-filled audio track and the new clips that we just captured. This part can be painstaking if you're not familiar with audio editing softwares, but as you'll learn, it's really not that hard.
You're going to look at your original audio track and compare it to your new working audio clips. You should be able to notice where those new clips are supposed to go by looking at the identical (or close to identical) waveform shapes in your original audio track. The two should correspond with one another. If you don't understand what I mean right now, you will when you start playing around with the audio. This is why marking times is very important.
Take your new clips and split them up if you haven't already, that way you can drag them around and edit them separately from one another. Essentially your going to line these new clips up with original and then replace the original parts with new ones.
We need to get this as precise as possible, so start off by getting them as close as you can with your naked eye, and then use a zoom tool to zoom in as much as possible so that you can get them lined up PERFECTLY, or at least extremely close. In some softwares you can just drag these new clips on top of the old track, but most of the time you will need to actually cut out the old piece and replace it with the new one. In doing this, zoom in and make sure that you are NOT cutting out a bigger space than your new clip will fill - otherwise you will have small gaps in your audio.
VERY IMPORTANT: Also make sure that this new audio track starts at the EXACT SAME time as your original - otherwise your new audio will be out of sync.
I know this part can really suck if you're not used to audio editing, but at this point, there is little other choice.
6.) Once you are done with this, export your newly pieced together audio track.
7.) Now open iMovie and create a NEW project. Re-import the video that you exported earlier that has the messed up audio. This might take a while, so just be patient.
8.) Then right click the clip and select "Detach Audio". This will do just that - allowing you to edit the audio separately from the video. Now delete this audio.
9.) Now, import the new, perfect audio track that we just made and make sure that it starts at the start of the project. Make sure it's in sync and that everything works.
Now just export your new video with the working audio and you should be done. Since we have given iMovie the audio with no editing actually being done in iMovie, it does not have to generate its own audio now and you should have absolutely no errors now - unless there is some that you forgot to take out earlier.
YOU'RE FINALLY DONE!!!
I know this entire process sucks, but if you're that far into your project, there is little else that you can do. Now you've learned your lesson:
DON'T USE IMOVIE EVER AGAIN.
I hope this helped!
Please Log in to join the conversation.
- ronny courtens
-

- Offline
- Moderator
-

Less
More
- Posts: 4455
- Thank you received: 962
04 Nov 2014 12:42 #55475
by ronny courtens
Replied by ronny courtens on topic Audio muted, but audio still sounds in generated master file
I really don't know what versions of the software you guys are using, but I don't see anything what you say happening when you use the latest official versions of iMovie and FCP X on Mavericks or Yosemite.
1. iMovie is a perfectly mature and stable NLE. It does not have all the bells and whistles of it's big brother FCP X, but in its class it is one of the best editing applications I know. It even has some little features that I would like to see appear in future versions of FCP X.
2. When you publish an iMovie project to FCP X, every asset and every setting you have used in iMovie gets transferred to FCP X: clips, effects, color corrections, traditions, PIPs, audio levels, audio fades etc... This even includes iMovie titles and generators that you don't have in FCP X.
3. Before saying that FCP X has certain "weird things" you should make sure that you know the application and that the weirdness is not caused by yourself. If render files do not reappear or if audio levels get lost after shutting down and relaunching FCP X this means there is something wrong with your setup or with the version of the software you are using. Because this is not typical to FCP X.
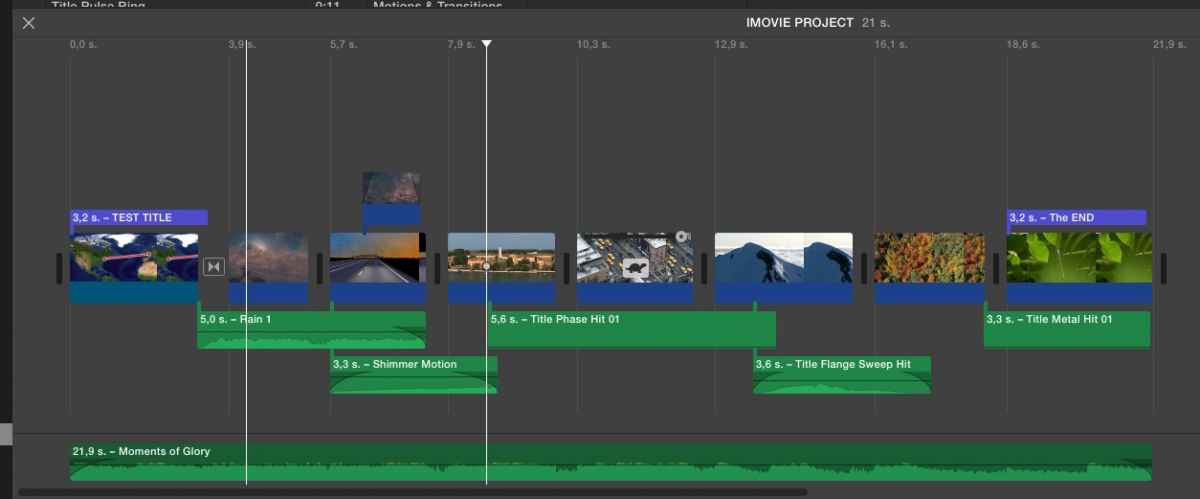
To prove my point I just did a test. I created an iMovie project with a bunch of clips, some titles and a generator that are exclusive to iMovie, a color correction, a speed change and a bunch of audio clips with different fade handles and audio levels. I also muted 2 of the audio clips by dragging their volume slider down to zero. This is the timeline in iMovie:
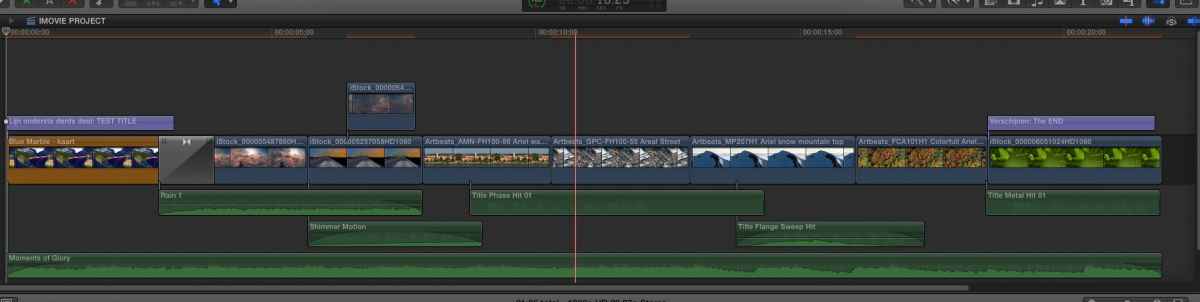
I chose File > Send to Final Cut Pro, FCP X automatically launches and the complete iMovie timeline is opened as a Project in FCP X. Every clip and setting has been transferred without any issues, including the two muted audio clips:
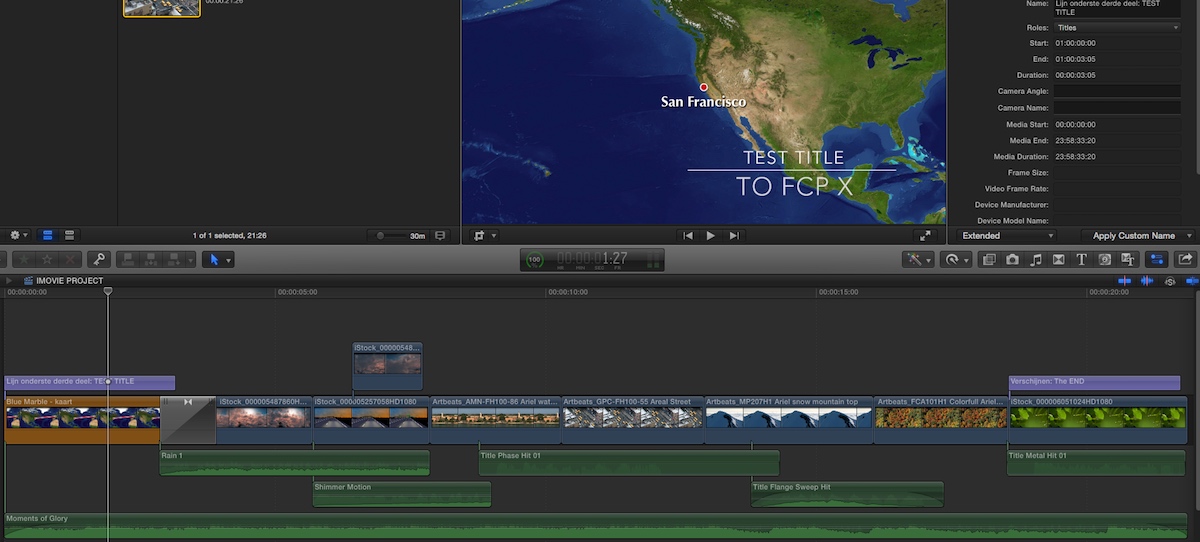
I render the timeline, I close FCP X and launch it again. All clips are still rendered and the levels on the audio clips has not changed:
So I really don't see what yo are talking about.
- Ronny
1. iMovie is a perfectly mature and stable NLE. It does not have all the bells and whistles of it's big brother FCP X, but in its class it is one of the best editing applications I know. It even has some little features that I would like to see appear in future versions of FCP X.
2. When you publish an iMovie project to FCP X, every asset and every setting you have used in iMovie gets transferred to FCP X: clips, effects, color corrections, traditions, PIPs, audio levels, audio fades etc... This even includes iMovie titles and generators that you don't have in FCP X.
3. Before saying that FCP X has certain "weird things" you should make sure that you know the application and that the weirdness is not caused by yourself. If render files do not reappear or if audio levels get lost after shutting down and relaunching FCP X this means there is something wrong with your setup or with the version of the software you are using. Because this is not typical to FCP X.
To prove my point I just did a test. I created an iMovie project with a bunch of clips, some titles and a generator that are exclusive to iMovie, a color correction, a speed change and a bunch of audio clips with different fade handles and audio levels. I also muted 2 of the audio clips by dragging their volume slider down to zero. This is the timeline in iMovie:
I chose File > Send to Final Cut Pro, FCP X automatically launches and the complete iMovie timeline is opened as a Project in FCP X. Every clip and setting has been transferred without any issues, including the two muted audio clips:
I render the timeline, I close FCP X and launch it again. All clips are still rendered and the levels on the audio clips has not changed:
So I really don't see what yo are talking about.
- Ronny
Please Log in to join the conversation.
