


- Posts: 24
- Thank you received: 1
3 Post Moderation Rule for New Boarders (25 Jan 2021)
New boarders will have their posts moderated - Don't worry if you cannot see your post immediately.
In trouble with chroma keying - Again! Advice please
- retepnikrap
-
 Topic Author
- Offline
- Junior Member
-

Less
More
18 Aug 2017 14:41 #89970
by retepnikrap
In trouble with chroma keying - Again! Advice please was created by retepnikrap
I am pretty new to fcp and an amateur, was in the process of creating a face painting video keying out the image (see attached). On reflection I should have used a backless chair or at least a chair with a narrow back so the subject concealed it, however in the end this was the only chair I had so I covered it chroma paper as you can see.
So this is the problem as the face painters arms move they cast small shadows on the back of the chair and the problem I have is that when I key out all of the chair back I am losing detail in the face painters arms. Tried tweaking all of the settings in keyer but can't get a balance that works. Is there a way to select or mask off an area and apply different settings? The default keyer settings work almost perfectly when applied, just the chair back that gives me a problem. Any help advice would be appreciated. Thanks
So this is the problem as the face painters arms move they cast small shadows on the back of the chair and the problem I have is that when I key out all of the chair back I am losing detail in the face painters arms. Tried tweaking all of the settings in keyer but can't get a balance that works. Is there a way to select or mask off an area and apply different settings? The default keyer settings work almost perfectly when applied, just the chair back that gives me a problem. Any help advice would be appreciated. Thanks
Please Log in to join the conversation.
- retepnikrap
-
Topic Author
- Offline
- Junior Member
-
Less
More
- Posts: 24
- Thank you received: 1
18 Aug 2017 14:51 #89972
by retepnikrap
Replied by retepnikrap on topic In trouble with chroma keying - Again! Advice please
Can't see my attached picture, I did add it, I may now need help on how to add an image to my post as well, things are getting worse as the day goes on!!
Please Log in to join the conversation.


18 Aug 2017 20:01 #89981
by JoeEditor
Replied by JoeEditor on topic In trouble with chroma keying - Again! Advice please
A Mac capture screens as .PNG and at large resolution. Change it to a JPEG and post it.
Please Log in to join the conversation.
- Karsten Schlüter
-

- Offline
- Moderator
-

Less
More
- Posts: 3790
- Thank you received: 718
19 Aug 2017 05:18 #89990
by Karsten Schlüter
Replied by Karsten Schlüter on topic In trouble with chroma keying - Again! Advice please
you can apply a 'dirt-mask' = draw mask, double the clip and apply diff. settings for keying inside and outside the mask …
and, for a start, sorry for asking perhaps the obvious: you are aware of the sample tool in FCPX keyer?
and, for a start, sorry for asking perhaps the obvious: you are aware of the sample tool in FCPX keyer?
Please Log in to join the conversation.
- retepnikrap
-
Topic Author
- Offline
- Junior Member
-
Less
More
- Posts: 24
- Thank you received: 1
19 Aug 2017 07:08 #89991
by retepnikrap
Thank you, here is the pic
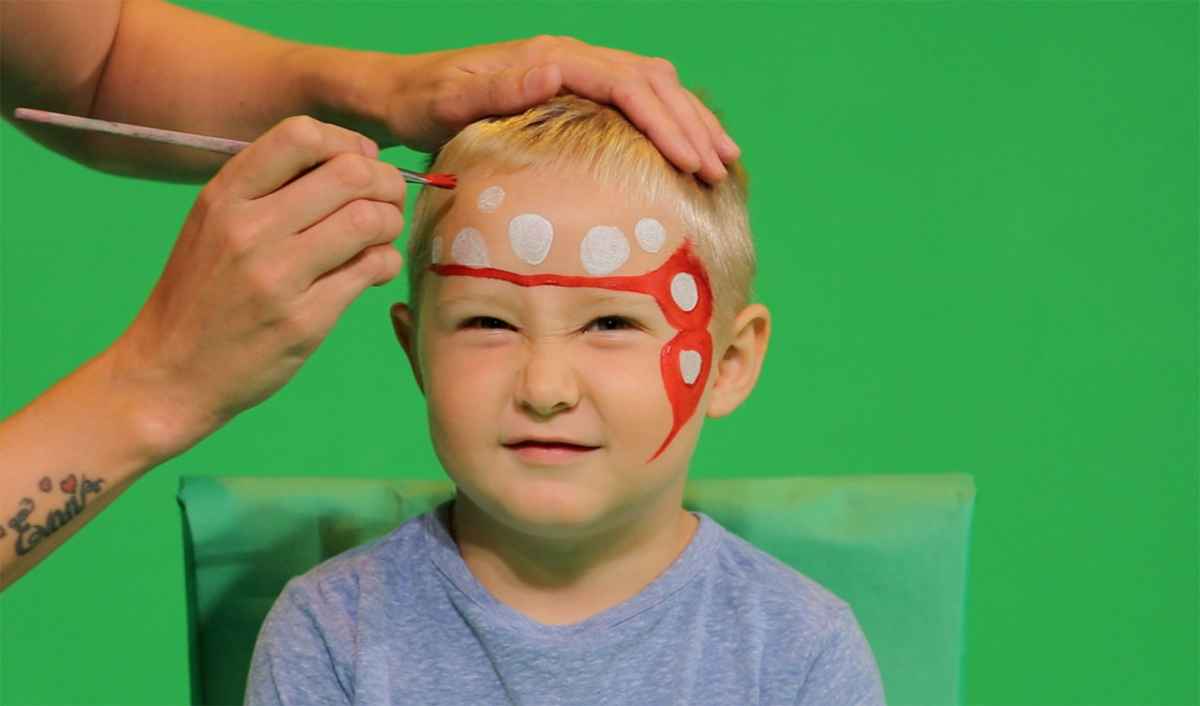
Replied by retepnikrap on topic In trouble with chroma keying - Again! Advice please
FCPX.guru wrote: A Mac capture screens as .PNG and at large resolution. Change it to a JPEG and post it.
Thank you, here is the pic
Please Log in to join the conversation.
- retepnikrap
-
Topic Author
- Offline
- Junior Member
-
Less
More
- Posts: 24
- Thank you received: 1
19 Aug 2017 07:30 #89992
by retepnikrap
Replied by retepnikrap on topic In trouble with chroma keying - Again! Advice please
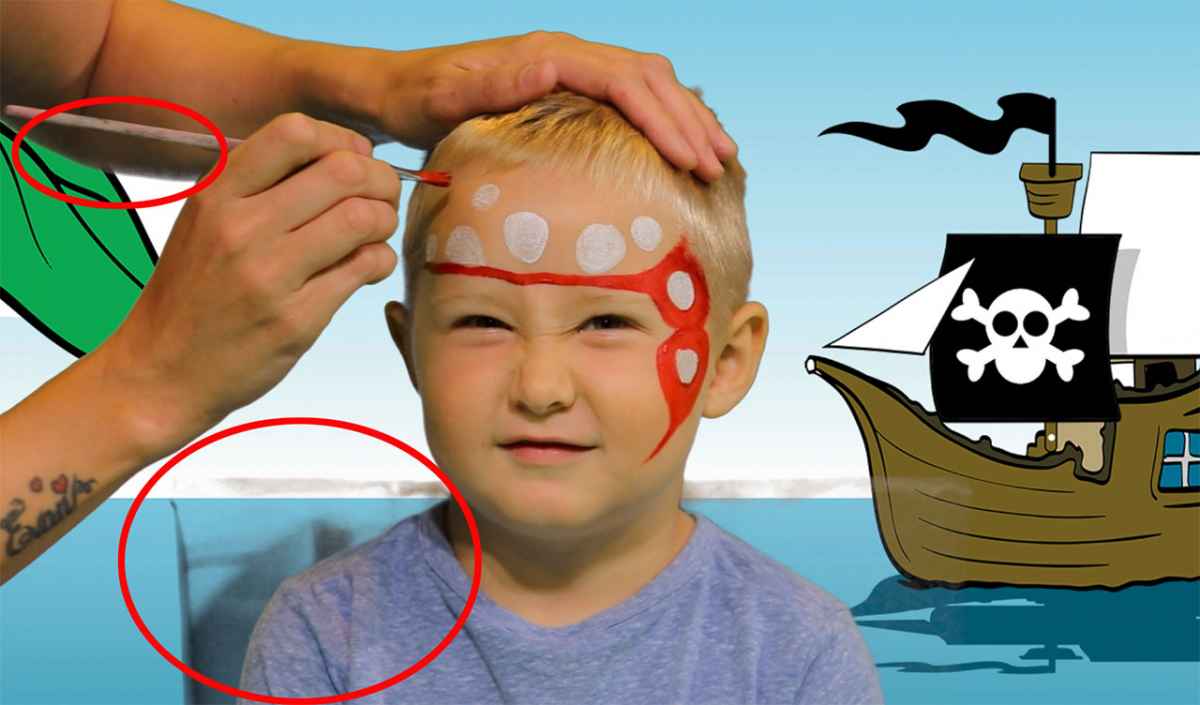
Here is what happens when I apply the basic keyer, when I start applying manual adjustments to remove what remains of the chair back, which I can do successfully, I lose the edge of the face painters under arm and other parts. Any advice would be welcome. On reflection it was a stupid idea covering the chair back but it's doing these things that provide experience so will avoid next time.
Please Log in to join the conversation.
- Karsten Schlüter
-
- Offline
- Moderator
-
Less
More
- Posts: 3790
- Thank you received: 718
19 Aug 2017 07:32 - 19 Aug 2017 07:39 #89993
by Karsten Schlüter
Replied by Karsten Schlüter on topic In trouble with chroma keying - Again! Advice please
ROTFL - you made my day, kids are awesome, that face "no want… I do… don't …"
(note2myself: no coffee while opening new post…)
hmmm, I tried with a grab of your grab, which can only give a vague, close result but:

I took 3 samples, and tweaked a bit with soften and fills…
plus It depends very much on the background.
Strange: there's spill/reflection under his chin …??
And: the artists arm is tricky, little the chair …

missed your 2nd pic by the minute - can you upload the plain bg, just for testing?
(note2myself: no coffee while opening new post…)
hmmm, I tried with a grab of your grab, which can only give a vague, close result but:
I took 3 samples, and tweaked a bit with soften and fills…
plus It depends very much on the background.
Strange: there's spill/reflection under his chin …??
And: the artists arm is tricky, little the chair …
missed your 2nd pic by the minute - can you upload the plain bg, just for testing?
Last edit: 19 Aug 2017 07:39 by Karsten Schlüter.
Please Log in to join the conversation.
- retepnikrap
-
Topic Author
- Offline
- Junior Member
-
Less
More
- Posts: 24
- Thank you received: 1
19 Aug 2017 08:31 #89995
by retepnikrap
Replied by retepnikrap on topic In trouble with chroma keying - Again! Advice please
Thanks for your help. Tried the sample colour but the chair back with a shadow on it is close to other colours in the scene, especially around the artists arms so they start to get keyed out as well. If I could mask around the chair back and key that part out I could get away with that but not sure how to do that.

Please Log in to join the conversation.
- retepnikrap
-
Topic Author
- Offline
- Junior Member
-
Less
More
- Posts: 24
- Thank you received: 1
19 Aug 2017 08:47 #89996
by retepnikrap
Replied by retepnikrap on topic In trouble with chroma keying - Again! Advice please
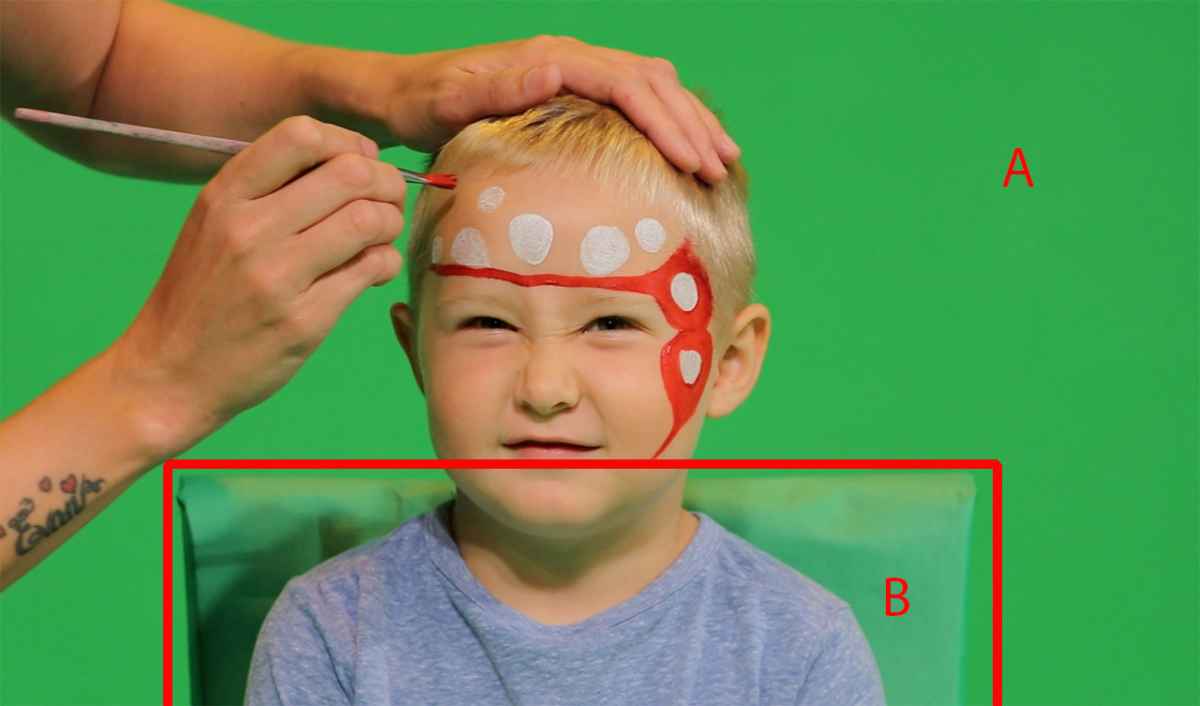
Is there a way to apply different keying settings to parts A and B on the attached screen grab? I can key out part B and get a good result and the same with part A, just don't know how to put them both together to get the result I need.
Please Log in to join the conversation.
- Karsten Schlüter
-
- Offline
- Moderator
-
Less
More
- Posts: 3790
- Thank you received: 718
19 Aug 2017 10:34 #89998
by Karsten Schlüter
Replied by Karsten Schlüter on topic In trouble with chroma keying - Again! Advice please
// … sorry for the pause - real life called for offline action… //
Soooo, two options:
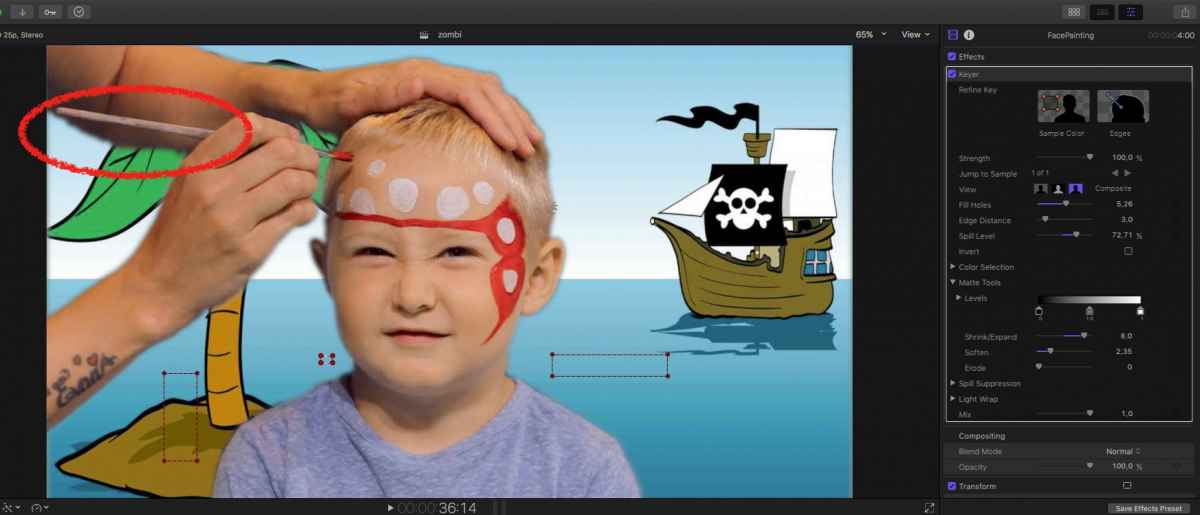
What I've done here, is simply using 3 samples and tweaking with some settings (fill holes, soften, wider) - chair no problem, but the spill on the arm isn't nice/have to soften the key = no 'sharp' pic
Plan
your idea: hold alt-key and drag the clip in the timeline=that doubles it
the top one gets cropped…
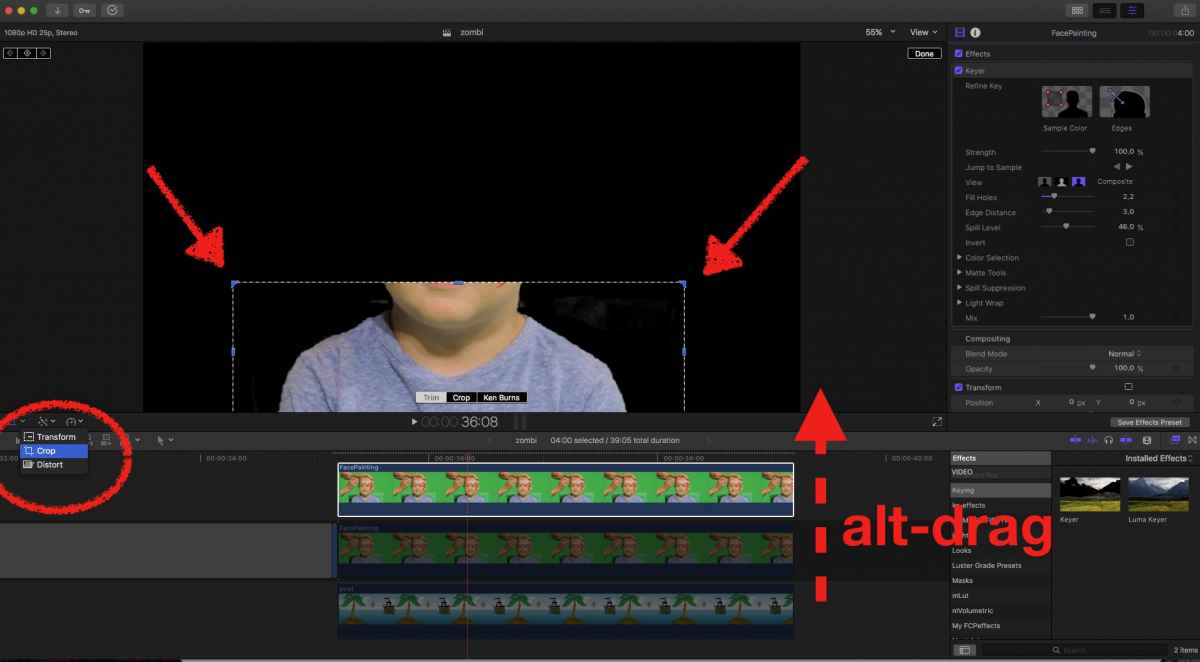
that way you create two 'zones' with two diff. keyers:
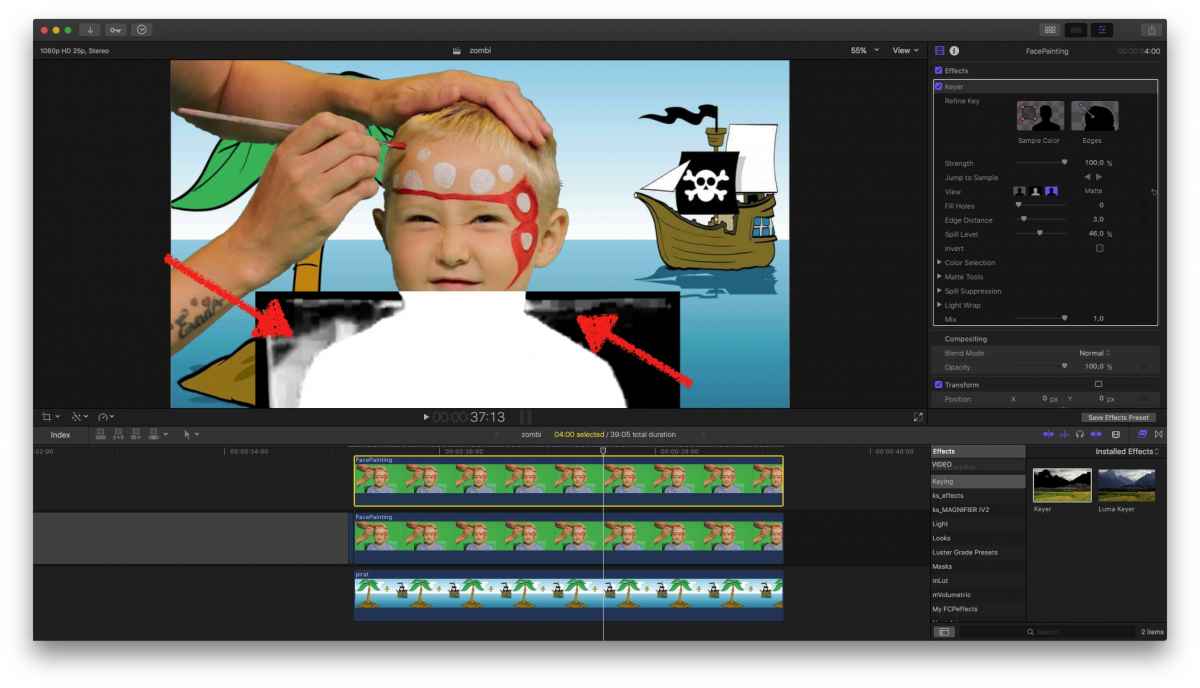
… in mask mode we see the whole drama: very little separation…
But,FCPX is keyer is for tinkerers like us!
I drag ONE sample box onto it, and most of the damage is gone.
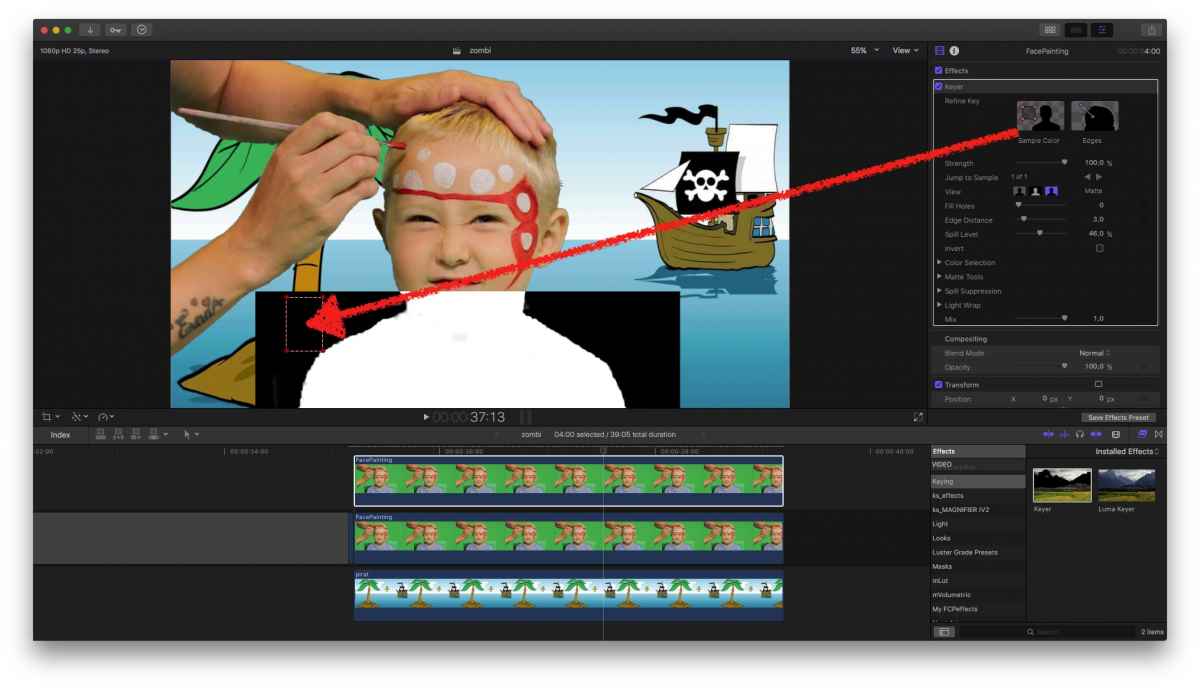
ok, 'fill holes' to get rid of that spot under Jack Sparrow Jr. chin … but not too bad.
You probably have to adjust the key while the action takes place.
The RippleTwins™ offer a free tutorial 'Keying compressed video) (sort-of) on youtube, …
Soooo, two options:
What I've done here, is simply using 3 samples and tweaking with some settings (fill holes, soften, wider) - chair no problem, but the spill on the arm isn't nice/have to soften the key = no 'sharp' pic
Plan
your idea: hold alt-key and drag the clip in the timeline=that doubles it
the top one gets cropped…
that way you create two 'zones' with two diff. keyers:
… in mask mode we see the whole drama: very little separation…
But,FCPX is keyer is for tinkerers like us!
I drag ONE sample box onto it, and most of the damage is gone.
ok, 'fill holes' to get rid of that spot under Jack Sparrow Jr. chin … but not too bad.
You probably have to adjust the key while the action takes place.
The RippleTwins™ offer a free tutorial 'Keying compressed video) (sort-of) on youtube, …
Please Log in to join the conversation.
- Karsten Schlüter
-
- Offline
- Moderator
-
Less
More
- Posts: 3790
- Thank you received: 718
19 Aug 2017 10:36 #89999
by Karsten Schlüter
Replied by Karsten Schlüter on topic In trouble with chroma keying - Again! Advice please
ahh, found it, this one:
Please Log in to join the conversation.
- retepnikrap
-
Topic Author
- Offline
- Junior Member
-
Less
More
- Posts: 24
- Thank you received: 1
19 Aug 2017 11:10 #90000
by retepnikrap
Replied by retepnikrap on topic In trouble with chroma keying - Again! Advice please
Really appreciate your help, I did what you said so I have 2 identical green screen clips. Cropped the top one down as you show and apply the keyer + sample colour and other adjustments all is good, perfect key. However, when I key the lower clip so the arm etc are all a good (this leaves the chair back not fully keyed out), because the top cropped clip is now perfectly keyed you can see the bad chair back on the lower clip. I must be not fully understanding the process or doing something wrong.
Please Log in to join the conversation.
- Karsten Schlüter
-
- Offline
- Moderator
-
Less
More
- Posts: 3790
- Thank you received: 718
19 Aug 2017 11:33 - 19 Aug 2017 11:37 #90001
by Karsten Schlüter
No, I'm so stupid LOL!
For sure, when you key the top layer, the next layer = bad keyed chair gets visible:
Asks to 'punch a hole' in the lower layer:
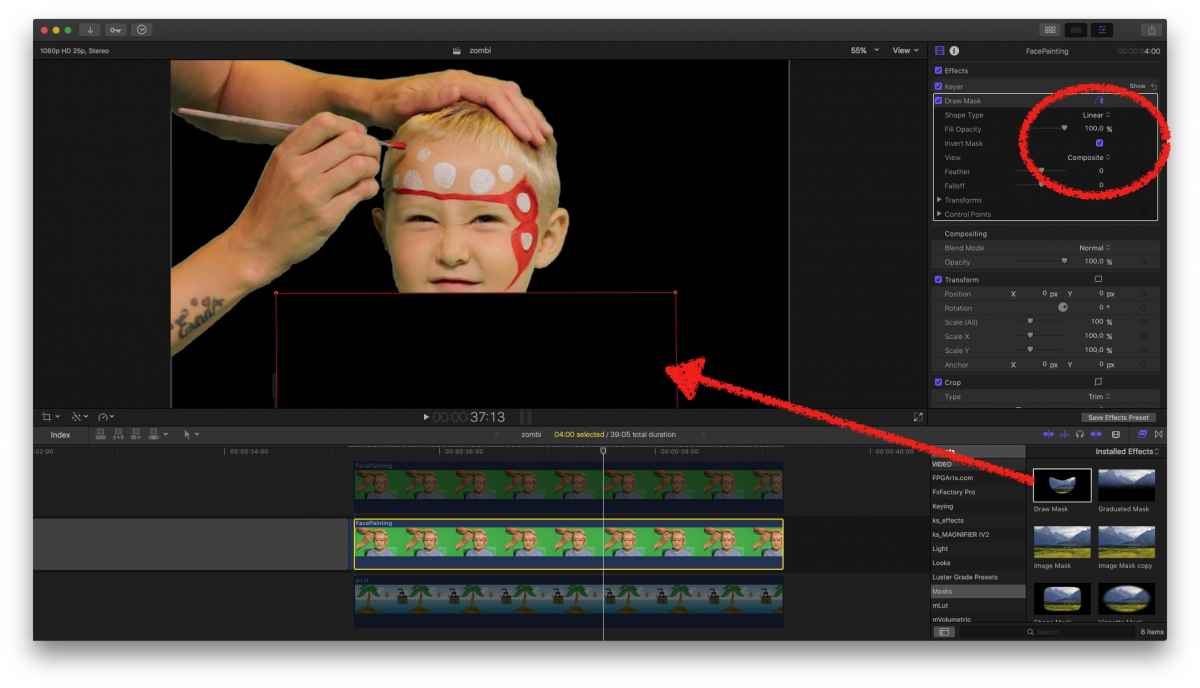
… applied a mask, invert it, and then, hopefully, finally, we get this going… :silly:
I suggest anyhow the first method, with 3 or more color-samples …
The tricky part is anyhow: Jack and the painter have both many 'green spill' on their skin… I'm used to 'bad green screen', I frequently claim, our school has the worse green screens ever… so, I'm used to tweak with the settings.
Replied by Karsten Schlüter on topic In trouble with chroma keying - Again! Advice please
retepnikrap wrote: …you can see the bad chair back on the lower clip. I must be not fully understanding the process or doing something wrong.
No, I'm so stupid LOL!
For sure, when you key the top layer, the next layer = bad keyed chair gets visible:
Asks to 'punch a hole' in the lower layer:
… applied a mask, invert it, and then, hopefully, finally, we get this going… :silly:
I suggest anyhow the first method, with 3 or more color-samples …
The tricky part is anyhow: Jack and the painter have both many 'green spill' on their skin… I'm used to 'bad green screen', I frequently claim, our school has the worse green screens ever… so, I'm used to tweak with the settings.
Last edit: 19 Aug 2017 11:37 by Karsten Schlüter.
Please Log in to join the conversation.
- retepnikrap
-
Topic Author
- Offline
- Junior Member
-
Less
More
- Posts: 24
- Thank you received: 1
20 Aug 2017 08:02 #90012
by retepnikrap
Replied by retepnikrap on topic In trouble with chroma keying - Again! Advice please
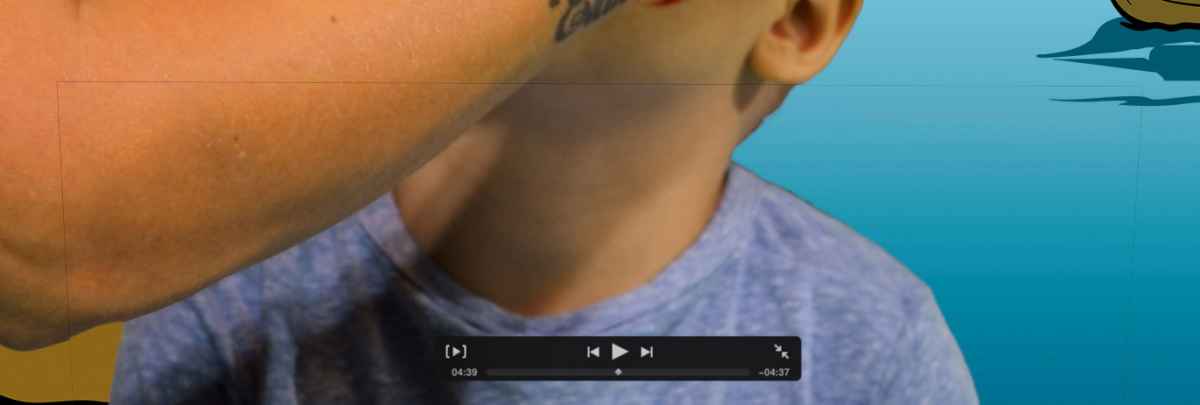
Well, I feel I'm getting pretty close now, thanks to your help. Two remaining problems, one of which I think I can fix. See attached image, need to do some colour correction between the two keyed clips, this I think I can do. Creating the mask has left a key line around the masked area, tried all the settings on both clips but struggling to get rid of the line. Any ideas? Thanks again.
Please Log in to join the conversation.
- Karsten Schlüter
-
- Offline
- Moderator
-
Less
More
- Posts: 3790
- Thank you received: 718
20 Aug 2017 08:58 #90013
by Karsten Schlüter
ahh that nasty bug! I remember…
Thought the fix is/was changing the 'staple' order of effects in the Inspector -not so
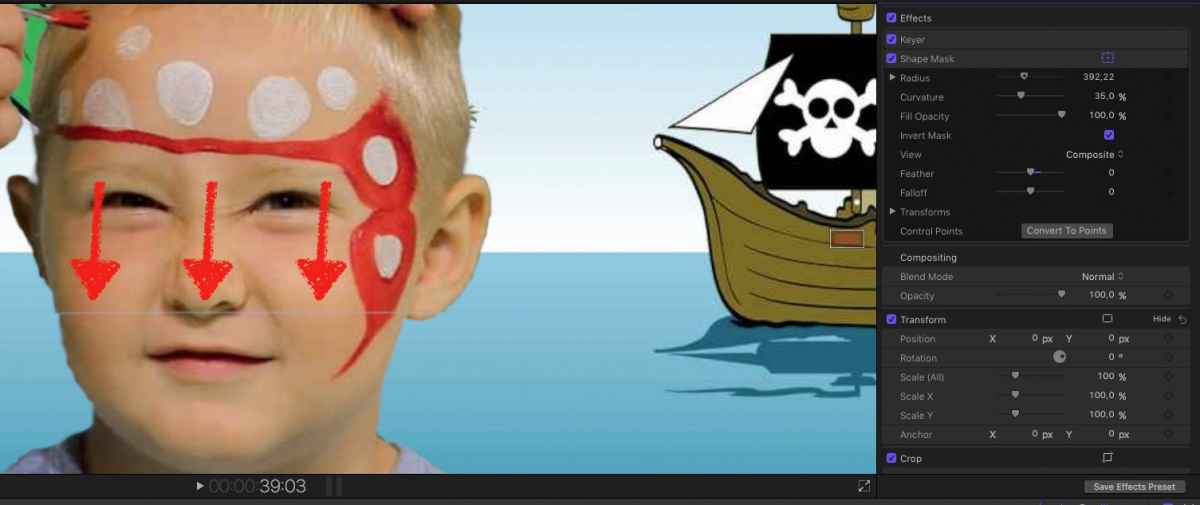
OK, last try (I'm stubborn to recommend the 3-4 sample method! LOL)
What I did here:
Applied a Shape mask to clip#1, set its Feather to 0 = creates a 'hole' in the clip
Then doubled the clip, invert the mask
Applied to both clips a keyer, with diff. settings (btw: the Spill Surpression is the culprit for colour changes) aka samples)
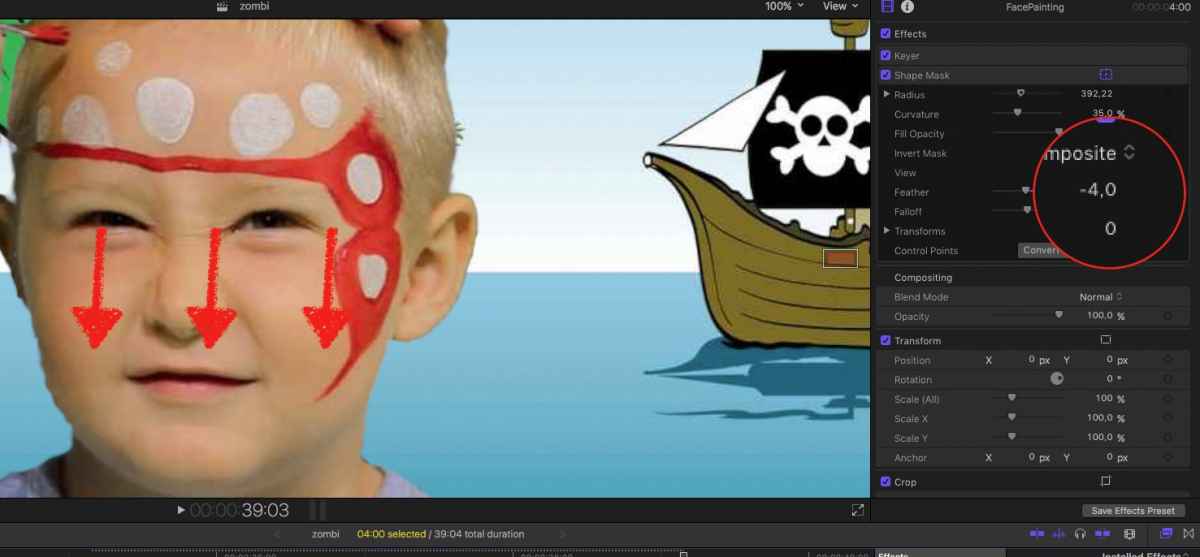
Finally, I 'feathered' the mask a bit inwards … looks promising
Replied by Karsten Schlüter on topic In trouble with chroma keying - Again! Advice please
retepnikrap wrote: …Creating the mask has left a key line around the masked area,…
ahh that nasty bug! I remember…
Thought the fix is/was changing the 'staple' order of effects in the Inspector -not so
OK, last try (I'm stubborn to recommend the 3-4 sample method! LOL)
What I did here:
Applied a Shape mask to clip#1, set its Feather to 0 = creates a 'hole' in the clip
Then doubled the clip, invert the mask
Applied to both clips a keyer, with diff. settings (btw: the Spill Surpression is the culprit for colour changes) aka samples)
Finally, I 'feathered' the mask a bit inwards … looks promising
Please Log in to join the conversation.
- retepnikrap
-
Topic Author
- Offline
- Junior Member
-
Less
More
- Posts: 24
- Thank you received: 1
20 Aug 2017 09:57 #90014
by retepnikrap
Replied by retepnikrap on topic In trouble with chroma keying - Again! Advice please
OK, tried that, this is what I did.
Drag video clip to timeline, dragged the background image to timeline under video clip. Made a mask around chair back on video clip, pressed 'alt' and duplicated the masked video clip above the original masked video clip. I then inverted the mask on the top video clip. I then applied the keyer to both video clips, adjusted etc.
I have the offending keyline around the masked area, I tried adjusting the feather, both ways on both video clips as you suggest but can't hide, reduce or remove the offending keyline. Is this the process you suggested or have I missed out something? Thank you
Drag video clip to timeline, dragged the background image to timeline under video clip. Made a mask around chair back on video clip, pressed 'alt' and duplicated the masked video clip above the original masked video clip. I then inverted the mask on the top video clip. I then applied the keyer to both video clips, adjusted etc.
I have the offending keyline around the masked area, I tried adjusting the feather, both ways on both video clips as you suggest but can't hide, reduce or remove the offending keyline. Is this the process you suggested or have I missed out something? Thank you
Please Log in to join the conversation.
- Karsten Schlüter
-
- Offline
- Moderator
-
Less
More
- Posts: 3790
- Thank you received: 718
20 Aug 2017 11:12 - 20 Aug 2017 11:13 #90015
by Karsten Schlüter
I missed some points in my description:
in the lower track, I set the Feather to 0
and I dragged the Keyer over the Mask in the Inspector
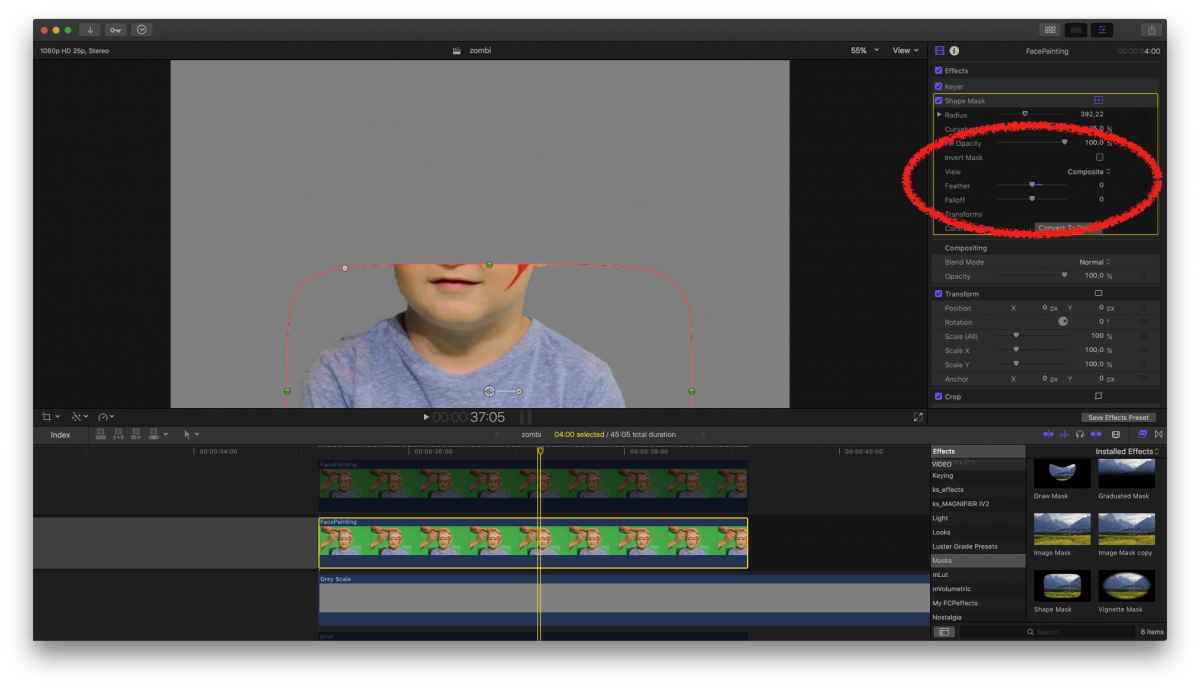
then…
doubled track, invert Mask, Feather just a tine bit, -0.4
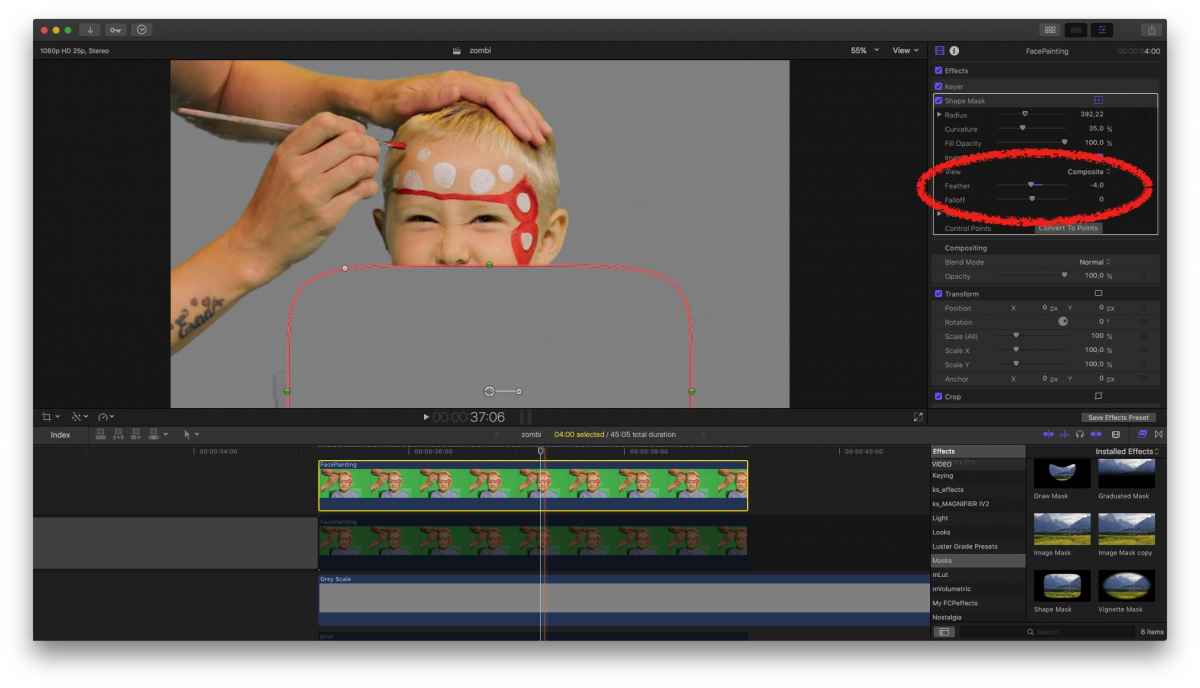
Adjusted the Keyer by 2,3 samples, fill holes, soften - no Spill correction:

aside the terrible banding (due to jpg, compression, et al), outcome fulfill my hobbyists needs ...
Replied by Karsten Schlüter on topic In trouble with chroma keying - Again! Advice please
retepnikrap wrote: … have I missed out something?
I missed some points in my description:
in the lower track, I set the Feather to 0
and I dragged the Keyer over the Mask in the Inspector
then…
doubled track, invert Mask, Feather just a tine bit, -0.4
Adjusted the Keyer by 2,3 samples, fill holes, soften - no Spill correction:
aside the terrible banding (due to jpg, compression, et al), outcome fulfill my hobbyists needs ...
Last edit: 20 Aug 2017 11:13 by Karsten Schlüter.
Please Log in to join the conversation.
- retepnikrap
-
Topic Author
- Offline
- Junior Member
-
Less
More
- Posts: 24
- Thank you received: 1
21 Aug 2017 08:35 #90025
by retepnikrap
Replied by retepnikrap on topic In trouble with chroma keying - Again! Advice please
Thank you for the work you have done to help me I appreciate the time and effort you have put in.
Well, I followed your instructions letter by letter and I just can't get rid of that keyline, tried everything and pretty much every combination of settings as well as yours and still there.
I am going to try and find some 3rd party mask plugins and try that, if that fails will have to re shoot which I was trying desperately to avoid. Thank you again.
Well, I followed your instructions letter by letter and I just can't get rid of that keyline, tried everything and pretty much every combination of settings as well as yours and still there.
I am going to try and find some 3rd party mask plugins and try that, if that fails will have to re shoot which I was trying desperately to avoid. Thank you again.
Please Log in to join the conversation.
- Karsten Schlüter
-
- Offline
- Moderator
-
Less
More
- Posts: 3790
- Thank you received: 718
21 Aug 2017 11:26 #90030
by Karsten Schlüter
sorry to hear that and of being of no help.
Just as a last word: that 'line' problem is house-made by yourself (kinda ) because you try to key masked areas of a single clip.
I would spend more time on adjusting & tweaking the settings of ONE keyer on one clip… as seen in all my grabs, the chair is less a problem than the arm (and a bit on the left face of Cpt Sparrow Jr.) . The spill from the green bg is way too much = more distance.
I don't see how it looks like on playback… but you can, for example, add diff. sample-boxes for diff. timestamps...
'softening' the key gives acceptable results - imho.
Keep in mind: the focus of your audience is on the face-painting, not on the artists tattoos…
Replied by Karsten Schlüter on topic In trouble with chroma keying - Again! Advice please
retepnikrap wrote: … can't get rid of that keyline, …
I am going to try and find some 3rd party mask plugins and try that, if that fails will have to re shoot which I was trying desperately to avoid. Thank you again.
sorry to hear that and of being of no help.
Just as a last word: that 'line' problem is house-made by yourself (kinda
) because you try to key masked areas of a single clip.I would spend more time on adjusting & tweaking the settings of ONE keyer on one clip… as seen in all my grabs, the chair is less a problem than the arm (and a bit on the left face of Cpt Sparrow Jr.) . The spill from the green bg is way too much = more distance.
I don't see how it looks like on playback… but you can, for example, add diff. sample-boxes for diff. timestamps...
'softening' the key gives acceptable results - imho.
Keep in mind: the focus of your audience is on the face-painting, not on the artists tattoos…
Please Log in to join the conversation.
- retepnikrap
-
Topic Author
- Offline
- Junior Member
-
Less
More
- Posts: 24
- Thank you received: 1
21 Aug 2017 20:54 #90037
by retepnikrap
Replied by retepnikrap on topic In trouble with chroma keying - Again! Advice please
Ok, I'll keep tweaking and see if I can hit the sweet spot, thank you again for all your help much appreciated.
Thank you
Thank you
Please Log in to join the conversation.
